Brother International PT-9700PC Users Manual - English and Spanish - Page 19
Installing the tape cassette - label
 |
View all Brother International PT-9700PC manuals
Add to My Manuals
Save this manual to your list of manuals |
Page 19 highlights
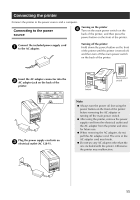
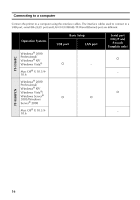
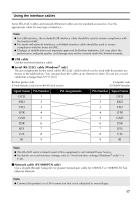
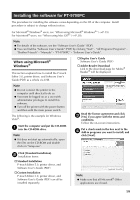
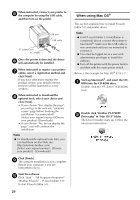
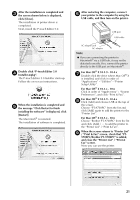
Installing the tape cassette This section lists the types of tape that may be used with the printer and explains the procedures to install the tape cassettes. Authorized tape Install the tape cassette. 3 Make sure that the end of the tape feeds under the tape guides. The types of tape that may be used with the printer are listed below. ■ TZ Tapes † Standard Laminated Tape † Extra Strength Adhesive Tape - Laminated † Flexible ID tape - Laminated † Tamper Evident Tape - Laminated † Fabric Iron-On Tape - Non-Laminated ■ HG Tapes HG tapes enable three available combinations of higher printing speed and print resolutions. For details on high-speed printing, refer to "Printing at a higher speed or at a higher resolution" (→ P.34). Toothed wheel End of the Tape guide tape • If the ink ribbon is loose, use your finger to wind the toothed wheel in the direction of the arrow on the cassette. Close the tape compartment cover and 4 press the power button on the printer. Installing the tape cassette This section explains the procedures to install the tape cassette. Hold down the power button on the front 1 of the printer, and make sure that the power is turned off with the power button. Press the cover release button and open 2 the tape compartment cover. Press the Feed/Cut button to remove the 5 tape slack. Note ● If no additional operation is performed within 10 minutes after printing a label, you will hear the roller assembly being automatically released. Prior to being released, the tape cannot be removed if the AC adapter is removed from the printer with the printer powered on or if the power is first turned off by the main power switch on the back of the printer. Always turn the power off first using the power button on the front of the printer before removing the AC adapter or turning off the main power switch. Cover release button 18
-
 1
1 -
2
-
3
-
4
-
5
-
6
-
7
-
8
-
9
-
10
-
11
-
12
-
13
-
 14
14 -
 15
15 -
 16
16 -
 17
17 -
 18
18 -
 19
19 -
 20
20 -
 21
21 -
 22
22 -
 23
23 -
 24
24 -
25
-
26
-
27
-
28
-
29
-
30
-
31
-
32
-
33
-
34
-
35
-
36
-
37
-
38
-
39
-
40
-
41
-
42
-
43
-
44
-
45
-
46
-
47
-
48
-
49
-
50
-
51
-
52
-
53
-
54
-
55
-
56
-
57
-
58
-
59
-
60
-
61
-
62
-
63
-
64
-
65
-
66
-
67
-
68
-
69
-
70
-
71
-
72
-
73
-
74
-
75
-
76
-
77
-
78
-
79
-
80
-
81
-
82
-
83
-
84
-
85
-
86
-
87
-
88
-
89
-
90
-
91
-
92
-
93
-
94
-
95
-
96
-
97
-
98
-
99
-
100
-
101
-
102
-
103
-
104
-
105
-
106
-
107
-
108
-
109
-
110
-
111
-
112
-
113
-
114
-
115
-
116
-
117
-
118
 |
 |
