Brother International PT-9700PC Users Manual - English and Spanish - Page 44
Printing the printer settings - label printer driver
 |
View all Brother International PT-9700PC manuals
Add to My Manuals
Save this manual to your list of manuals |
Page 44 highlights
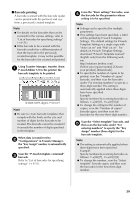
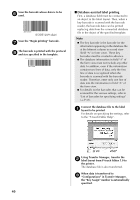
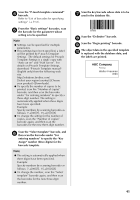
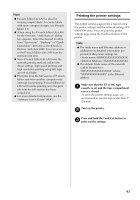
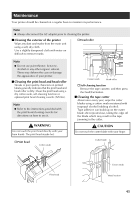
Note ● P-touch Editor Lite LAN is ideal for creating simple labels. To create labels with more complex designs, use P-touch Editor 5.0. ● When using the P-touch Editor Lite LAN for the first time, "Add shortcut" dialog box appears. Select the desired location from "Start menu", "Desktop" or "Quick Launch bar", then put a check mark in the box, and click [OK]. You can access to the P-touch Editor Lite LAN from the shortcut next time. ● Since P-touch Editor Lite LAN uses the network printing method and not the driver settings, high speed printing and high resolution printing using HG tape are not available. ● Print jobs from the full version of P-touch Editor sent from another computer may interrupt your printing. P-touch Editor Lite LAN will resume printing once the print job from the full version has been completed. ● For more detailed information, see the "Software User's Guide" (PDF). Printing the printer settings The printer settings page prints a report listing the printer settings and the network settings (PT9800PCN only). You can print the printer settings page using the Feed/Cut button of the printer. Note ● The node name and Ethernet address in addition to its detailed information are printed in the printer settings list. BRNXXXXXXXXXXXXXXX XXXXXXXXXXXXXXX ● The default Node name of the network card in the printer is "BRNXXXXXXXXXXXXXXX" where "XXXXXXXXXXXXXXX" is the Ethernet address. Make sure that the TZ or HG tape 1 cassette is set and the tape compartment cover is closed. To print the printer settings page, we recommend to use the tape wider than 1" (24 mm). Turn on the printer. 2 Press and hold the Feed/Cut button to 3 print out the settings. 43
-
 1
1 -
2
-
3
-
4
-
5
-
6
-
7
-
8
-
9
-
10
-
11
-
12
-
13
-
14
-
15
-
16
-
17
-
18
-
19
-
20
-
21
-
22
-
23
-
24
-
25
-
26
-
27
-
28
-
29
-
30
-
31
-
32
-
33
-
34
-
35
-
36
-
37
-
38
-
 39
39 -
 40
40 -
 41
41 -
 42
42 -
 43
43 -
 44
44 -
 45
45 -
 46
46 -
 47
47 -
 48
48 -
 49
49 -
50
-
51
-
52
-
53
-
54
-
55
-
56
-
57
-
58
-
59
-
60
-
61
-
62
-
63
-
64
-
65
-
66
-
67
-
68
-
69
-
70
-
71
-
72
-
73
-
74
-
75
-
76
-
77
-
78
-
79
-
80
-
81
-
82
-
83
-
84
-
85
-
86
-
87
-
88
-
89
-
90
-
91
-
92
-
93
-
94
-
95
-
96
-
97
-
98
-
99
-
100
-
101
-
102
-
103
-
104
-
105
-
106
-
107
-
108
-
109
-
110
-
111
-
112
-
113
-
114
-
115
-
116
-
117
-
118
 |
 |