Brother International PT-9700PC Users Manual - English and Spanish - Page 40
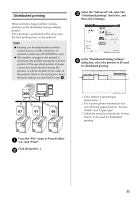
Barcode printing
 |
View all Brother International PT-9700PC manuals
Add to My Manuals
Save this manual to your list of manuals |
Page 40 highlights
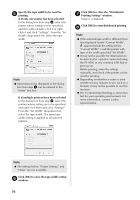
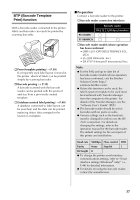
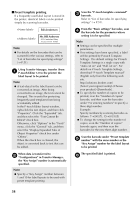
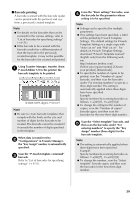
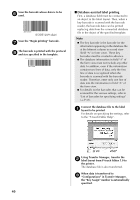
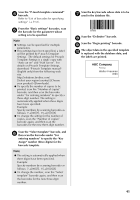
■ Barcode printing A barcode scanned with the barcode reader can be printed with the protocol and size from a previously created template. Note ● For details on the barcodes that can be scanned for the various settings, refer to "List of barcodes for specifying settings" (→ P.51). ● If the barcode to be scanned with the barcode reader has a different protocol than the barcode in the previously created template, it may not be possible for the barcode to be created and printed. Using Transfer Manager, transfer (from 1 P-touch Editor 5.0 to the printer) the barcode template to be printed. (CODE128/9-digit/2.7"×0.65") Note ● Be sure to create barcode templates that comply with the limits on the size and number of digits for the barcode to be created. The barcode cannot be created if it exceeds the number of digits specified in the template. When data is transferred to 2 "Configurations" in Transfer Manager, the "Key Assign" number is automatically specified. Scan the "P-touch template command" 3 barcode. Refer to "List of barcodes for specifying settings" (→ P.51). From the "Basic settings" barcodes, scan 4 the barcode for the parameter whose setting is to be specified. Note ● Settings can be specified for multiple parameters. ● If no settings have been specified, a label will be printed by P-touch Template Settings. The default settings for P-touch Template Settings is a single copy with "Auto cut on" and "Half cut on". For details on P-touch Template Settings, download "P-touch Template manual" (English only) from the following web site. http://solutions.brother.com/ [Select your region/country]-[Choose your product]-[Downloads]. ● To specify the number of copies to be printed, scan the "Number of copies" barcode, and then scan the barcodes under "For entering numbers" to specify a three-digit number. The setting is automatically applied when three digits have been specified. Example: Specify numbers by scanning barcodes as follows: 7→[00][7], 15→[0][1][5] ● To change the setting for the number of copies, scan the "Number of copies" barcode again, and then scan the barcodes for the new three-digit number. Scan the "Select template" barcode, and 5 then scan the barcodes under "For entering numbers" to specify the "Key Assign" number (three digits) for the barcode template. Note ● The setting is automatically applied when three digits have been specified. Example: Specify numbers by scanning barcodes as follows: 7→[00][7], 15→[0][1][5] ● To change the number, scan the "Select template" barcode again, and then scan the barcodes for the new three-digit number. 39
-
 1
1 -
2
-
3
-
4
-
5
-
6
-
7
-
8
-
9
-
10
-
11
-
12
-
13
-
14
-
15
-
16
-
17
-
18
-
19
-
20
-
21
-
22
-
23
-
24
-
25
-
26
-
27
-
28
-
29
-
30
-
31
-
32
-
33
-
34
-
 35
35 -
 36
36 -
 37
37 -
 38
38 -
 39
39 -
 40
40 -
 41
41 -
 42
42 -
 43
43 -
 44
44 -
 45
45 -
46
-
47
-
48
-
49
-
50
-
51
-
52
-
53
-
54
-
55
-
56
-
57
-
58
-
59
-
60
-
61
-
62
-
63
-
64
-
65
-
66
-
67
-
68
-
69
-
70
-
71
-
72
-
73
-
74
-
75
-
76
-
77
-
78
-
79
-
80
-
81
-
82
-
83
-
84
-
85
-
86
-
87
-
88
-
89
-
90
-
91
-
92
-
93
-
94
-
95
-
96
-
97
-
98
-
99
-
100
-
101
-
102
-
103
-
104
-
105
-
106
-
107
-
108
-
109
-
110
-
111
-
112
-
113
-
114
-
115
-
116
-
117
-
118
 |
 |
