Cisco ISE Software Configuration Guide - Page 58
interface atm, service-policy output
 |
UPC - 746320730097
View all Cisco ISE manuals
Add to My Manuals
Save this manual to your list of manuals |
Page 58 highlights
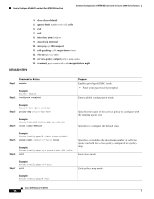
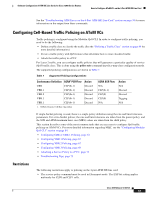
How to Configure AToM VCs on the 4-Port ATM ISE Line Card Software Configuration of ATM ISE Line Cards for Cisco 12000 Series Routers DETAILED STEPS 4. class class-default 5. queue-limit number-of-cells cells 6. exit 7. exit 8. interface atmslot/port 9. atm clock internal 10. atm pvp vpi l2transport 11. cell-packing cells mcpt-timer timer 12. vbr-nrt pcr scr mbs 13. service-policy output policy-map-name 14. xconnect peer-router-id vcid encapsulation mpls Command or Action Step 1 enable Step 2 Example: Router> enable configure terminal Purpose Enables privileged EXEC mode. • Enter your password if prompted. Enters global configuration mode. Step 3 Example: Router# configure terminal policy-map policy-map-name Step 4 Example: Router(config)# policy-map out_vbr-nrt class class-default Specifies the name of the service policy to configure with the shaping queue size. Specifies to configure the default class. Step 5 Example: Router(config-pmap)# class class-default queue-limit number-of-cells cells Step 6 Example: Router(config-pmap-c)# queue-limit 400 cells exit Specifies or modifies the maximum number of cells the queue can hold for a class policy configured in a policy map. Exits class mode. Step 7 Example: Router(config-pmap-c)# exit exit Exits policy-map mode. Example: Router(config-pmap)# exit Cisco IOS Release 12.0(27)S 58
-
 1
1 -
2
-
3
-
4
-
5
-
6
-
7
-
8
-
9
-
10
-
11
-
12
-
13
-
14
-
15
-
16
-
17
-
18
-
19
-
20
-
21
-
22
-
23
-
24
-
25
-
26
-
27
-
28
-
29
-
30
-
31
-
32
-
33
-
34
-
35
-
36
-
37
-
38
-
39
-
40
-
41
-
42
-
43
-
44
-
45
-
46
-
47
-
48
-
49
-
50
-
51
-
52
-
 53
53 -
 54
54 -
 55
55 -
 56
56 -
 57
57 -
 58
58 -
 59
59 -
 60
60 -
 61
61 -
 62
62 -
 63
63 -
64
-
65
-
66
-
67
-
68
-
69
-
70
-
71
-
72
-
73
-
74
-
75
-
76
-
77
-
78
-
79
-
80
-
81
-
82
-
83
-
84
-
85
-
86
-
87
-
88
-
89
-
90
-
91
-
92
-
93
-
94
-
95
-
96
-
97
-
98
-
99
-
100
-
101
-
102
 |
 |
