Computer Associates BABNWUP900NE6 Administration Guide - Page 193
Backing Up and Restoring with the Catalog Database, Submitting Backup Jobs
 |
UPC - 757943261509
View all Computer Associates BABNWUP900NE6 manuals
Add to My Manuals
Save this manual to your list of manuals |
Page 193 highlights
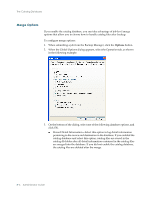
The Catalog Database ■ Record Job and Session Information Only-This is the recommended option. Select this to log only job and session information in the database. If you select this option, no detail information is merged into the database. If you enabled the catalog database and select this option, catalog files are stored in the catalog.db folder. If you did not enable the catalog database, catalog files are deleted afterwards. ■ Disable Database Recording-Select this option if you do not want to log any information about this job in the database. Select this option if you are backing up the BrightStor ARCserve Backup database or if you have limited disk space. Backing Up and Restoring with the Catalog Database If you use the catalog database, perform the following procedures to submit backup and restore jobs. Submitting Backup Jobs To submit a backup job using the catalog database: 1. If you have not enabled the catalog database yet, open the Server Admin Manager, click the Config button, choose the Database Engine tab, place a check mark in the Enable Catalog Database check box, and then click OK. 2. Open the Backup Manager. 3. When the Backup Manager appears, on the Source tab, select the items from the machine tree you want to back up. 4. Click the Destination tab and specify the media group and media (if you have a specific one in mind) you want the files backed up to. 5. Click the Schedule tab, select a backup method, and a schedule for this job. 6. Click the Options button. 7. When the Global Options dialog appears, click the Operation tab. 8. On the Operation tab, under the Database heading, select the Record Job and Session Information Only option and click OK. This option lets you record all information about this job in the database except detail information about individual files and folders. Detail information about individual files and folders is saved in a catalog file in the folder C:\Program Files\CA\ BrightStor ARCserve Backup\database. Note: (Optional) From the Global Options dialog, select additional options for your backup job. 9. Click the Start button and when the Security and Agent Information dialog appears, edit or confirm the security and agent information for the job, and then click OK. Managing the Database and Reporting 8-7
-
 1
1 -
2
-
3
-
4
-
5
-
6
-
7
-
8
-
9
-
10
-
11
-
12
-
13
-
14
-
15
-
16
-
17
-
18
-
19
-
20
-
21
-
22
-
23
-
24
-
25
-
26
-
27
-
28
-
29
-
30
-
31
-
32
-
33
-
34
-
35
-
36
-
37
-
38
-
39
-
40
-
41
-
42
-
43
-
44
-
45
-
46
-
47
-
48
-
49
-
50
-
51
-
52
-
53
-
54
-
55
-
56
-
57
-
58
-
59
-
60
-
61
-
62
-
63
-
64
-
65
-
66
-
67
-
68
-
69
-
70
-
71
-
72
-
73
-
74
-
75
-
76
-
77
-
78
-
79
-
80
-
81
-
82
-
83
-
84
-
85
-
86
-
87
-
88
-
89
-
90
-
91
-
92
-
93
-
94
-
95
-
96
-
97
-
98
-
99
-
100
-
101
-
102
-
103
-
104
-
105
-
106
-
107
-
108
-
109
-
110
-
111
-
112
-
113
-
114
-
115
-
116
-
117
-
118
-
119
-
120
-
121
-
122
-
123
-
124
-
125
-
126
-
127
-
128
-
129
-
130
-
131
-
132
-
133
-
134
-
135
-
136
-
137
-
138
-
139
-
140
-
141
-
142
-
143
-
144
-
145
-
146
-
147
-
148
-
149
-
150
-
151
-
152
-
153
-
154
-
155
-
156
-
157
-
158
-
159
-
160
-
161
-
162
-
163
-
164
-
165
-
166
-
167
-
168
-
169
-
170
-
171
-
172
-
173
-
174
-
175
-
176
-
177
-
178
-
179
-
180
-
181
-
182
-
183
-
184
-
185
-
186
-
187
-
 188
188 -
 189
189 -
 190
190 -
 191
191 -
 192
192 -
 193
193 -
 194
194 -
 195
195 -
 196
196 -
 197
197 -
 198
198 -
199
-
200
-
201
-
202
-
203
-
204
-
205
-
206
-
207
-
208
-
209
-
210
-
211
-
212
-
213
-
214
-
215
-
216
-
217
-
218
-
219
-
220
-
221
-
222
-
223
-
224
-
225
-
226
-
227
-
228
-
229
-
230
-
231
-
232
-
233
-
234
-
235
-
236
-
237
-
238
-
239
-
240
-
241
-
242
-
243
-
244
-
245
-
246
-
247
-
248
-
249
-
250
-
251
-
252
-
253
-
254
-
255
-
256
-
257
-
258
-
259
-
260
-
261
-
262
-
263
-
264
-
265
-
266
-
267
-
268
-
269
-
270
-
271
-
272
-
273
-
274
-
275
-
276
-
277
-
278
-
279
-
280
-
281
-
282
-
283
-
284
-
285
-
286
-
287
-
288
-
289
-
290
-
291
-
292
-
293
-
294
-
295
-
296
-
297
-
298
-
299
-
300
-
301
-
302
-
303
-
304
-
305
-
306
-
307
-
308
-
309
-
310
-
311
-
312
-
313
-
314
-
315
-
316
-
317
-
318
-
319
-
320
-
321
-
322
-
323
-
324
-
325
-
326
-
327
-
328
-
329
-
330
-
331
-
332
-
333
-
334
-
335
-
336
-
337
-
338
-
339
-
340
-
341
-
342
-
343
-
344
-
345
-
346
-
347
-
348
-
349
-
350
-
351
-
352
-
353
-
354
-
355
-
356
-
357
-
358
-
359
-
360
-
361
-
362
-
363
-
364
-
365
-
366
-
367
-
368
-
369
-
370
-
371
-
372
-
373
-
374
-
375
-
376
-
377
-
378
-
379
-
380
-
381
-
382
 |
 |
