Dell PowerEdge MX750c EMC Installation and Service Manual - Page 22
Before working inside your system, Recommended tools, PowerEdge MX750c sled
 |
View all Dell PowerEdge MX750c manuals
Add to My Manuals
Save this manual to your list of manuals |
Page 22 highlights
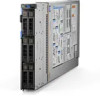
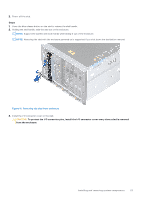
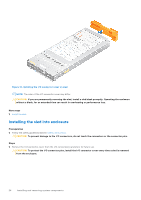
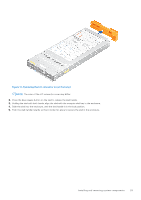
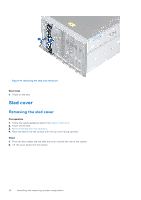
NOTE: While replacing faulty storage controller, FC, or NIC card with the same type of card, after you power on the system; the new card automatically updates to the same firmware and configuration of the faulty one. For more information about the Part replacement configuration, see the Lifecycle Controller User's Guide at https://www.dell.com/idracmanuals. Before working inside your system Prerequisites Follow the safety guidelines listed in the Safety instructions. Steps 1. Power off the sled. 2. Remove the sled from the enclosure. 3. If applicable install the I/O connector cover. CAUTION: To prevent damage to the I/O connectors on the system, ensure that you cover the connectors when you remove the system from the enclosure. 4. Remove the system cover. After working inside your system Prerequisites Follow the safety guidelines listed in Safety instructions. Steps 1. If applicable, remove the I/O connector cover from the system connectors. Install the sled into the enclosure. 2. Reconnect the peripherals and connect the system to the electrical outlet, and then power on the system. Recommended tools You need the following tools to perform the removal and installation procedures: ● Phillips #1 screwdriver ● Phillips #2 screwdriver ● Torx #T30 screwdriver ● 5 mm hex nut screwdriver ● Plastic scribe ● 1/4-inch flat blade screwdriver ● Wrist grounding strap connected to the ground ● ESD mat ● Needle-nose pliers PowerEdge MX750c sled The PowerEdge MX750c sled is a server unit that is installed into the PowerEdge MX7000 enclosure. Removing the sled from enclosure Prerequisites 1. Follow the safety guidelines listed in Safety Instructions. 22 Installing and removing system components
-
 1
1 -
2
-
3
-
4
-
5
-
6
-
7
-
8
-
9
-
10
-
11
-
12
-
13
-
14
-
15
-
16
-
 17
17 -
 18
18 -
 19
19 -
 20
20 -
 21
21 -
 22
22 -
 23
23 -
 24
24 -
 25
25 -
 26
26 -
 27
27 -
28
-
29
-
30
-
31
-
32
-
33
-
34
-
35
-
36
-
37
-
38
-
39
-
40
-
41
-
42
-
43
-
44
-
45
-
46
-
47
-
48
-
49
-
50
-
51
-
52
-
53
-
54
-
55
-
56
-
57
-
58
-
59
-
60
-
61
-
62
-
63
-
64
-
65
-
66
-
67
-
68
-
69
-
70
-
71
-
72
-
73
-
74
-
75
-
76
-
77
-
78
-
79
-
80
-
81
-
82
-
83
-
84
-
85
-
86
-
87
-
88
-
89
-
90
-
91
-
92
-
93
-
94
-
95
-
96
-
97
-
98
-
99
-
100
-
101
-
102
-
103
-
104
-
105
-
106
-
107
-
108
-
109
-
110
-
111
-
112
-
113
 |
 |
