Dell PowerEdge MX750c EMC Installation and Service Manual - Page 90
Removing the internal USB memory key, Installing the internal USB memory key
 |
View all Dell PowerEdge MX750c manuals
Add to My Manuals
Save this manual to your list of manuals |
Page 90 highlights
Figure 84. Removing the internal USB memory key 3. Insert the replacement USB memory key into the USB port. Figure 85. Installing the internal USB memory key Next steps 1. While booting, press F2 to enter System Setup and verify that the system detects the USB memory key. 2. Follow the procedure listed in After working inside your system. 90 Installing and removing system components
-
 1
1 -
2
-
3
-
4
-
5
-
6
-
7
-
8
-
9
-
10
-
11
-
12
-
13
-
14
-
15
-
16
-
17
-
18
-
19
-
20
-
21
-
22
-
23
-
24
-
25
-
26
-
27
-
28
-
29
-
30
-
31
-
32
-
33
-
34
-
35
-
36
-
37
-
38
-
39
-
40
-
41
-
42
-
43
-
44
-
45
-
46
-
47
-
48
-
49
-
50
-
51
-
52
-
53
-
54
-
55
-
56
-
57
-
58
-
59
-
60
-
61
-
62
-
63
-
64
-
65
-
66
-
67
-
68
-
69
-
70
-
71
-
72
-
73
-
74
-
75
-
76
-
77
-
78
-
79
-
80
-
81
-
82
-
83
-
84
-
 85
85 -
 86
86 -
 87
87 -
 88
88 -
 89
89 -
 90
90 -
 91
91 -
 92
92 -
 93
93 -
 94
94 -
 95
95 -
96
-
97
-
98
-
99
-
100
-
101
-
102
-
103
-
104
-
105
-
106
-
107
-
108
-
109
-
110
-
111
-
112
-
113
 |
 |

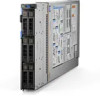
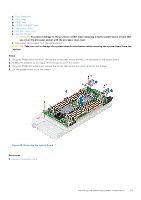
Figure 84. Removing the internal USB memory key
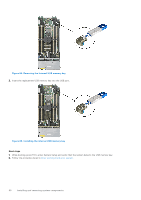
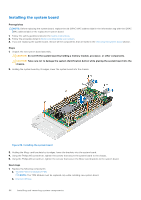
3.
Insert the replacement USB memory key into the USB port.
Figure 85. Installing the internal USB memory key
Next steps
1.
While booting, press F2 to enter System Setup and verify that the system detects the USB memory key.
2.
Follow the procedure listed in
After working inside your system
.
90
Installing and removing system components