Epson 1715C User's Guide - Page 159
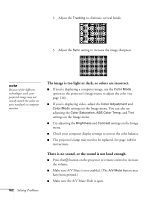
The message, is displayed., Only part of the computer image is displayed.
 |
UPC - 010343858237
View all Epson 1715C manuals
Add to My Manuals
Save this manual to your list of manuals |
Page 159 highlights
If you're using a PC notebook: ■ Hold down the Fn key on the keyboard and press the function key that lets you display on an external monitor. It may have an icon such as , or it may be labelled CRT/LCD. Allow a few seconds for the projector to sync up after pressing it. Check your notebook's manual or online help for details. On most systems, the key lets you toggle between the LCD screen and the projector, or display on both at the same time. ■ Depending on your computer's video card, you might need to use the Display utility in the Control Panel to make sure that both the LCD screen and external monitor port are enabled. See your computer's documentation or online help for details. If you're using Mac OS X: 1. Open System Preferences. 2. Click Displays. 3. Click Detect Displays. 4. Make sure the VGA Display or Color LCD dialog box is selected. 5. Click the Arrangement or Arrange tab. 6. Make sure the Mirror Displays checkbox is selected. The message Not Supported is displayed. ■ Make sure the correct input signal is selected in the Signal menu (see page 118). ■ Make sure your computer's resolution doesn't exceed UXGA (1600 × 1200) and the frequency or refresh rate is supported by the projector (see page 179). If necessary, change your computer's resolution setting as described below. Only part of the computer image is displayed. ■ Press the Auto button on the remote control. ■ Make sure the image Position setting is correct in the Signal menu. See page 119 for more information. Solving Problems 159
-
 1
1 -
2
-
3
-
4
-
5
-
6
-
7
-
8
-
9
-
10
-
11
-
12
-
13
-
14
-
15
-
16
-
17
-
18
-
19
-
20
-
21
-
22
-
23
-
24
-
25
-
26
-
27
-
28
-
29
-
30
-
31
-
32
-
33
-
34
-
35
-
36
-
37
-
38
-
39
-
40
-
41
-
42
-
43
-
44
-
45
-
46
-
47
-
48
-
49
-
50
-
51
-
52
-
53
-
54
-
55
-
56
-
57
-
58
-
59
-
60
-
61
-
62
-
63
-
64
-
65
-
66
-
67
-
68
-
69
-
70
-
71
-
72
-
73
-
74
-
75
-
76
-
77
-
78
-
79
-
80
-
81
-
82
-
83
-
84
-
85
-
86
-
87
-
88
-
89
-
90
-
91
-
92
-
93
-
94
-
95
-
96
-
97
-
98
-
99
-
100
-
101
-
102
-
103
-
104
-
105
-
106
-
107
-
108
-
109
-
110
-
111
-
112
-
113
-
114
-
115
-
116
-
117
-
118
-
119
-
120
-
121
-
122
-
123
-
124
-
125
-
126
-
127
-
128
-
129
-
130
-
131
-
132
-
133
-
134
-
135
-
136
-
137
-
138
-
139
-
140
-
141
-
142
-
143
-
144
-
145
-
146
-
147
-
148
-
149
-
150
-
151
-
152
-
153
-
 154
154 -
 155
155 -
 156
156 -
 157
157 -
 158
158 -
 159
159 -
 160
160 -
 161
161 -
 162
162 -
 163
163 -
 164
164 -
165
-
166
-
167
-
168
-
169
-
170
-
171
-
172
-
173
-
174
-
175
-
176
-
177
-
178
-
179
-
180
-
181
-
182
-
183
-
184
-
185
-
186
-
187
-
188
-
189
-
190
-
191
-
192
-
193
-
194
-
195
-
196
-
197
-
198
 |
 |