Epson 1715C User's Guide - Page 90
menu, then press, button on the remote control, select
 |
UPC - 010343858237
View all Epson 1715C manuals
Add to My Manuals
Save this manual to your list of manuals |
Page 90 highlights
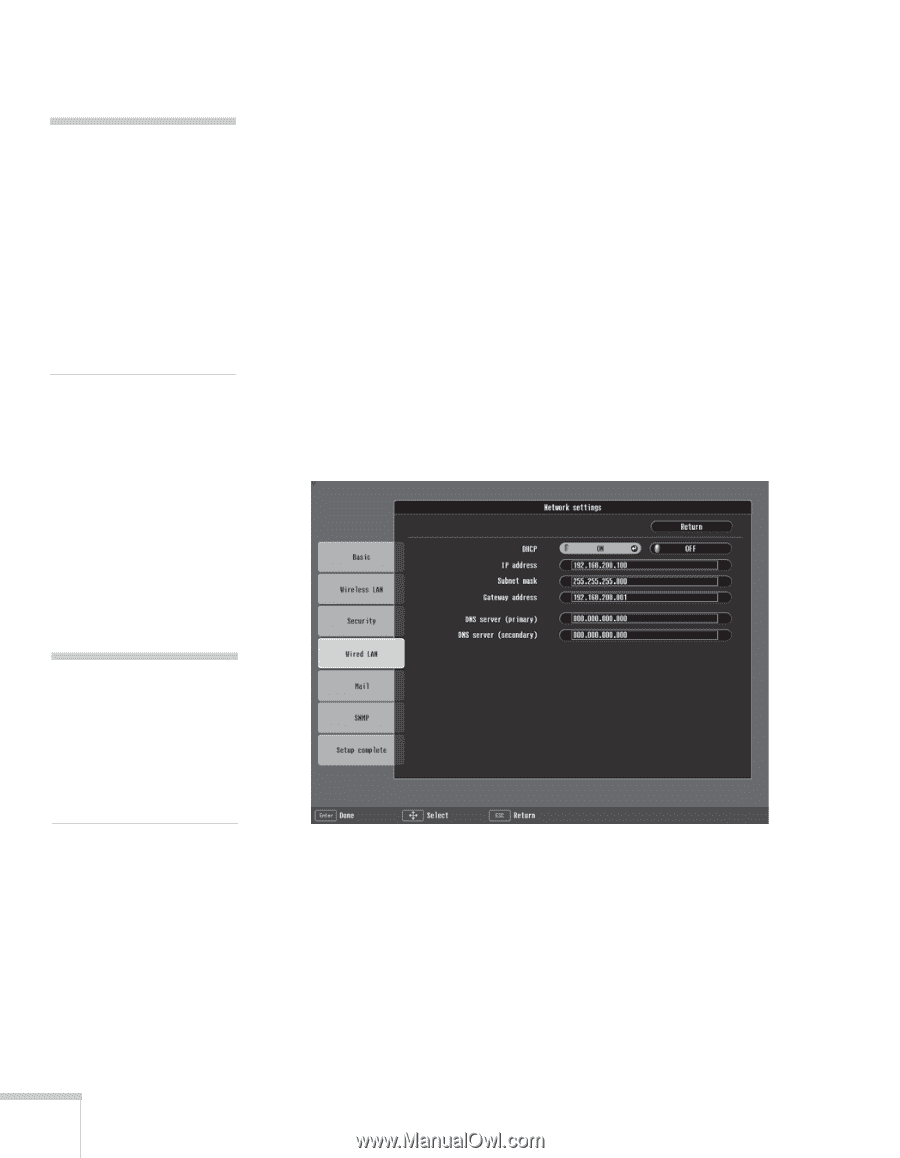
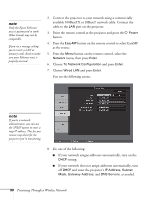
note Only the Epson Ethernet unit is guaranteed to work. Other brands may not be compatible. If you see a message asking you to insert a LAN or memory card, check to make sure your Ethernet unit is properly inserted. 2. Connect the projector to your network using a commercially available 100BaseTX or 10BaseT network cable. Connect the cable to the LAN port on the projector. 3. Point the remote control at the projector and press the P Power button. 4. Press the EasyMP button on the remote control to select EasyMP as the source. 5. Press the Menu button on the remote control, select the Network menu, then press Enter. 6. Choose To Network Configuration and press Enter. 7. Choose Wired LAN and press Enter. You see the following screen: note If you're a network administrator, you can use the SNMP option to enter a trap IP address. This lets you receive trap alerts for the projectors you're monitoring. 8. Do one of the following: ■ If your network assigns addresses automatically, turn on the DHCP setting. ■ If your network does not assign addresses automatically, turn off DHCP and enter the projector's IP Address, Subnet Mask, Gateway Address, and DNS Servers, as needed. 90 Presenting Through a Wireless Network
-
 1
1 -
2
-
3
-
4
-
5
-
6
-
7
-
8
-
9
-
10
-
11
-
12
-
13
-
14
-
15
-
16
-
17
-
18
-
19
-
20
-
21
-
22
-
23
-
24
-
25
-
26
-
27
-
28
-
29
-
30
-
31
-
32
-
33
-
34
-
35
-
36
-
37
-
38
-
39
-
40
-
41
-
42
-
43
-
44
-
45
-
46
-
47
-
48
-
49
-
50
-
51
-
52
-
53
-
54
-
55
-
56
-
57
-
58
-
59
-
60
-
61
-
62
-
63
-
64
-
65
-
66
-
67
-
68
-
69
-
70
-
71
-
72
-
73
-
74
-
75
-
76
-
77
-
78
-
79
-
80
-
81
-
82
-
83
-
84
-
 85
85 -
 86
86 -
 87
87 -
 88
88 -
 89
89 -
 90
90 -
 91
91 -
 92
92 -
 93
93 -
 94
94 -
 95
95 -
96
-
97
-
98
-
99
-
100
-
101
-
102
-
103
-
104
-
105
-
106
-
107
-
108
-
109
-
110
-
111
-
112
-
113
-
114
-
115
-
116
-
117
-
118
-
119
-
120
-
121
-
122
-
123
-
124
-
125
-
126
-
127
-
128
-
129
-
130
-
131
-
132
-
133
-
134
-
135
-
136
-
137
-
138
-
139
-
140
-
141
-
142
-
143
-
144
-
145
-
146
-
147
-
148
-
149
-
150
-
151
-
152
-
153
-
154
-
155
-
156
-
157
-
158
-
159
-
160
-
161
-
162
-
163
-
164
-
165
-
166
-
167
-
168
-
169
-
170
-
171
-
172
-
173
-
174
-
175
-
176
-
177
-
178
-
179
-
180
-
181
-
182
-
183
-
184
-
185
-
186
-
187
-
188
-
189
-
190
-
191
-
192
-
193
-
194
-
195
-
196
-
197
-
198
 |
 |