Epson 9600 User Manual - Page 62
best block, then press, button to select the number of
 |
UPC - 010343841888
View all Epson 9600 manuals
Add to My Manuals
Save this manual to your list of manuals |
Page 62 highlights
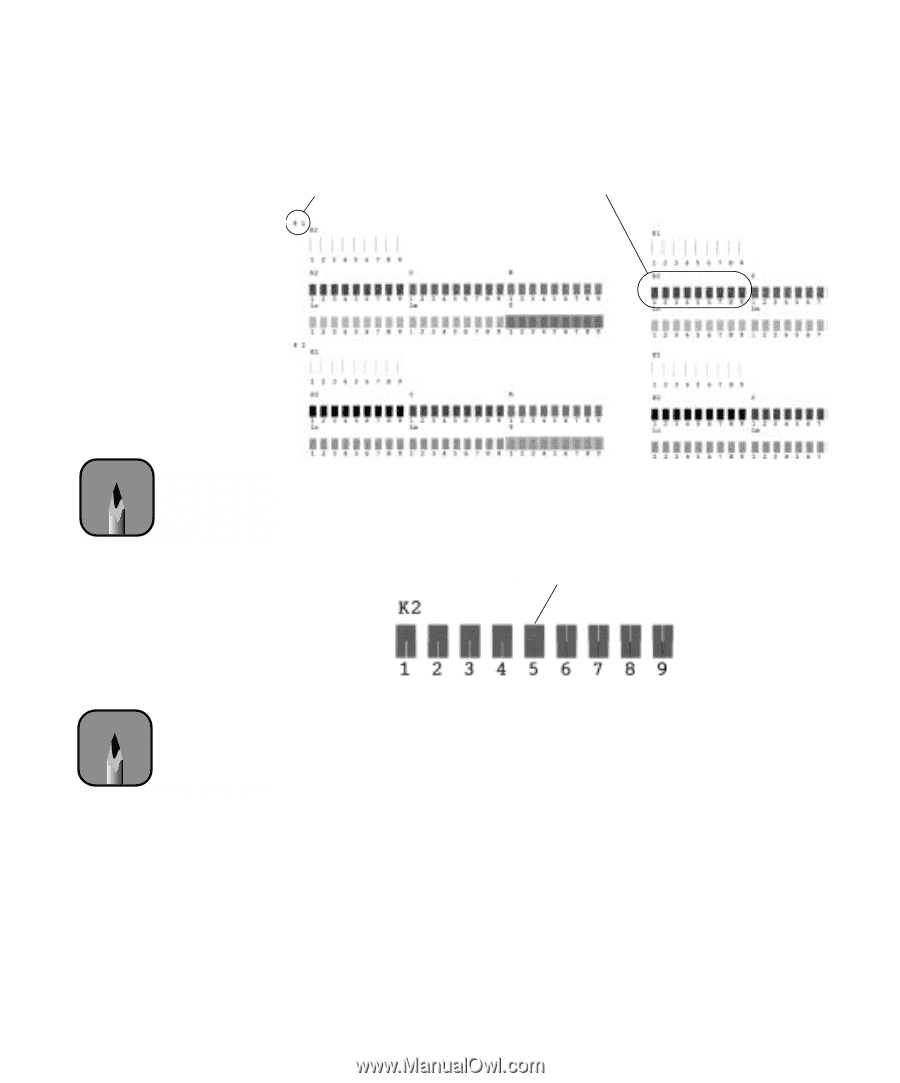
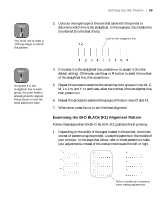
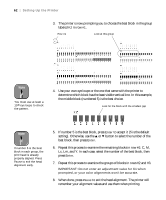
62 | Setting Up the Printer 3. The printer is now prompting you to choose the best block in the group labeled K2 in row #1. Row #1 Look at this group Note You must use at least a 10× eye loupe to check the pattern. 4. Use your own eye loupe or the one that came with the printer to determine which block has the least visible vertical line. In this example, the middle block (numbered 5) is the best choice. Look for the block with the smallest gap Note If number 5 is the best block in each group, the print head is already properly aligned. Press Pause to exit the head alignment early. 5. If number 5 is the best block, press Enter to accept it (5 is the default setting). Otherwise, use the u or d button to select the number of the best block, then press Enter. 6. Repeat this process to examine the remaining blocks in row #1: C, M, Lc, Lm, and Y. In each case, select the number of the best block, then press Enter. 7. Repeat this process to examine the groups of blocks in rows #2 and #3. IMPORTANT: Do not enter an adjustment value for K1 when prompted, or your color alignments won't be accurate. 8. When done, press Pause to exit the head alignment. The printer will remember your alignment values and use them when printing. 1-62
-
 1
1 -
2
-
3
-
4
-
5
-
6
-
7
-
8
-
9
-
10
-
11
-
12
-
13
-
14
-
15
-
16
-
17
-
18
-
19
-
20
-
21
-
22
-
23
-
24
-
25
-
26
-
27
-
28
-
29
-
30
-
31
-
32
-
33
-
34
-
35
-
36
-
37
-
38
-
39
-
40
-
41
-
42
-
43
-
44
-
45
-
46
-
47
-
48
-
49
-
50
-
51
-
52
-
53
-
54
-
55
-
56
-
 57
57 -
 58
58 -
 59
59 -
 60
60 -
 61
61 -
 62
62 -
 63
63 -
 64
64 -
 65
65 -
 66
66 -
 67
67 -
68
-
69
-
70
-
71
-
72
-
73
-
74
-
75
-
76
-
77
-
78
-
79
-
80
-
81
-
82
-
83
-
84
-
85
-
86
-
87
-
88
-
89
-
90
-
91
-
92
-
93
-
94
-
95
-
96
-
97
-
98
-
99
-
100
-
101
-
102
-
103
-
104
-
105
-
106
-
107
-
108
-
109
-
110
-
111
-
112
-
113
-
114
-
115
-
116
-
117
-
118
-
119
-
120
-
121
-
122
-
123
-
124
-
125
-
126
-
127
-
128
-
129
-
130
-
131
-
132
-
133
-
134
-
135
-
136
-
137
-
138
-
139
-
140
-
141
-
142
-
143
-
144
-
145
-
146
-
147
-
148
-
149
-
150
-
151
-
152
-
153
-
154
-
155
-
156
-
157
-
158
-
159
-
160
-
161
-
162
-
163
-
164
-
165
-
166
-
167
-
168
-
169
-
170
-
171
-
172
-
173
-
174
-
175
-
176
-
177
-
178
-
179
-
180
-
181
-
182
-
183
-
184
-
185
-
186
-
187
-
188
-
189
-
190
-
191
-
192
 |
 |