Epson 9600 User Manual - Page 81
Adjusting the Platen Gap for Thick or Thin Paper, button to exit the menu.
 |
UPC - 010343841888
View all Epson 9600 manuals
Add to My Manuals
Save this manual to your list of manuals |
Page 81 highlights
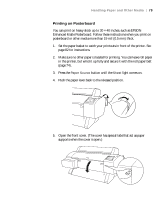
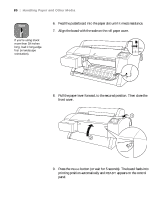
Handling Paper and Other Media | 81 Caution To avoid damaging the printer, never move the paper lever while the Operate or Pause light is flashing. 10. Print your page. After it is finished, the posterboard stays in the printer. 11. To remove the print, hold it while pushing the paper lever back to the released position. Adjusting the Platen Gap for Thick or Thin Paper When you print on unusually thick or thin paper, you may need to adjust the platen gap setting. Normally, the STANDARD setting allows the printer to adjust automatically. However, if print quality is not satisfactory when using very thin or very thick stock, you may need to change this setting. Follow these steps: 1. Press the SelecType button until PRINTER SETUP appears on the display. 2. Press the r button twice. The display shows the current setting for the platen gap. 3. Use the u and d buttons to change the setting. (STANDARD is the default setting; you can also choose NARROW, WIDE, or WIDER.) 4. Press the Enter button to save the new setting. 5. Press the Pause button to exit the menu. If you've selected a non-standard platen gap, the letter N or W appears in the corner of the display to remind you of the narrow or wide setting. When you switch media, don't forget to change the setting back to STANDARD. If you're printing on non-EPSON media, you may also need to create a paper profile to optimize your results. See page 85. 2-81
-
 1
1 -
2
-
3
-
4
-
5
-
6
-
7
-
8
-
9
-
10
-
11
-
12
-
13
-
14
-
15
-
16
-
17
-
18
-
19
-
20
-
21
-
22
-
23
-
24
-
25
-
26
-
27
-
28
-
29
-
30
-
31
-
32
-
33
-
34
-
35
-
36
-
37
-
38
-
39
-
40
-
41
-
42
-
43
-
44
-
45
-
46
-
47
-
48
-
49
-
50
-
51
-
52
-
53
-
54
-
55
-
56
-
57
-
58
-
59
-
60
-
61
-
62
-
63
-
64
-
65
-
66
-
67
-
68
-
69
-
70
-
71
-
72
-
73
-
74
-
75
-
 76
76 -
 77
77 -
 78
78 -
 79
79 -
 80
80 -
 81
81 -
 82
82 -
 83
83 -
 84
84 -
 85
85 -
 86
86 -
87
-
88
-
89
-
90
-
91
-
92
-
93
-
94
-
95
-
96
-
97
-
98
-
99
-
100
-
101
-
102
-
103
-
104
-
105
-
106
-
107
-
108
-
109
-
110
-
111
-
112
-
113
-
114
-
115
-
116
-
117
-
118
-
119
-
120
-
121
-
122
-
123
-
124
-
125
-
126
-
127
-
128
-
129
-
130
-
131
-
132
-
133
-
134
-
135
-
136
-
137
-
138
-
139
-
140
-
141
-
142
-
143
-
144
-
145
-
146
-
147
-
148
-
149
-
150
-
151
-
152
-
153
-
154
-
155
-
156
-
157
-
158
-
159
-
160
-
161
-
162
-
163
-
164
-
165
-
166
-
167
-
168
-
169
-
170
-
171
-
172
-
173
-
174
-
175
-
176
-
177
-
178
-
179
-
180
-
181
-
182
-
183
-
184
-
185
-
186
-
187
-
188
-
189
-
190
-
191
-
192
 |
 |