Epson 9600 User Manual - Page 84
Optimizing the Settings for Your Paper, Adjusting the Paper Settings
 |
UPC - 010343841888
View all Epson 9600 manuals
Add to My Manuals
Save this manual to your list of manuals |
Page 84 highlights
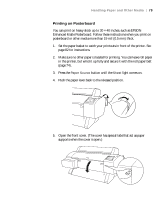
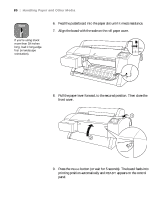
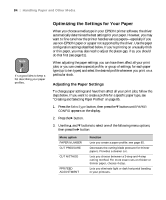
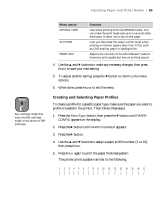
84 | Handling Paper and Other Media Note It's a good idea to keep a list describing your paper profiles. Optimizing the Settings for Your Paper When you choose a media type in your EPSON printer software, the driver automatically determines the best settings for your paper. However, you may want to fine-tune how the printer handles various papers-especially if you use non-EPSON paper or a paper not supported by the driver. Use the paper configuration settings described below. If you're printing on unusually thick or thin paper, you may also need to adjust the platen gap; if so, you should do that first (see page 81). When adjusting the paper settings, you can have them affect all your print jobs; or you can create a special profile, or group of settings, for each paper type (up to ten types) and select the desired profile whenever you print on a particular stock. Adjusting the Paper Settings To change paper settings and have them affect all your print jobs, follow the steps below. If you want to create a profile for a specific paper type, see "Creating and Selecting Paper Profiles" on page 85. 1. Press the SelecType button, then press the d button until PAPER CONFIG appears on the display. 2. Press the r button. 3. Use the u and d buttons to select one of the following menu options, then press the r button: Menu option PAPER NUMBER CUT PRESSURE CUT METHOD PPR FEED ADJUSTMENT Function Lets you create a paper profile; see page 85. Decreases the cutting blade pressure for thinner papers. Provides a cleaner cut. Lets you choose between a 3-step and 4-step cutting method. For more exact cuts on thicker or thinner paper, choose 4-step. Lets you eliminate light or dark horizontal banding in your printouts. 2-84
-
 1
1 -
2
-
3
-
4
-
5
-
6
-
7
-
8
-
9
-
10
-
11
-
12
-
13
-
14
-
15
-
16
-
17
-
18
-
19
-
20
-
21
-
22
-
23
-
24
-
25
-
26
-
27
-
28
-
29
-
30
-
31
-
32
-
33
-
34
-
35
-
36
-
37
-
38
-
39
-
40
-
41
-
42
-
43
-
44
-
45
-
46
-
47
-
48
-
49
-
50
-
51
-
52
-
53
-
54
-
55
-
56
-
57
-
58
-
59
-
60
-
61
-
62
-
63
-
64
-
65
-
66
-
67
-
68
-
69
-
70
-
71
-
72
-
73
-
74
-
75
-
76
-
77
-
78
-
 79
79 -
 80
80 -
 81
81 -
 82
82 -
 83
83 -
 84
84 -
 85
85 -
 86
86 -
 87
87 -
 88
88 -
 89
89 -
90
-
91
-
92
-
93
-
94
-
95
-
96
-
97
-
98
-
99
-
100
-
101
-
102
-
103
-
104
-
105
-
106
-
107
-
108
-
109
-
110
-
111
-
112
-
113
-
114
-
115
-
116
-
117
-
118
-
119
-
120
-
121
-
122
-
123
-
124
-
125
-
126
-
127
-
128
-
129
-
130
-
131
-
132
-
133
-
134
-
135
-
136
-
137
-
138
-
139
-
140
-
141
-
142
-
143
-
144
-
145
-
146
-
147
-
148
-
149
-
150
-
151
-
152
-
153
-
154
-
155
-
156
-
157
-
158
-
159
-
160
-
161
-
162
-
163
-
164
-
165
-
166
-
167
-
168
-
169
-
170
-
171
-
172
-
173
-
174
-
175
-
176
-
177
-
178
-
179
-
180
-
181
-
182
-
183
-
184
-
185
-
186
-
187
-
188
-
189
-
190
-
191
-
192
 |
 |