Epson P-1000 User Manual - Page 19
Connecting a Computer to the P-1000, Connecting an External Video Device - photo pc
 |
UPC - 010343849280
View all Epson P-1000 manuals
Add to My Manuals
Save this manual to your list of manuals |
Page 19 highlights
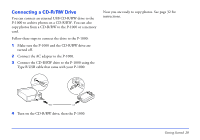
Connecting a Computer to the P-1000 You can connect a computer to display images on your monitor and to copy images from one device to the other. Follow these steps: 1 Connect the AC adapter to the P-1000. 2 Make sure your computer and the P-1000 are turned on and the Main Menu is displayed on the LCD screen. 3 Connect the larger, flat end of the Type A USB cable to your computer and connect the other end to the P-1000. Note: Although the LCD screen is off while the USB cable is connected, you can make it come on briefly by pressing any button on the P-1000. If your computer does not recognize the P-1000 right away, you may need to refresh the view or restart your computer. Now you can view your P-1000 images on the computer's monitor (as described on page 25) or copy files to or from the computer (see page 31). 4 When you are done, close your application and/or click the USB device icon on your screen (or drag it to the trash icon) to stop the device. Then you can safely unplug the USB cable. The PC peripheral mode icon ( ) appears on the P-1000 screen, then the LCD is turned off. Connecting an External Video Device If you have an external monitor such as a TV that has a composite video-in connector, you can connect it to the P-1000 and view photos on the larger screen. Just connect the monitor to your P-1000 with the video cable that came with the P-1000. Note: Check the Video Out signal as described on page 49 to make sure it is correct for your video source (NTSC or PAL). Getting Started 19
-
 1
1 -
2
-
3
-
4
-
5
-
6
-
7
-
8
-
9
-
10
-
11
-
12
-
13
-
 14
14 -
 15
15 -
 16
16 -
 17
17 -
 18
18 -
 19
19 -
 20
20 -
 21
21 -
 22
22 -
 23
23 -
 24
24 -
25
-
26
-
27
-
28
-
29
-
30
-
31
-
32
-
33
-
34
-
35
-
36
-
37
-
38
-
39
-
40
-
41
-
42
-
43
-
44
-
45
-
46
-
47
-
48
-
49
-
50
-
51
-
52
-
53
-
54
-
55
-
56
-
57
-
58
-
59
-
60
-
61
-
62
-
63
-
64
-
65
-
66
-
67
-
68
-
69
-
70
-
71
-
72
-
73
-
74
-
75
-
76
-
77
 |
 |
