Epson P-1000 User Manual - Page 26
available depend on what you are doing when you press
 |
UPC - 010343849280
View all Epson P-1000 manuals
Add to My Manuals
Save this manual to your list of manuals |
Page 26 highlights
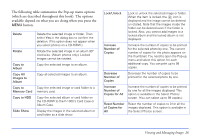
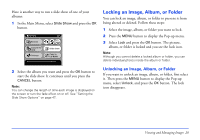
The following table summarizes the Pop-up menu options (which are described throughout this book). The options available depend on what you are doing when you press the MENU button. Delete Rotate Copy to Album Copy All Images to Album Copy to Memory Card Copy to HDD Slide Show Delete the selected image or folder. Then select Yes in the dialog box to confirm the deletion. (This option does not appear when you select photos on a CD-R/RW.) Rotate the selected image in an album 90° clockwise. (Album photos only.) Locked images cannot be rotated. Copy the selected image to an album. Copy all selected images to an album. Copy the selected image or card folder to a memory card. Copy the selected album or card folder on the CD-R/RW to the P-1000's Card Case or Album Case. Display the images in the selected album or card folder as a slide show. Lock/Unlock Lock or unlock the selected image or folder. When the item is locked, the icon is displayed and the image cannot be deleted or rotated. Note that the images inside the folder can be deleted even if the folder is locked. Also, you cannot add images to a locked album and the locked album is not displayed. Increase Number of Copies Increase the number of copies to be printed for the selected photo by one. The current number of copies for the photo appears on the thumbnail. You need to open the Pop-up menu and select this option for each additional copy. You can print up to 99 copies. Decrease Number of Copies Decrease the number of copies to be printed for the selected photo by one. Increase Number of Copies for All Increase the number of copies to be printed by one for all the images displayed. This option is available in the Select Photos screen. (You can select up to 99 copies.) Reset Number Reset the number of copies to 0 for all the of Copies for images displayed. This option is available in All the Select Photos screen. Viewing and Managing Images 26
-
 1
1 -
2
-
3
-
4
-
5
-
6
-
7
-
8
-
9
-
10
-
11
-
12
-
13
-
14
-
15
-
16
-
17
-
18
-
19
-
20
-
 21
21 -
 22
22 -
 23
23 -
 24
24 -
 25
25 -
 26
26 -
 27
27 -
 28
28 -
 29
29 -
 30
30 -
 31
31 -
32
-
33
-
34
-
35
-
36
-
37
-
38
-
39
-
40
-
41
-
42
-
43
-
44
-
45
-
46
-
47
-
48
-
49
-
50
-
51
-
52
-
53
-
54
-
55
-
56
-
57
-
58
-
59
-
60
-
61
-
62
-
63
-
64
-
65
-
66
-
67
-
68
-
69
-
70
-
71
-
72
-
73
-
74
-
75
-
76
-
77
 |
 |
