Epson P-1000 User Manual - Page 33
icon appears on the selected folder or, You see this message
 |
UPC - 010343849280
View all Epson P-1000 manuals
Add to My Manuals
Save this manual to your list of manuals |
Page 33 highlights
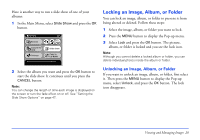
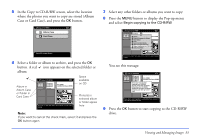
5 In the Copy to CD-R/RW screen, select the location where the photos you want to copy are stored (Album Case or Card Case), and press the OK button. Copy to CD-R/RW Album Case Card Case Press OK to copy albums. 6 Select a folder or album to archive, and press the OK button. A red icon appears on the selected folder or album: Album in Album Case or Folder in Card Case Copy to CD-R/RW 1 2 Favourites Birthday Size:128MB Available Disk Space:400MB Press OK to select this option. Press Cancel to finish making settings. Space available on CD Photo(s) in selected album or folder appear here Note: If you want to cancel the check mark, select it and press the OK button again. 7 Select any other folders or albums you want to copy. 8 Press the MENU button to display the Pop-up menu and select Begin copying to the CD-R/RW. Copy to CD-R/RW 1 2 Favourites Delete Size:128MB Available Disk Space:400MB BirCthodpayy All Images to Album Slide Show Lock Return to Main Menu Hide Unsupported Files Begin copying to the CD-R/RW Select to Delete Press OK to select this option. Press Cancel to finish making settings. You see this message: Copy to CD-R/RW 1 2 Size:128MB Available Disk Space:400MB Favourites Birthday Once you have started copying to a CDR/RW, do not cancel the operation. Otherwise, the CD-R/RW media will become corrupted. Copying can take up to one hour. Press OK to start copying to a CD-R/RW. Press Cancel to return to the previous screen. 9 Press the OK button to start copying to the CD-R/RW drive. Viewing and Managing Images 33
-
 1
1 -
2
-
3
-
4
-
5
-
6
-
7
-
8
-
9
-
10
-
11
-
12
-
13
-
14
-
15
-
16
-
17
-
18
-
19
-
20
-
21
-
22
-
23
-
24
-
25
-
26
-
27
-
 28
28 -
 29
29 -
 30
30 -
 31
31 -
 32
32 -
 33
33 -
 34
34 -
 35
35 -
 36
36 -
 37
37 -
 38
38 -
39
-
40
-
41
-
42
-
43
-
44
-
45
-
46
-
47
-
48
-
49
-
50
-
51
-
52
-
53
-
54
-
55
-
56
-
57
-
58
-
59
-
60
-
61
-
62
-
63
-
64
-
65
-
66
-
67
-
68
-
69
-
70
-
71
-
72
-
73
-
74
-
75
-
76
-
77
 |
 |
