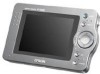
Epson P-1000 User Manual - Page 25
Displaying Images on Your Computer Monitor, Managing Photos in Albums, Using the Pop-up Menu, Monitor
 |
UPC - 010343849280
View all Epson P-1000 manuals
Add to My Manuals
Save this manual to your list of manuals |
Page 25 highlights
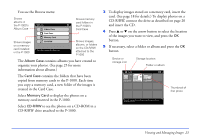
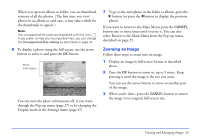
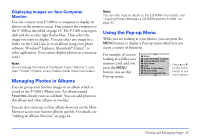
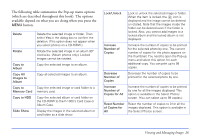
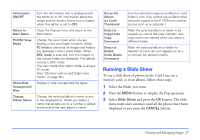
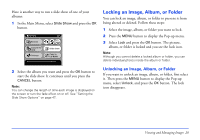
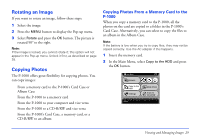
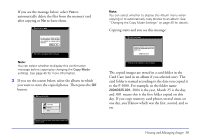
Displaying Images on Your Computer Monitor You can connect your P-1000 to a computer to display its photos on the monitor screen. First connect the computer to the P-1000 as described on page 19. The P-1000 screen goes dark and the activity light flashes blue. Then select the image you want to display. You can select any image in a folder on the Card Case or in an album using your photo software, Windows® Explorer, Macintosh® Finder,™ or other application. (You cannot display photos on a memory card.) Note: Do not change the name of the Album Case ("Albums"), card case ("Cards") folders, or any folders inside these two folders. Managing Photos in Albums You can group your favorite images in an album which is stored in the P-1000's Album case. An album named Favorites already exists as a default. You can add photos to this album and other albums as you like. You can also create up to three album shortcuts on the Main Menu to access your favorite albums quickly. For details, see "Adding an Album Shortcut" on page 44. Note: You can also copy an album to the CD-R/RW. For details, see "Copying Photos Between a CD-R/RW and the P-1000" on page 32. Using the Pop-up Menu While you are looking at your photos, you can press the MENU button to display a Pop-up menu which lets you access a variety of functions. For example, if you are looking at a folder on a memory card, and you press the MENU button, you see this Pop-up menu: Delete Copy All Images to Album Copy to Memory Card Slide Show Lock Return to Main Menu PC View Mode Hide Unsupported Files Press u or d on the arrow button to see more options Viewing and Managing Images 25
-
 1
1 -
2
-
3
-
4
-
5
-
6
-
7
-
8
-
9
-
10
-
11
-
12
-
13
-
14
-
15
-
16
-
17
-
18
-
19
-
 20
20 -
 21
21 -
 22
22 -
 23
23 -
 24
24 -
 25
25 -
 26
26 -
 27
27 -
 28
28 -
 29
29 -
 30
30 -
31
-
32
-
33
-
34
-
35
-
36
-
37
-
38
-
39
-
40
-
41
-
42
-
43
-
44
-
45
-
46
-
47
-
48
-
49
-
50
-
51
-
52
-
53
-
54
-
55
-
56
-
57
-
58
-
59
-
60
-
61
-
62
-
63
-
64
-
65
-
66
-
67
-
68
-
69
-
70
-
71
-
72
-
73
-
74
-
75
-
76
-
77
 |
 |