Epson P-1000 User Manual - Page 37
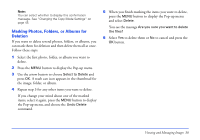
Deleting Photos, Select an image, folder, or album to delete.
 |
UPC - 010343849280
View all Epson P-1000 manuals
Add to My Manuals
Save this manual to your list of manuals |
Page 37 highlights
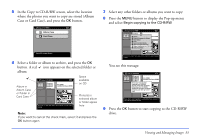
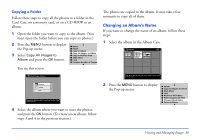
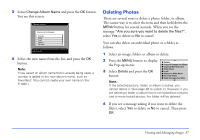
3 Select Change Album Name and press the OK button. You see this screen: Copy to Album Select one of the following: Favorites Family Travel Hobbies Christmas Press OK to select the option. Press Cancel to return to the previous screen. 4 Select the new name from the list, and press the OK button. Note: If you select an album name that is already being used, a number is added to the new album's name, such as Favorites2. (You cannot create your own name on the P-1000.) Deleting Photos There are several ways to delete a photo, folder, or album. The easiest way is to select the item and then hold down the MENU button for several seconds. When you see the message "Are you sure you want to delete the files?", select Yes to delete or No to cancel. You can also delete an individual photo or a folder as follows: 1 Select an image, folder, or album to delete. 2 Press the MENU button to display the Pop-up menu: 3 Select Delete and press the OK button. Delete Copy All Images to Album Copy to Memory Card Slide Show Lock Return to Main Menu PC View Mode Hide Unsupported Files Note: If the selected picture, folder, or album is locked, you cannot delete it. (See page 26 to unlock it.) However, if you are deleting a folder or album that is not locked but contains one or more locked photos, the folder will be deleted. 4 If you see a message asking if you want to delete the file(s), select Yes to delete or No to cancel. Then press OK. Viewing and Managing Images 37
-
 1
1 -
2
-
3
-
4
-
5
-
6
-
7
-
8
-
9
-
10
-
11
-
12
-
13
-
14
-
15
-
16
-
17
-
18
-
19
-
20
-
21
-
22
-
23
-
24
-
25
-
26
-
27
-
28
-
29
-
30
-
31
-
 32
32 -
 33
33 -
 34
34 -
 35
35 -
 36
36 -
 37
37 -
 38
38 -
 39
39 -
 40
40 -
 41
41 -
 42
42 -
43
-
44
-
45
-
46
-
47
-
48
-
49
-
50
-
51
-
52
-
53
-
54
-
55
-
56
-
57
-
58
-
59
-
60
-
61
-
62
-
63
-
64
-
65
-
66
-
67
-
68
-
69
-
70
-
71
-
72
-
73
-
74
-
75
-
76
-
77
 |
 |
