Epson Stylus Pro 7890 User's Guide - Page 151
Running Cleaning Cycles, Run the power cleaning only if the normal cleaning process is not sufficient
 |
View all Epson Stylus Pro 7890 manuals
Add to My Manuals
Save this manual to your list of manuals |
Page 151 highlights
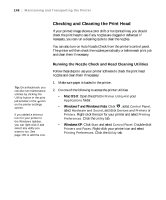
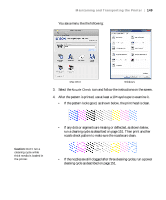
Maintaining and Transporting the Printer | 151 Caution: Don't run a cleaning cycle while thick media is loaded in the printer. 3. Select one of the following, then press OK: • ON: PERIODICALLY-The printer periodically checks its nozzles and runs a cleaning cycle if necessary (default). • ON: EVERY JOB-The printer automatically checks its nozzles and runs a cleaning cycle if necessary before each print job. This process uses a very small amount of ink (and no paper) and is recommended if you are running large print jobs unattended. • OFF-The printer will not perform automatic nozzle checks and cleaning cycles. 4. Press l, then select PRINT NOZZLE PATTERN and press r. 5. Select ON: EVERY PAGE to have the nozzle check pattern printed before each print job, or ON: EVERY 10 PAGES or OFF. These settings take effect only when you print on roll paper. 6. Press OK to save the setting. Running Cleaning Cycles You can run several types of cleaning cycles from the control panel (or from the Epson LFP Remote Panel2): normal cleaning, power cleaning, and cleaning each pair of ink colors. Run the power cleaning only if the normal cleaning process is not sufficient to clear the nozzles. The power cycle uses a large quantity of ink, so it is recommended only as a last resort. The cartridges need to be at least 50% full to use power cleaning. You may need to replace a low cartridge to run the cleaning cycle. After cleaning, you can reinsert the old cartridge. 1. Print a nozzle check to make sure the print head needs cleaning, as described on page 150. 2. Make sure the printer is ready and the red B ink Check light on the printer's control panel is not on or flashing. 3. Press r Menu. 151
-
 1
1 -
2
-
3
-
4
-
5
-
6
-
7
-
8
-
9
-
10
-
11
-
12
-
13
-
14
-
15
-
16
-
17
-
18
-
19
-
20
-
21
-
22
-
23
-
24
-
25
-
26
-
27
-
28
-
29
-
30
-
31
-
32
-
33
-
34
-
35
-
36
-
37
-
38
-
39
-
40
-
41
-
42
-
43
-
44
-
45
-
46
-
47
-
48
-
49
-
50
-
51
-
52
-
53
-
54
-
55
-
56
-
57
-
58
-
59
-
60
-
61
-
62
-
63
-
64
-
65
-
66
-
67
-
68
-
69
-
70
-
71
-
72
-
73
-
74
-
75
-
76
-
77
-
78
-
79
-
80
-
81
-
82
-
83
-
84
-
85
-
86
-
87
-
88
-
89
-
90
-
91
-
92
-
93
-
94
-
95
-
96
-
97
-
98
-
99
-
100
-
101
-
102
-
103
-
104
-
105
-
106
-
107
-
108
-
109
-
110
-
111
-
112
-
113
-
114
-
115
-
116
-
117
-
118
-
119
-
120
-
121
-
122
-
123
-
124
-
125
-
126
-
127
-
128
-
129
-
130
-
131
-
132
-
133
-
134
-
135
-
136
-
137
-
138
-
139
-
140
-
141
-
142
-
143
-
144
-
145
-
 146
146 -
 147
147 -
 148
148 -
 149
149 -
 150
150 -
 151
151 -
 152
152 -
 153
153 -
 154
154 -
 155
155 -
 156
156 -
157
-
158
-
159
-
160
-
161
-
162
-
163
-
164
-
165
-
166
-
167
-
168
-
169
-
170
-
171
-
172
-
173
-
174
-
175
-
176
-
177
-
178
-
179
-
180
-
181
-
182
-
183
-
184
-
185
-
186
-
187
-
188
-
189
-
190
-
191
-
192
-
193
-
194
-
195
-
196
-
197
-
198
-
199
-
200
-
201
-
202
-
203
-
204
-
205
-
206
-
207
-
208
-
209
-
210
-
211
-
212
-
213
-
214
-
215
-
216
-
217
-
218
-
219
-
220
-
221
-
222
-
223
-
224
 |
 |
