Epson Stylus Pro 7890 User's Guide - Page 50
Installing the Software for Windows, User Account Control screen, click
 |
View all Epson Stylus Pro 7890 manuals
Add to My Manuals
Save this manual to your list of manuals |
Page 50 highlights
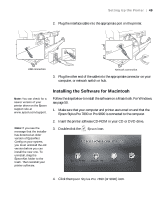
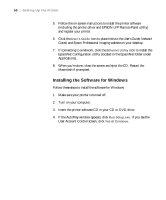
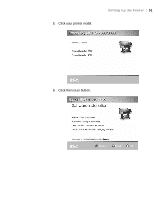
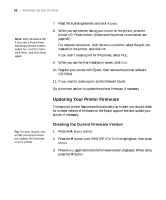
50 | Setting Up the Printer 5. Follow the on-screen instructions to install the printer software (including the printer driver and EPSON LFP Remote Panel utility) and register your printer. 6. Click the User's Guide icon to place links to the User's Guide, Network Guide, and Epson Professional Imaging website on your desktop. 7. If connecting to a network, click the Ethernet Utility icon to install the EpsonNet Configuration utility (located in the EpsonNet folder under Applications). 8. When you're done, close the screen and eject the CD. Restart the Macintosh if prompted. Installing the Software for Windows Follow these steps to install the software for Windows: 1. Make sure your printer is turned off. 2. Turn on your computer. 3. Insert the printer software CD in your CD or DVD drive. 4. If the AutoPlay window appears, click Run Setup.exe. If you see the User Account Control screen, click Yes or Continue. 50
-
 1
1 -
2
-
3
-
4
-
5
-
6
-
7
-
8
-
9
-
10
-
11
-
12
-
13
-
14
-
15
-
16
-
17
-
18
-
19
-
20
-
21
-
22
-
23
-
24
-
25
-
26
-
27
-
28
-
29
-
30
-
31
-
32
-
33
-
34
-
35
-
36
-
37
-
38
-
39
-
40
-
41
-
42
-
43
-
44
-
 45
45 -
 46
46 -
 47
47 -
 48
48 -
 49
49 -
 50
50 -
 51
51 -
 52
52 -
 53
53 -
 54
54 -
 55
55 -
56
-
57
-
58
-
59
-
60
-
61
-
62
-
63
-
64
-
65
-
66
-
67
-
68
-
69
-
70
-
71
-
72
-
73
-
74
-
75
-
76
-
77
-
78
-
79
-
80
-
81
-
82
-
83
-
84
-
85
-
86
-
87
-
88
-
89
-
90
-
91
-
92
-
93
-
94
-
95
-
96
-
97
-
98
-
99
-
100
-
101
-
102
-
103
-
104
-
105
-
106
-
107
-
108
-
109
-
110
-
111
-
112
-
113
-
114
-
115
-
116
-
117
-
118
-
119
-
120
-
121
-
122
-
123
-
124
-
125
-
126
-
127
-
128
-
129
-
130
-
131
-
132
-
133
-
134
-
135
-
136
-
137
-
138
-
139
-
140
-
141
-
142
-
143
-
144
-
145
-
146
-
147
-
148
-
149
-
150
-
151
-
152
-
153
-
154
-
155
-
156
-
157
-
158
-
159
-
160
-
161
-
162
-
163
-
164
-
165
-
166
-
167
-
168
-
169
-
170
-
171
-
172
-
173
-
174
-
175
-
176
-
177
-
178
-
179
-
180
-
181
-
182
-
183
-
184
-
185
-
186
-
187
-
188
-
189
-
190
-
191
-
192
-
193
-
194
-
195
-
196
-
197
-
198
-
199
-
200
-
201
-
202
-
203
-
204
-
205
-
206
-
207
-
208
-
209
-
210
-
211
-
212
-
213
-
214
-
215
-
216
-
217
-
218
-
219
-
220
-
221
-
222
-
223
-
224
 |
 |