Epson Stylus Pro 7890 User's Guide - Page 42
Completing Setup and Connecting the Power Cord, User's Guide - user manual
 |
View all Epson Stylus Pro 7890 manuals
Add to My Manuals
Save this manual to your list of manuals |
Page 42 highlights
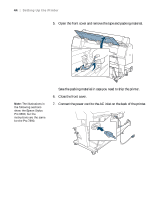
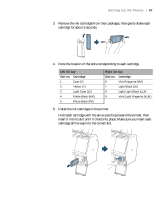
42 | Setting Up the Printer 17. Attach the paper guides to the bottom of the printer as shown: 18. Continue with the next section to complete the setup process and connect the power cord. Completing Setup and Connecting the Power Cord 1. Attach the manual holder to the left or right side of the stand. Store the User's Guide in the holder. 2. Unlock the casters. Then move the printer to the place of use. (The casters are meant for moving the printer for only a short distance.) Lock the casters after moving. 42
-
 1
1 -
2
-
3
-
4
-
5
-
6
-
7
-
8
-
9
-
10
-
11
-
12
-
13
-
14
-
15
-
16
-
17
-
18
-
19
-
20
-
21
-
22
-
23
-
24
-
25
-
26
-
27
-
28
-
29
-
30
-
31
-
32
-
33
-
34
-
35
-
36
-
 37
37 -
 38
38 -
 39
39 -
 40
40 -
 41
41 -
 42
42 -
 43
43 -
 44
44 -
 45
45 -
 46
46 -
 47
47 -
48
-
49
-
50
-
51
-
52
-
53
-
54
-
55
-
56
-
57
-
58
-
59
-
60
-
61
-
62
-
63
-
64
-
65
-
66
-
67
-
68
-
69
-
70
-
71
-
72
-
73
-
74
-
75
-
76
-
77
-
78
-
79
-
80
-
81
-
82
-
83
-
84
-
85
-
86
-
87
-
88
-
89
-
90
-
91
-
92
-
93
-
94
-
95
-
96
-
97
-
98
-
99
-
100
-
101
-
102
-
103
-
104
-
105
-
106
-
107
-
108
-
109
-
110
-
111
-
112
-
113
-
114
-
115
-
116
-
117
-
118
-
119
-
120
-
121
-
122
-
123
-
124
-
125
-
126
-
127
-
128
-
129
-
130
-
131
-
132
-
133
-
134
-
135
-
136
-
137
-
138
-
139
-
140
-
141
-
142
-
143
-
144
-
145
-
146
-
147
-
148
-
149
-
150
-
151
-
152
-
153
-
154
-
155
-
156
-
157
-
158
-
159
-
160
-
161
-
162
-
163
-
164
-
165
-
166
-
167
-
168
-
169
-
170
-
171
-
172
-
173
-
174
-
175
-
176
-
177
-
178
-
179
-
180
-
181
-
182
-
183
-
184
-
185
-
186
-
187
-
188
-
189
-
190
-
191
-
192
-
193
-
194
-
195
-
196
-
197
-
198
-
199
-
200
-
201
-
202
-
203
-
204
-
205
-
206
-
207
-
208
-
209
-
210
-
211
-
212
-
213
-
214
-
215
-
216
-
217
-
218
-
219
-
220
-
221
-
222
-
223
-
224
 |
 |

42
42
|
Setting Up the Printer
17.
Attach the paper guides to the bottom of the printer as shown:
18.
Continue with the next section to complete the setup process and
connect the power cord.
Completing Setup and Connecting the Power
Cord
1.
Attach the manual holder to the left or right side of the stand. Store the
User’s Guide
in the holder.
2.
Unlock the casters. Then move the printer to the place of use. (The
casters are meant for moving the printer for only a short distance.) Lock
the casters after moving.