Epson SureColor P7000 Commercial Edition User Manual - Page 116
Advanced Color Settings - OS X, Output Resolution Settings - OS X, Print Options - OS X
 |
View all Epson SureColor P7000 Commercial Edition manuals
Add to My Manuals
Save this manual to your list of manuals |
Page 116 highlights
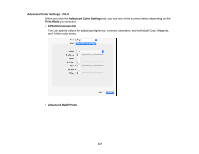
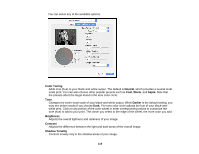
11. Select one of the following as the Print Mode setting: • Select EPSON Precision Dot for any type of photographic printing. • Select Advanced B&W Photo to print black-and-white photos on certain types of photo paper. See the list of Advanced B&W Photo options for details. If your paper type does not support this option, print black-and- white photos using the EPSON Precision Dot setting. • Select Grayscale when using plain paper. Note: Advanced B&W mode is not available for the SureColor P7000 and P9000 Commercial Edition printers (configured with the Violet ink). 12. Select one of the following as the Color Mode setting: • Business Graphics: Intensifies colors and lightens the midtones and highlights of an image. Click the Advanced Color Settings tab to use advanced color controls. • EPSON Standard (sRGB): Increases the contrast in images. Click the Advanced Color Settings tab to use advanced color controls. • Adobe RGB: Matches image colors to the Adobe RGB color standard. Use this setting if your source file was captured in Adobe RGB. Click the Advanced Color Settings tab to use advanced color controls. • Off (No Color Adjustment): Turns off color management in your printer software so you can manage color using only your application software. Note: If desired, you can instead use ColorSync to manage colors. In most cases, you get better results by applying color management in your application, rather than in the printer driver. 13. Select the Output Resolution setting you want to use. 14. Select any of the available print options. Advanced Color Settings - OS X Output Resolution Settings - OS X Print Options - OS X Parent topic: Printing with OS X Related tasks Selecting Roll Paper Settings - OS X 116
-
 1
1 -
2
-
3
-
4
-
5
-
6
-
7
-
8
-
9
-
10
-
11
-
12
-
13
-
14
-
15
-
16
-
17
-
18
-
19
-
20
-
21
-
22
-
23
-
24
-
25
-
26
-
27
-
28
-
29
-
30
-
31
-
32
-
33
-
34
-
35
-
36
-
37
-
38
-
39
-
40
-
41
-
42
-
43
-
44
-
45
-
46
-
47
-
48
-
49
-
50
-
51
-
52
-
53
-
54
-
55
-
56
-
57
-
58
-
59
-
60
-
61
-
62
-
63
-
64
-
65
-
66
-
67
-
68
-
69
-
70
-
71
-
72
-
73
-
74
-
75
-
76
-
77
-
78
-
79
-
80
-
81
-
82
-
83
-
84
-
85
-
86
-
87
-
88
-
89
-
90
-
91
-
92
-
93
-
94
-
95
-
96
-
97
-
98
-
99
-
100
-
101
-
102
-
103
-
104
-
105
-
106
-
107
-
108
-
109
-
110
-
 111
111 -
 112
112 -
 113
113 -
 114
114 -
 115
115 -
 116
116 -
 117
117 -
 118
118 -
 119
119 -
 120
120 -
 121
121 -
122
-
123
-
124
-
125
-
126
-
127
-
128
-
129
-
130
-
131
-
132
-
133
-
134
-
135
-
136
-
137
-
138
-
139
-
140
-
141
-
142
-
143
-
144
-
145
-
146
-
147
-
148
-
149
-
150
-
151
-
152
-
153
-
154
-
155
-
156
-
157
-
158
-
159
-
160
-
161
-
162
-
163
-
164
-
165
-
166
-
167
-
168
-
169
-
170
-
171
-
172
-
173
-
174
-
175
-
176
-
177
-
178
-
179
-
180
-
181
-
182
-
183
-
184
-
185
-
186
-
187
-
188
-
189
-
190
-
191
-
192
-
193
-
194
-
195
-
196
-
197
-
198
-
199
-
200
-
201
-
202
-
203
-
204
-
205
-
206
-
207
-
208
-
209
-
210
-
211
-
212
-
213
-
214
-
215
-
216
-
217
-
218
-
219
-
220
-
221
-
222
-
223
-
224
-
225
-
226
 |
 |
