Epson SureColor P7000 Commercial Edition User Manual - Page 164
Aligning the Print Head Automatically Using the Product Control Panel, Parent topic, Related concepts
 |
View all Epson SureColor P7000 Commercial Edition manuals
Add to My Manuals
Save this manual to your list of manuals |
Page 164 highlights
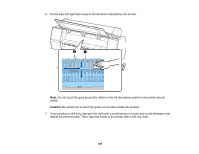
Parent topic: Adjusting Print Quality Related concepts Print Head Nozzle Check Print Head Cleaning Aligning the Print Head Automatically Using the Product Control Panel You can automatically align the print head using the control panel on your product. 1. Load roll paper or cut sheet paper in this size or larger: A4 (8.3 × 11.7 inches [210 × 297 mm]). 2. Make sure the correct paper type is selected. 3. Press the Menu button. 4. Press the up or down arrow button to select Maintenance and press the right arrow button. 5. Select Head Alignment and press the right arrow button. 6. Select Auto and press the right arrow button. 7. Press the up or down arrow button to select one of the following options: • Uni-D aligns each color for uni-directional printing based on Light Cyan. • Bi-D 2-color aligns each color for bi-directional printing based on Light Cyan and Vivid Light Magenta. • Bi-D All Color aligns each color for bi-directional printing based on all colors. • Bi-D #1, Bi-D #2, Bi-D #3, and Bi-D #4 perform the most detailed adjustments based on the size of the ink dots. Run all four adjustments in order from Bi-D #1 to Bi-D #4 to ensure that the printer is aligned properly for all driver settings and ink dot sizes. 8. Press the OK button. The alignment process starts. Note: Do not open the front cover or turn off the printer during the alignment process. When the automatic head alignment process is complete, your product should be properly aligned. If it is not, select a different alignment method and repeat the process. If your printer still is not properly aligned, perform a manual head alignment. Parent topic: Print Head Alignment Related references Maintenance Menu Settings 164
-
 1
1 -
2
-
3
-
4
-
5
-
6
-
7
-
8
-
9
-
10
-
11
-
12
-
13
-
14
-
15
-
16
-
17
-
18
-
19
-
20
-
21
-
22
-
23
-
24
-
25
-
26
-
27
-
28
-
29
-
30
-
31
-
32
-
33
-
34
-
35
-
36
-
37
-
38
-
39
-
40
-
41
-
42
-
43
-
44
-
45
-
46
-
47
-
48
-
49
-
50
-
51
-
52
-
53
-
54
-
55
-
56
-
57
-
58
-
59
-
60
-
61
-
62
-
63
-
64
-
65
-
66
-
67
-
68
-
69
-
70
-
71
-
72
-
73
-
74
-
75
-
76
-
77
-
78
-
79
-
80
-
81
-
82
-
83
-
84
-
85
-
86
-
87
-
88
-
89
-
90
-
91
-
92
-
93
-
94
-
95
-
96
-
97
-
98
-
99
-
100
-
101
-
102
-
103
-
104
-
105
-
106
-
107
-
108
-
109
-
110
-
111
-
112
-
113
-
114
-
115
-
116
-
117
-
118
-
119
-
120
-
121
-
122
-
123
-
124
-
125
-
126
-
127
-
128
-
129
-
130
-
131
-
132
-
133
-
134
-
135
-
136
-
137
-
138
-
139
-
140
-
141
-
142
-
143
-
144
-
145
-
146
-
147
-
148
-
149
-
150
-
151
-
152
-
153
-
154
-
155
-
156
-
157
-
158
-
 159
159 -
 160
160 -
 161
161 -
 162
162 -
 163
163 -
 164
164 -
 165
165 -
 166
166 -
 167
167 -
 168
168 -
 169
169 -
170
-
171
-
172
-
173
-
174
-
175
-
176
-
177
-
178
-
179
-
180
-
181
-
182
-
183
-
184
-
185
-
186
-
187
-
188
-
189
-
190
-
191
-
192
-
193
-
194
-
195
-
196
-
197
-
198
-
199
-
200
-
201
-
202
-
203
-
204
-
205
-
206
-
207
-
208
-
209
-
210
-
211
-
212
-
213
-
214
-
215
-
216
-
217
-
218
-
219
-
220
-
221
-
222
-
223
-
224
-
225
-
226
 |
 |
