Epson SureColor P7000 Commercial Edition User Manual - Page 58
Selecting Custom Paper Configurations, Using the Auto Take-up Reel
 |
View all Epson SureColor P7000 Commercial Edition manuals
Add to My Manuals
Save this manual to your list of manuals |
Page 58 highlights
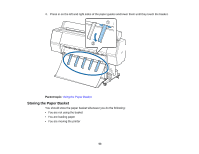
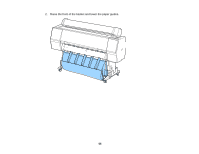
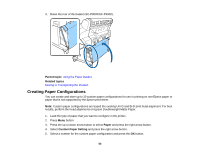
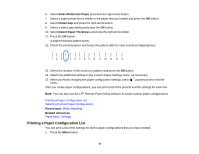
2. Press the down arrow button to select Paper and press the right arrow button. 3. Select Print Paper List and press the right arrow button. 4. Press the OK button to print the list of your paper configurations. Parent topic: Creating Paper Configurations Related references Paper Menu Settings Selecting Custom Paper Configurations Once you have created a paper configuration, you can select the configuration whenever you print on the associated media. 1. Press the Menu button. 2. Press the up or down arrow button to select Paper and press the right arrow button. 3. Select Paper Type and press the right arrow button. 4. Select Custom Paper and press the right arrow button. 5. Select the paper configuration you want to use and press the OK button. 6. Press the pause/cancel button to exit the menu. The custom paper configuration you selected is displayed on the LCD screen. Parent topic: Creating Paper Configurations Related references Paper Menu Settings Using the Auto Take-up Reel See these sections to use the auto take-up reel with your product. About the Optional Auto Take-up Reel Take Up with the Printable Side In Take Up with the Printable Side Out Removing Media from the Optional Auto Take-up Reel Parent topic: Media Handling About the Optional Auto Take-up Reel The optional auto take-up reel automatically rolls up printed media as you print. 58
-
 1
1 -
2
-
3
-
4
-
5
-
6
-
7
-
8
-
9
-
10
-
11
-
12
-
13
-
14
-
15
-
16
-
17
-
18
-
19
-
20
-
21
-
22
-
23
-
24
-
25
-
26
-
27
-
28
-
29
-
30
-
31
-
32
-
33
-
34
-
35
-
36
-
37
-
38
-
39
-
40
-
41
-
42
-
43
-
44
-
45
-
46
-
47
-
48
-
49
-
50
-
51
-
52
-
 53
53 -
 54
54 -
 55
55 -
 56
56 -
 57
57 -
 58
58 -
 59
59 -
 60
60 -
 61
61 -
 62
62 -
 63
63 -
64
-
65
-
66
-
67
-
68
-
69
-
70
-
71
-
72
-
73
-
74
-
75
-
76
-
77
-
78
-
79
-
80
-
81
-
82
-
83
-
84
-
85
-
86
-
87
-
88
-
89
-
90
-
91
-
92
-
93
-
94
-
95
-
96
-
97
-
98
-
99
-
100
-
101
-
102
-
103
-
104
-
105
-
106
-
107
-
108
-
109
-
110
-
111
-
112
-
113
-
114
-
115
-
116
-
117
-
118
-
119
-
120
-
121
-
122
-
123
-
124
-
125
-
126
-
127
-
128
-
129
-
130
-
131
-
132
-
133
-
134
-
135
-
136
-
137
-
138
-
139
-
140
-
141
-
142
-
143
-
144
-
145
-
146
-
147
-
148
-
149
-
150
-
151
-
152
-
153
-
154
-
155
-
156
-
157
-
158
-
159
-
160
-
161
-
162
-
163
-
164
-
165
-
166
-
167
-
168
-
169
-
170
-
171
-
172
-
173
-
174
-
175
-
176
-
177
-
178
-
179
-
180
-
181
-
182
-
183
-
184
-
185
-
186
-
187
-
188
-
189
-
190
-
191
-
192
-
193
-
194
-
195
-
196
-
197
-
198
-
199
-
200
-
201
-
202
-
203
-
204
-
205
-
206
-
207
-
208
-
209
-
210
-
211
-
212
-
213
-
214
-
215
-
216
-
217
-
218
-
219
-
220
-
221
-
222
-
223
-
224
-
225
-
226
 |
 |