Epson SureColor P7000 Commercial Edition User Manual - Page 40
Adjusting the Platen Gap, Parent topic, Related references, Related tasks, Wider, Printer Setup
 |
View all Epson SureColor P7000 Commercial Edition manuals
Add to My Manuals
Save this manual to your list of manuals |
Page 40 highlights
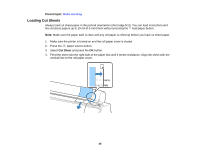
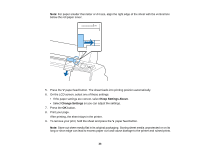
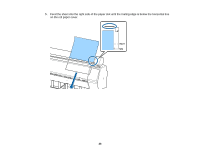
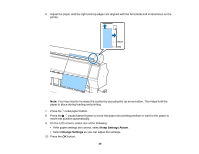
11. Print your page. After printing, the sheet stays in the printer. 12. To remove your print, hold the sheet and press the paper feed button. Note: Store cut sheet media flat in its original packaging. Storing sheet media unprotected or on its long or short edge can lead to excess paper curl and cause damage to the printer and ruined prints. Parent topic: Cut Sheet Handling Related references Available Epson Papers Paper Specifications Related tasks Storing the Paper Basket Adjusting the Platen Gap If the print quality is not satisfactory when printing on very thin or very thick media, you may need to adjust the Platen Gap setting. Note: If you notice scuffs on the first few inches of your prints, this is caused by paper curl and print head strikes. Make sure your paper is flat. You can also try changing the Platen Gap setting to Wide. If that doesn't solve the problem, try changing it to Wider. 1. Press the Menu button. 2. Press the down arrow button to select Printer Setup and press the right arrow button. 3. Press the right arrow button to select Platen Gap. 4. Press the up or down arrow to select a platen gap setting and press the OK button. Note: To avoid damaging the printer, do not select the Narrow setting when loading thick media. A check mark appears next to the selected setting. 5. Press the pause/cancel button to exit the menu. The platen gap symbol on the LCD screen changes to match the new setting. Parent topic: Cut Sheet Handling 40
-
 1
1 -
2
-
3
-
4
-
5
-
6
-
7
-
8
-
9
-
10
-
11
-
12
-
13
-
14
-
15
-
16
-
17
-
18
-
19
-
20
-
21
-
22
-
23
-
24
-
25
-
26
-
27
-
28
-
29
-
30
-
31
-
32
-
33
-
34
-
 35
35 -
 36
36 -
 37
37 -
 38
38 -
 39
39 -
 40
40 -
 41
41 -
 42
42 -
 43
43 -
 44
44 -
 45
45 -
46
-
47
-
48
-
49
-
50
-
51
-
52
-
53
-
54
-
55
-
56
-
57
-
58
-
59
-
60
-
61
-
62
-
63
-
64
-
65
-
66
-
67
-
68
-
69
-
70
-
71
-
72
-
73
-
74
-
75
-
76
-
77
-
78
-
79
-
80
-
81
-
82
-
83
-
84
-
85
-
86
-
87
-
88
-
89
-
90
-
91
-
92
-
93
-
94
-
95
-
96
-
97
-
98
-
99
-
100
-
101
-
102
-
103
-
104
-
105
-
106
-
107
-
108
-
109
-
110
-
111
-
112
-
113
-
114
-
115
-
116
-
117
-
118
-
119
-
120
-
121
-
122
-
123
-
124
-
125
-
126
-
127
-
128
-
129
-
130
-
131
-
132
-
133
-
134
-
135
-
136
-
137
-
138
-
139
-
140
-
141
-
142
-
143
-
144
-
145
-
146
-
147
-
148
-
149
-
150
-
151
-
152
-
153
-
154
-
155
-
156
-
157
-
158
-
159
-
160
-
161
-
162
-
163
-
164
-
165
-
166
-
167
-
168
-
169
-
170
-
171
-
172
-
173
-
174
-
175
-
176
-
177
-
178
-
179
-
180
-
181
-
182
-
183
-
184
-
185
-
186
-
187
-
188
-
189
-
190
-
191
-
192
-
193
-
194
-
195
-
196
-
197
-
198
-
199
-
200
-
201
-
202
-
203
-
204
-
205
-
206
-
207
-
208
-
209
-
210
-
211
-
212
-
213
-
214
-
215
-
216
-
217
-
218
-
219
-
220
-
221
-
222
-
223
-
224
-
225
-
226
 |
 |
