HTC S710 User Manual - Page 87
Set up a POP3/IMAP4 e-mail account - review
 |
View all HTC S710 manuals
Add to My Manuals
Save this manual to your list of manuals |
Page 87 highlights
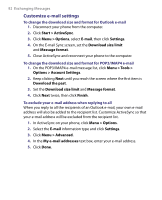
Exchanging Messages 87 Set up a POP3/IMAP4 e-mail account You can easily set up an e-mail account that you have with an Internet service provider (ISP), a web-based e-mail or an account that you access using a VPN server connection (typically a work account) on your phone. 1. On the Home screen, click Start > Messaging > New E-mail Account. 2. In Email address, enter your e-mail address. Select Try to get e-mail settings automatically from the Internet and click Next. Note By selecting the option, the phone attempts to download necessary e-mail server settings so that you do not need to enter them manually. 3. After Auto Setup finishes, click Next. Note If Auto Setup is unsuccessful, contact your ISP or network administrator for the settings: 4. Enter Your name and the Account display name you want to use and then click Next. 5. Enter the User name and Password for the e-mail account and then click Next. 6. Select the frequency you want to send and receive e-mail for your e-mail account and click Finish. Note Click Review all download settings to check the options you have selected for your e-mail account. 7. A message then appears, prompting whether or not you want to download the e-mail messages to your phone. Click Yes or No according to your preference. Note This message will only appear if you have an active Internet connection.
-
 1
1 -
2
-
3
-
4
-
5
-
6
-
7
-
8
-
9
-
10
-
11
-
12
-
13
-
14
-
15
-
16
-
17
-
18
-
19
-
20
-
21
-
22
-
23
-
24
-
25
-
26
-
27
-
28
-
29
-
30
-
31
-
32
-
33
-
34
-
35
-
36
-
37
-
38
-
39
-
40
-
41
-
42
-
43
-
44
-
45
-
46
-
47
-
48
-
49
-
50
-
51
-
52
-
53
-
54
-
55
-
56
-
57
-
58
-
59
-
60
-
61
-
62
-
63
-
64
-
65
-
66
-
67
-
68
-
69
-
70
-
71
-
72
-
73
-
74
-
75
-
76
-
77
-
78
-
79
-
80
-
81
-
 82
82 -
 83
83 -
 84
84 -
 85
85 -
 86
86 -
 87
87 -
 88
88 -
 89
89 -
 90
90 -
 91
91 -
 92
92 -
93
-
94
-
95
-
96
-
97
-
98
-
99
-
100
-
101
-
102
-
103
-
104
-
105
-
106
-
107
-
108
-
109
-
110
-
111
-
112
-
113
-
114
-
115
-
116
-
117
-
118
-
119
-
120
-
121
-
122
-
123
-
124
-
125
-
126
-
127
-
128
-
129
-
130
-
131
-
132
-
133
-
134
-
135
-
136
-
137
-
138
-
139
-
140
-
141
-
142
-
143
-
144
-
145
-
146
-
147
-
148
-
149
-
150
-
151
-
152
-
153
-
154
-
155
-
156
-
157
-
158
-
159
-
160
-
161
-
162
-
163
-
164
-
165
-
166
-
167
-
168
-
169
-
170
-
171
-
172
 |
 |