HTC S710 User Manual - Page 94
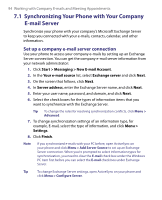
Synchronizing Your Phone with Your Company, E-mail Server
 |
View all HTC S710 manuals
Add to My Manuals
Save this manual to your list of manuals |
Page 94 highlights
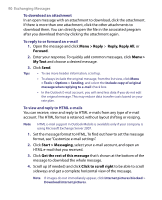
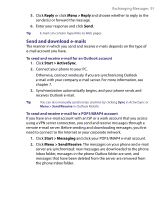
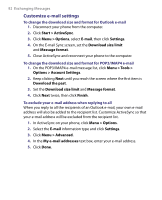
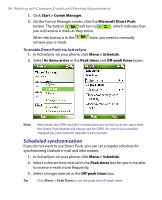
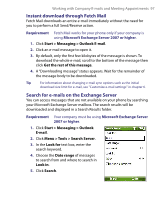
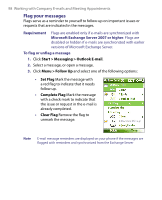
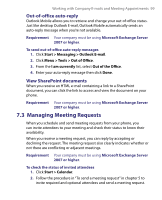
94 Working with Company E-mails and Meeting Appointments 7.1 Synchronizing Your Phone with Your Company E-mail Server Synchronize your phone with your company's Microsoft Exchange Server to keep you connected with your e-mails, contacts, calendar, and other information. Set up a company e-mail server connection Use your phone to access your company e-mails by setting up an Exchange Server connection. You can get the company e-mail server information from your network administrator: 1. Click Start > Messaging > New E-mail Account. 2. In the Your e-mail source list, select Exchange server and click Next. 3. On the screen that follows, click Next. 4. In Server address, enter the Exchange Server name, and click Next. 5. Enter your user name, password, and domain, and click Next. 6. Select the check boxes for the types of information items that you want to synchronize with the Exchange Server. Tip To change the rules for resolving synchronization conflicts, click Menu > Advanced. 7. To change synchronization settings of an information type, for example, E-mail, select the type of information, and click Menu > Settings. 8. Click Finish. Note If you synchronized e-mails with your PC before, open ActiveSync on your phone and click Menu > Add Server Source to set up an Exchange Server connection. When you're prompted to select information types for synchronization, you need to clear the E-mail check box under the Windows PC item first before you can select the E-mail check box under Exchange Server. Tip To change Exchange Server settings, open ActiveSync on your phone and click Menu > Configure Server.
-
 1
1 -
2
-
3
-
4
-
5
-
6
-
7
-
8
-
9
-
10
-
11
-
12
-
13
-
14
-
15
-
16
-
17
-
18
-
19
-
20
-
21
-
22
-
23
-
24
-
25
-
26
-
27
-
28
-
29
-
30
-
31
-
32
-
33
-
34
-
35
-
36
-
37
-
38
-
39
-
40
-
41
-
42
-
43
-
44
-
45
-
46
-
47
-
48
-
49
-
50
-
51
-
52
-
53
-
54
-
55
-
56
-
57
-
58
-
59
-
60
-
61
-
62
-
63
-
64
-
65
-
66
-
67
-
68
-
69
-
70
-
71
-
72
-
73
-
74
-
75
-
76
-
77
-
78
-
79
-
80
-
81
-
82
-
83
-
84
-
85
-
86
-
87
-
88
-
 89
89 -
 90
90 -
 91
91 -
 92
92 -
 93
93 -
 94
94 -
 95
95 -
 96
96 -
 97
97 -
 98
98 -
 99
99 -
100
-
101
-
102
-
103
-
104
-
105
-
106
-
107
-
108
-
109
-
110
-
111
-
112
-
113
-
114
-
115
-
116
-
117
-
118
-
119
-
120
-
121
-
122
-
123
-
124
-
125
-
126
-
127
-
128
-
129
-
130
-
131
-
132
-
133
-
134
-
135
-
136
-
137
-
138
-
139
-
140
-
141
-
142
-
143
-
144
-
145
-
146
-
147
-
148
-
149
-
150
-
151
-
152
-
153
-
154
-
155
-
156
-
157
-
158
-
159
-
160
-
161
-
162
-
163
-
164
-
165
-
166
-
167
-
168
-
169
-
170
-
171
-
172
 |
 |
