HP 2300n HP Business Inkjet 2300 - User Guide - Page 30
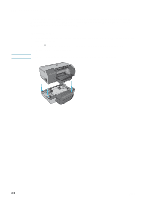
If your printer does not have a side cover, On an empty DIMM slot - tray 2 empty
 |
View all HP 2300n manuals
Add to My Manuals
Save this manual to your list of manuals |
Page 30 highlights
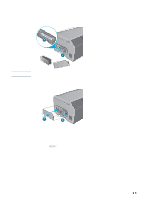
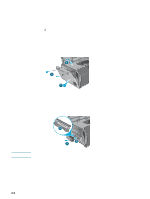
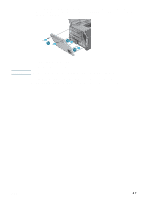
If your printer does not have a side cover If your printer does not have a side cover on its left panel, follow these instructions to install the DIMM. 1 If you have not already done so, print a Configuration page to find out how much memory is installed in the printer before adding more memory. See "Printing a Configuration page." 2 Press (power button) to turn off the printer. 3 Unplug the power cord and disconnect any cables. 4 Lift the printer off Tray 2. 5 Open the top cover. 6 Use a Phillips screwdriver to remove the screws at the top of the side access panel. 7 Grasp the top of the panel and remove it from the printer. 5 6 7 8 Remove the DIMM cover. 9 On an empty DIMM slot, push the DIMM locks outward to release the locks. 10 Remove the DIMM from the antistatic package. Align the DIMM so that the notches on the lower edge line up with the raised marks in the DIMM slot. 11 Insert and press the DIMM into the slot until it snaps into place. Note 11 10 8 To remove a DIMM, release the locks on the DIMM slot by pushing them outward. 12 Replace the DIMM cover. 2-6 ENWW
-
 1
1 -
2
-
3
-
4
-
5
-
6
-
7
-
8
-
9
-
10
-
11
-
12
-
13
-
14
-
15
-
16
-
17
-
18
-
19
-
20
-
21
-
22
-
23
-
24
-
 25
25 -
 26
26 -
 27
27 -
 28
28 -
 29
29 -
 30
30 -
 31
31 -
 32
32 -
 33
33 -
 34
34 -
 35
35 -
36
-
37
-
38
-
39
-
40
-
41
-
42
-
43
-
44
-
45
-
46
-
47
-
48
-
49
-
50
-
51
-
52
-
53
-
54
-
55
-
56
-
57
-
58
-
59
-
60
-
61
-
62
-
63
-
64
-
65
-
66
-
67
-
68
-
69
-
70
-
71
-
72
-
73
-
74
-
75
-
76
-
77
-
78
-
79
-
80
-
81
-
82
-
83
-
84
-
85
-
86
-
87
-
88
-
89
-
90
-
91
-
92
-
93
-
94
-
95
-
96
-
97
-
98
-
99
-
100
-
101
-
102
-
103
-
104
-
105
-
106
-
107
-
108
-
109
-
110
-
111
-
112
-
113
-
114
-
115
-
116
-
117
-
118
-
119
-
120
-
121
-
122
-
123
-
124
-
125
-
126
-
127
-
128
-
129
-
130
-
131
-
132
 |
 |
