HP 2300n HP Business Inkjet 2300 - User Guide - Page 60
Cleaning the printhead contacts
 |
View all HP 2300n manuals
Add to My Manuals
Save this manual to your list of manuals |
Page 60 highlights
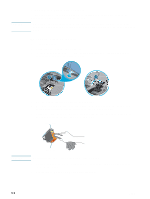
CAUTION Cleaning the printhead contacts If lines or dots are still missing from printed text or graphics after you have cleaned the printheads, the printhead contacts might be dirty. HP recommends that you clean the printhead contacts only after you have cleaned the printheads. Printhead contacts contain sensitive electronic components that can be damaged easily. To clean the printhead contacts 1 Turn the printer on. 2 Lift the top cover and the ink cartridge cover. 3 To open the printhead latch, lift it from the rear, and then pull it forward and down to release the hooks from the metal catch bar. 3 4 4 Pull the latch up and back to uncover the printheads. 5 To remove a printhead, place your index finger in the loop of printhead's handle, and gently pull up until the printhead releases from the carriage assembly. 6 Using a soft, dry, lint-free cloth, carefully remove any ink from the contact pads on the printhead and inside the printhead slot in the printer. contact pads CAUTION ink nozzles Do not clean the ink nozzles on the bottom of the printhead. 7 Reinsert the printhead into its color-coded slot. Press down firmly on the printhead to ensure proper contact. 8 Repeat steps 5 through 7 for the remaining printheads. 5-2 ENWW
-
 1
1 -
2
-
3
-
4
-
5
-
6
-
7
-
8
-
9
-
10
-
11
-
12
-
13
-
14
-
15
-
16
-
17
-
18
-
19
-
20
-
21
-
22
-
23
-
24
-
25
-
26
-
27
-
28
-
29
-
30
-
31
-
32
-
33
-
34
-
35
-
36
-
37
-
38
-
39
-
40
-
41
-
42
-
43
-
44
-
45
-
46
-
47
-
48
-
49
-
50
-
51
-
52
-
53
-
54
-
 55
55 -
 56
56 -
 57
57 -
 58
58 -
 59
59 -
 60
60 -
 61
61 -
 62
62 -
 63
63 -
 64
64 -
 65
65 -
66
-
67
-
68
-
69
-
70
-
71
-
72
-
73
-
74
-
75
-
76
-
77
-
78
-
79
-
80
-
81
-
82
-
83
-
84
-
85
-
86
-
87
-
88
-
89
-
90
-
91
-
92
-
93
-
94
-
95
-
96
-
97
-
98
-
99
-
100
-
101
-
102
-
103
-
104
-
105
-
106
-
107
-
108
-
109
-
110
-
111
-
112
-
113
-
114
-
115
-
116
-
117
-
118
-
119
-
120
-
121
-
122
-
123
-
124
-
125
-
126
-
127
-
128
-
129
-
130
-
131
-
132
 |
 |
