HP 2300n HP Business Inkjet 2300 - User Guide - Page 31
Be careful to keep your fingers and hands clear of the bottom of the printer.
 |
View all HP 2300n manuals
Add to My Manuals
Save this manual to your list of manuals |
Page 31 highlights
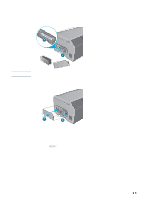
13 Insert the hooks at the bottom of the side access panel into the corresponding slots on the printer, and then close the side access panel. You might have to apply some force to close the panel completely. 12 14 13 WARNING! 14 Replace and tighten the screws. 15 Set the printer on top of Tray 2. Be careful to keep your fingers and hands clear of the bottom of the printer. 16 Reattach the power cord and any cables, and then turn on the printer. 17 Check that the DIMM is installed correctly. See "Checking memory installation." ENWW 2-7
-
 1
1 -
2
-
3
-
4
-
5
-
6
-
7
-
8
-
9
-
10
-
11
-
12
-
13
-
14
-
15
-
16
-
17
-
18
-
19
-
20
-
21
-
22
-
23
-
24
-
25
-
 26
26 -
 27
27 -
 28
28 -
 29
29 -
 30
30 -
 31
31 -
 32
32 -
 33
33 -
 34
34 -
 35
35 -
 36
36 -
37
-
38
-
39
-
40
-
41
-
42
-
43
-
44
-
45
-
46
-
47
-
48
-
49
-
50
-
51
-
52
-
53
-
54
-
55
-
56
-
57
-
58
-
59
-
60
-
61
-
62
-
63
-
64
-
65
-
66
-
67
-
68
-
69
-
70
-
71
-
72
-
73
-
74
-
75
-
76
-
77
-
78
-
79
-
80
-
81
-
82
-
83
-
84
-
85
-
86
-
87
-
88
-
89
-
90
-
91
-
92
-
93
-
94
-
95
-
96
-
97
-
98
-
99
-
100
-
101
-
102
-
103
-
104
-
105
-
106
-
107
-
108
-
109
-
110
-
111
-
112
-
113
-
114
-
115
-
116
-
117
-
118
-
119
-
120
-
121
-
122
-
123
-
124
-
125
-
126
-
127
-
128
-
129
-
130
-
131
-
132
 |
 |

ENWW
2
-
7
13
Insert the hooks at the bottom of the side access panel into the corresponding slots on the
printer, and then close the side access panel. You might have to apply some force to close
the panel completely.
14
Replace and tighten the screws.
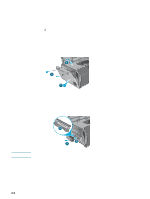
15
Set the printer on top of Tray 2.
WARNING!
Be careful to keep your fingers and hands clear of the bottom of the printer.
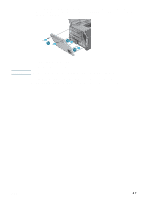
16
Reattach the power cord and any cables, and then turn on the printer.
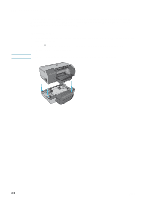
17
Check that the DIMM is installed correctly. See “
Checking memory installation
.”
12
13
14