HP 2300n HP Business Inkjet 2300 - User Guide - Page 62
Replacing printheads
 |
View all HP 2300n manuals
Add to My Manuals
Save this manual to your list of manuals |
Page 62 highlights
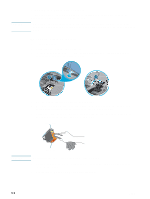
Replacing printheads Replace printheads when the following messages appear on the control panel: REPLACE [COLOR] PRINTHEAD INCOMPATIBLE [COLOR] PRINTHEAD To replace printheads 1 Turn the printer on. 2 Lift the top cover and the ink cartridge cover. 3 To open the printhead latch, lift it from the rear, and then pull it forward and down to release the hooks from the metal catch bar. 3 4 4 Pull the latch up and back to uncover the printheads. 5 To remove a printhead, place your index finger in the loop of the printhead's handle, and gently pull up until the printhead releases from the carriage assembly. Discard the used printhead. 6 Remove the new printhead from its package. 7 Remove the protective tape from the printhead. 8 Insert the new printhead into its color-coded slot. 9 Press down firmly on the printhead to ensure proper contact after installation. 10 Pull the latch all the way forward and down, and engage the metal catch bar with the hooks. Push the latch toward the back of the printer. You might have to apply some pressure to close the latch. 11 Close the top cover and the ink cartridge cover. 12 Wait while the printer aligns the printheads. This can take a few minutes. When the process is complete, an alignment page prints. 5-4 ENWW
-
 1
1 -
2
-
3
-
4
-
5
-
6
-
7
-
8
-
9
-
10
-
11
-
12
-
13
-
14
-
15
-
16
-
17
-
18
-
19
-
20
-
21
-
22
-
23
-
24
-
25
-
26
-
27
-
28
-
29
-
30
-
31
-
32
-
33
-
34
-
35
-
36
-
37
-
38
-
39
-
40
-
41
-
42
-
43
-
44
-
45
-
46
-
47
-
48
-
49
-
50
-
51
-
52
-
53
-
54
-
55
-
56
-
 57
57 -
 58
58 -
 59
59 -
 60
60 -
 61
61 -
 62
62 -
 63
63 -
 64
64 -
 65
65 -
 66
66 -
 67
67 -
68
-
69
-
70
-
71
-
72
-
73
-
74
-
75
-
76
-
77
-
78
-
79
-
80
-
81
-
82
-
83
-
84
-
85
-
86
-
87
-
88
-
89
-
90
-
91
-
92
-
93
-
94
-
95
-
96
-
97
-
98
-
99
-
100
-
101
-
102
-
103
-
104
-
105
-
106
-
107
-
108
-
109
-
110
-
111
-
112
-
113
-
114
-
115
-
116
-
117
-
118
-
119
-
120
-
121
-
122
-
123
-
124
-
125
-
126
-
127
-
128
-
129
-
130
-
131
-
132
 |
 |
