HP 4650n HP Color LaserJet 4650 series printer - User Guide - Page 101
Printing from Tray 2, Tray 3, and Tray 4, Loading detectable standard-sized media into Tray 2
 |
UPC - 829160046532
View all HP 4650n manuals
Add to My Manuals
Save this manual to your list of manuals |
Page 101 highlights
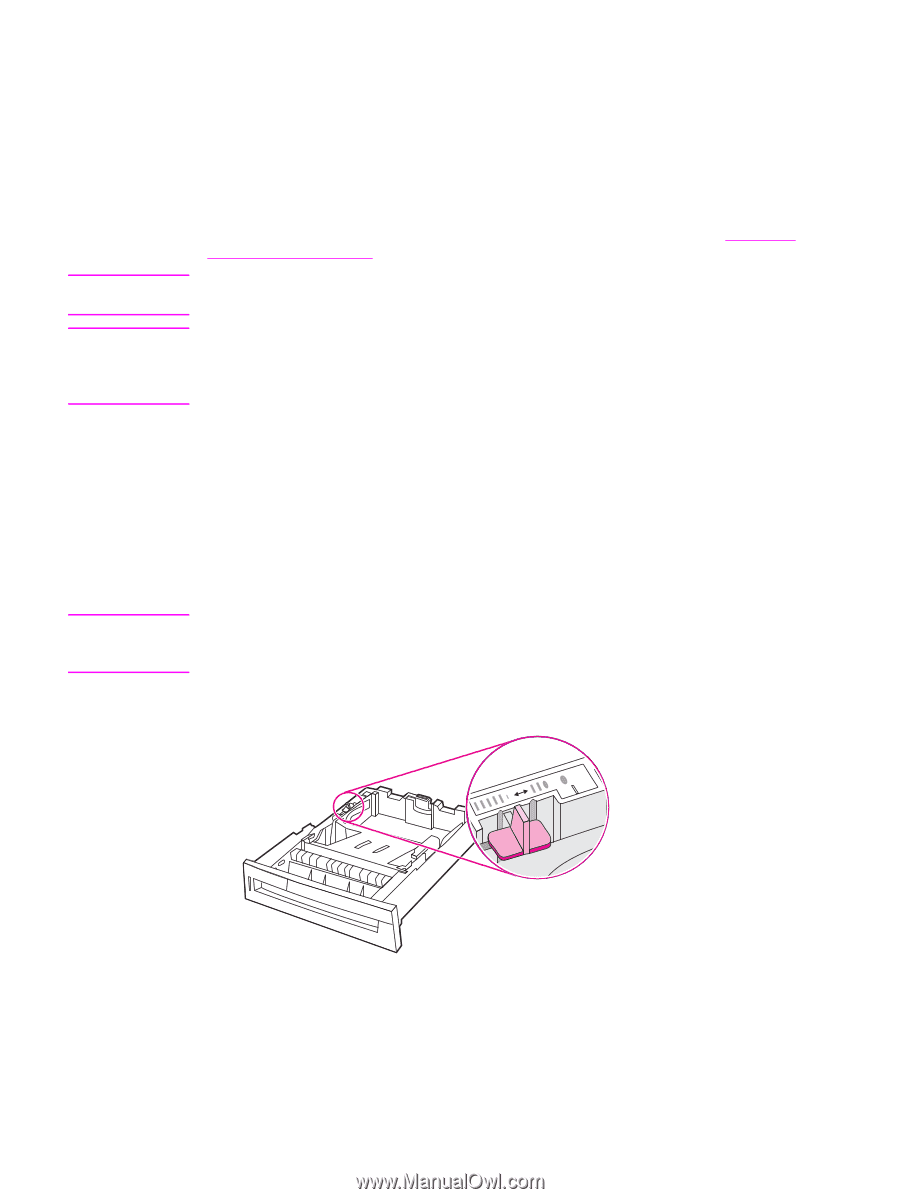
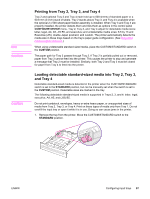
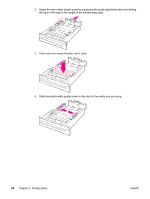
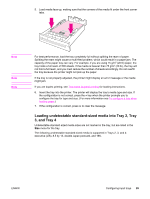
Note CAUTION CAUTION Printing from Tray 2, Tray 3, and Tray 4 Tray 2 and optional Tray 3 and Tray 4 each hold up to 500 sheets of standard paper or a 50.8 mm (2-inch) stack of labels. Tray 2 stacks above Tray 3, and Tray 4 is available when the optional 2 x 500-sheet paper feeder assembly is installed. When Tray 3 and Tray 4 are properly installed, the printer detects them and lists them as options in the control panel CONFIGURE DEVICE menu. Tray 2, Tray 3, and Tray 4 adjust for detectable media sizes; letter, legal, A4, A5, JIS B5, and executive; and undetectable media sizes: 8.5 by 13 and Executive (JIS), double Japan postcard, and custom. The printer automatically detects the media size in these trays based on the tray's paper guide configuration. (See Supported media weights and sizes.) When using undetectable standard-sized media, place the CUSTOM/STANDARD switch in the CUSTOM position. The paper path for Tray 3 passes through Tray 2. If Tray 2 is partially pulled out or removed, paper from Tray 3 cannot feed into the printer. This causes the printer to stop and generate a message that Tray 2 must be installed. Similarly, both Tray 2 and Tray 3 must be closed for paper from Tray 4 to feed into the printer. Loading detectable standard-sized media into Tray 2, Tray 3, and Tray 4 Detectable standard-sized media is detected in the printer when the CUSTOM/STANDARD switch is set to the STANDARD position, but can be manually set when the switch is set to the CUSTOM position. Detectable sizes are marked in the tray. The following detectable standard-sized media is supported in Trays 2, 3, and 4: letter, legal, executive, A4, A5, and (JIS) B5. Do not print cardstock, envelopes, heavy or extra heavy paper, or unsupported sizes of media from Tray 2, Tray 3, or Tray 4. Print on these types of media only from Tray 1. Do not overfill the input tray or open it while it is in use. Doing so can cause jams in the printer. 1. Remove the tray from the printer. Move the CUSTOM/STANDARD switch to the STANDARD position. ENWW Configuring input trays 87
-
 1
1 -
2
-
3
-
4
-
5
-
6
-
7
-
8
-
9
-
10
-
11
-
12
-
13
-
14
-
15
-
16
-
17
-
18
-
19
-
20
-
21
-
22
-
23
-
24
-
25
-
26
-
27
-
28
-
29
-
30
-
31
-
32
-
33
-
34
-
35
-
36
-
37
-
38
-
39
-
40
-
41
-
42
-
43
-
44
-
45
-
46
-
47
-
48
-
49
-
50
-
51
-
52
-
53
-
54
-
55
-
56
-
57
-
58
-
59
-
60
-
61
-
62
-
63
-
64
-
65
-
66
-
67
-
68
-
69
-
70
-
71
-
72
-
73
-
74
-
75
-
76
-
77
-
78
-
79
-
80
-
81
-
82
-
83
-
84
-
85
-
86
-
87
-
88
-
89
-
90
-
91
-
92
-
93
-
94
-
95
-
 96
96 -
 97
97 -
 98
98 -
 99
99 -
 100
100 -
 101
101 -
 102
102 -
 103
103 -
 104
104 -
 105
105 -
 106
106 -
107
-
108
-
109
-
110
-
111
-
112
-
113
-
114
-
115
-
116
-
117
-
118
-
119
-
120
-
121
-
122
-
123
-
124
-
125
-
126
-
127
-
128
-
129
-
130
-
131
-
132
-
133
-
134
-
135
-
136
-
137
-
138
-
139
-
140
-
141
-
142
-
143
-
144
-
145
-
146
-
147
-
148
-
149
-
150
-
151
-
152
-
153
-
154
-
155
-
156
-
157
-
158
-
159
-
160
-
161
-
162
-
163
-
164
-
165
-
166
-
167
-
168
-
169
-
170
-
171
-
172
-
173
-
174
-
175
-
176
-
177
-
178
-
179
-
180
-
181
-
182
-
183
-
184
-
185
-
186
-
187
-
188
-
189
-
190
-
191
-
192
-
193
-
194
-
195
-
196
-
197
-
198
-
199
-
200
-
201
-
202
-
203
-
204
-
205
-
206
-
207
-
208
-
209
-
210
-
211
-
212
-
213
-
214
-
215
-
216
-
217
-
218
-
219
-
220
-
221
-
222
-
223
-
224
-
225
-
226
-
227
-
228
-
229
-
230
-
231
-
232
-
233
-
234
-
235
-
236
-
237
-
238
-
239
-
240
-
241
-
242
-
243
-
244
-
245
-
246
-
247
-
248
-
249
-
250
-
251
-
252
-
253
-
254
-
255
-
256
-
257
-
258
-
259
-
260
-
261
-
262
-
263
-
264
-
265
-
266
-
267
-
268
-
269
-
270
-
271
-
272
-
273
-
274
-
275
-
276
 |
 |