HP 4650n HP Color LaserJet 4650 series printer - User Guide - Page 187
Resetting Kit Count, CON DEVICE
 |
UPC - 829160046532
View all HP 4650n manuals
Add to My Manuals
Save this manual to your list of manuals |
Page 187 highlights
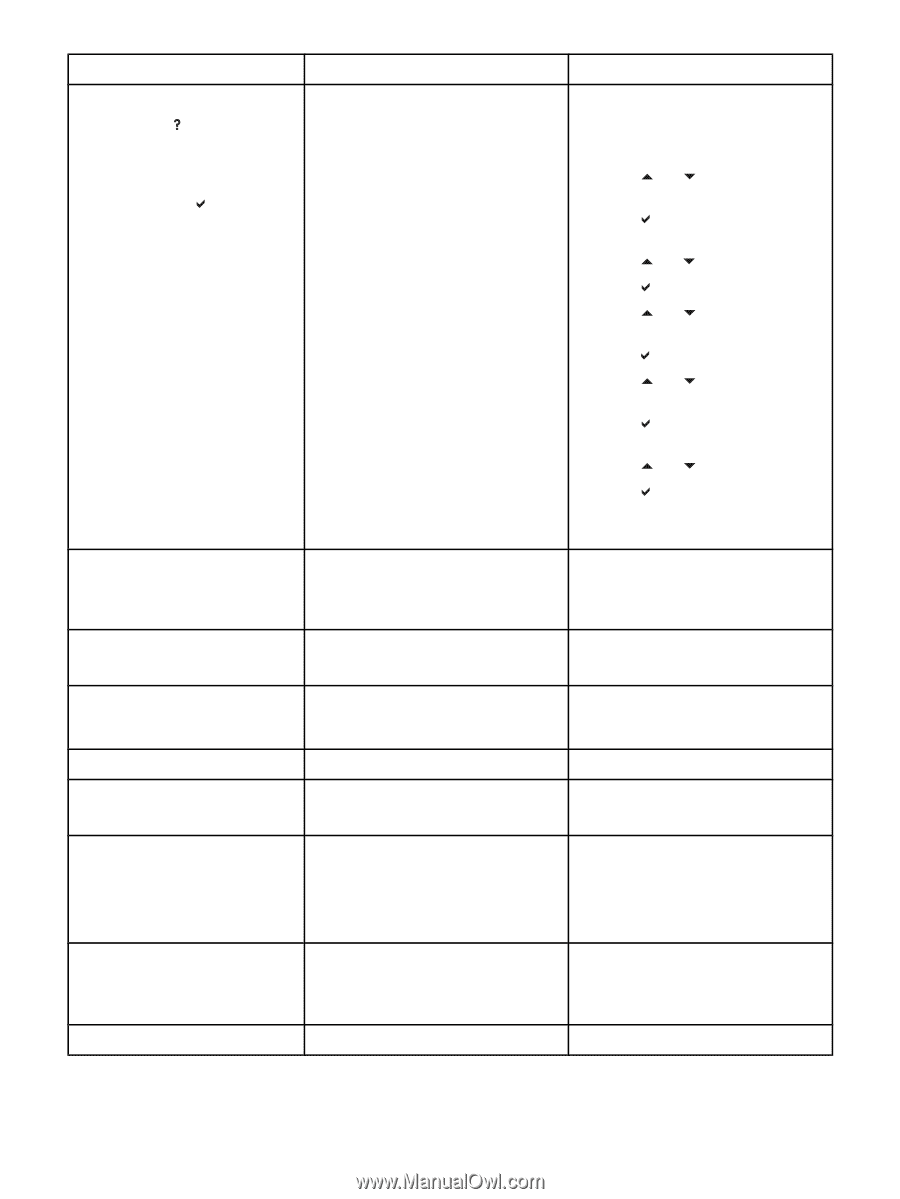
Control panel messages (continued) Control panel message Description Recommended action REPLACE TRANSFER KIT For help press alternates with REPLACE TRANSFER KIT To continue press The transfer unit is nearing the end of its useful life and the SUPPLIES LOW setting in SYSTEM SETUP is set to STOP. Continued To reset the transfer unit count 1. Press MENU to enter the MENUS. 2. Press and to highlight CONFIGURE DEVICE. 3. Press to select CONFIGURE DEVICE. 4. Press and to highlight RESETS. 5. Press to select RESETS. 6. Press and to highlight RESET SUPPLIES. 7. Press to select RESET SUPPLIES. 8. Press and to highlight NEW TRANSFER KIT. 9. Press to select NEW TRANSFER KIT. 10. Press and to highlight YES. 11. Press to select YES. The transfer unit count is reset and the printer is ready to use. Request accepted please wait The printer has accepted a request to print an internal page, but the current job must finish printing before the internal page will print. No action necessary. Resend upgrade The firmware upgrade was not completed successfully. Attempt upgrade again. Resetting Kit Count YES is selected in the Reset Supplies No action necessary. menu, to reset the counts for any of the supplies that cannot be detected as new. Restoring... The printer is restoring settings. No action necessary. Restoring... factory settings The printer is restoring factory settings. No action necessary. Rotating motor To exit press STOP key A component test is in progress; the component selected is the Cartridge motor. Press STOP when ready to stop this test. Rotating motor To exit press STOP key The printer is executing a Component Test and the component selected is a motor. Press STOP when ready to stop this test. Setting saved A menu selection has been saved. No action necessary. ENWW Control panel messages 173
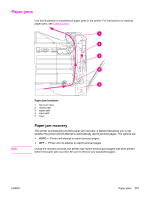
-
 1
1 -
2
-
3
-
4
-
5
-
6
-
7
-
8
-
9
-
10
-
11
-
12
-
13
-
14
-
15
-
16
-
17
-
18
-
19
-
20
-
21
-
22
-
23
-
24
-
25
-
26
-
27
-
28
-
29
-
30
-
31
-
32
-
33
-
34
-
35
-
36
-
37
-
38
-
39
-
40
-
41
-
42
-
43
-
44
-
45
-
46
-
47
-
48
-
49
-
50
-
51
-
52
-
53
-
54
-
55
-
56
-
57
-
58
-
59
-
60
-
61
-
62
-
63
-
64
-
65
-
66
-
67
-
68
-
69
-
70
-
71
-
72
-
73
-
74
-
75
-
76
-
77
-
78
-
79
-
80
-
81
-
82
-
83
-
84
-
85
-
86
-
87
-
88
-
89
-
90
-
91
-
92
-
93
-
94
-
95
-
96
-
97
-
98
-
99
-
100
-
101
-
102
-
103
-
104
-
105
-
106
-
107
-
108
-
109
-
110
-
111
-
112
-
113
-
114
-
115
-
116
-
117
-
118
-
119
-
120
-
121
-
122
-
123
-
124
-
125
-
126
-
127
-
128
-
129
-
130
-
131
-
132
-
133
-
134
-
135
-
136
-
137
-
138
-
139
-
140
-
141
-
142
-
143
-
144
-
145
-
146
-
147
-
148
-
149
-
150
-
151
-
152
-
153
-
154
-
155
-
156
-
157
-
158
-
159
-
160
-
161
-
162
-
163
-
164
-
165
-
166
-
167
-
168
-
169
-
170
-
171
-
172
-
173
-
174
-
175
-
176
-
177
-
178
-
179
-
180
-
181
-
 182
182 -
 183
183 -
 184
184 -
 185
185 -
 186
186 -
 187
187 -
 188
188 -
 189
189 -
 190
190 -
 191
191 -
 192
192 -
193
-
194
-
195
-
196
-
197
-
198
-
199
-
200
-
201
-
202
-
203
-
204
-
205
-
206
-
207
-
208
-
209
-
210
-
211
-
212
-
213
-
214
-
215
-
216
-
217
-
218
-
219
-
220
-
221
-
222
-
223
-
224
-
225
-
226
-
227
-
228
-
229
-
230
-
231
-
232
-
233
-
234
-
235
-
236
-
237
-
238
-
239
-
240
-
241
-
242
-
243
-
244
-
245
-
246
-
247
-
248
-
249
-
250
-
251
-
252
-
253
-
254
-
255
-
256
-
257
-
258
-
259
-
260
-
261
-
262
-
263
-
264
-
265
-
266
-
267
-
268
-
269
-
270
-
271
-
272
-
273
-
274
-
275
-
276
 |
 |