HP 4650n HP Color LaserJet 4650 series printer - User Guide - Page 180
Remove All, Print Cartridges
 |
UPC - 829160046532
View all HP 4650n manuals
Add to My Manuals
Save this manual to your list of manuals |
Page 180 highlights
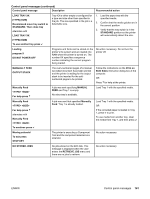
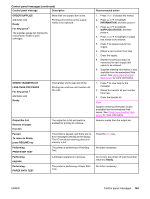
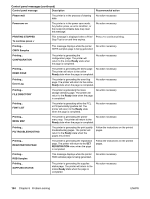
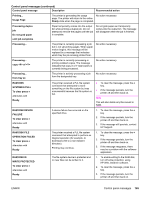
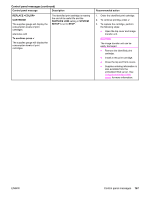
Control panel messages (continued) Control panel message Description Recommended action Ready The supplies gauge will display the consumption levels of print cartridges. The printer is online and ready for data. No status or device attendance messages are pending at the display. No action necessary. Ready Diagnostics mode To exit press STOP KEY The printer is in a special diagnostics mode. Press the STOP key to exit the special diagnostics mode. OR No action is necessary. Receiving upgrade A firmware upgrade is in progress. Do not turn the printer off until the printer returns to Ready. REMOVE ALL PRINT CARTRIDGES To exit press STOP KEY The printer is executing a Component Test and the component selected is Belt Only. Remove all print cartridges. Remove at least one print cartridge. To exit press STOP KEY The printer is executing a Disable Cartridge Check or Component Test where the component selected is Cartridge Motor. Remove one print cartridge. REPLACE CARTRIDGE The supplies gauge will display the consumption levels of print cartridges. alternates with For help press The supplies gauge will display the consumption levels of print cartridges. The identified print cartridge has reached the end of life and the COLOR SUPPLY OUT setting in SYSTEM SETUP is set to STOP. Printing will not continue until the cartridge is replaced. 1. Open the top cover and image transfer unit. CAUTION The image transfer unit can be easily damaged. 2. Remove the identified print cartridge. 3. Install a new print cartridge. 4. Close the top and front covers. 5. Supplies ordering information is also available from the embedded Web server. See Using the embedded Web server for more information. 166 Chapter 8 Problem solving ENWW
-
 1
1 -
2
-
3
-
4
-
5
-
6
-
7
-
8
-
9
-
10
-
11
-
12
-
13
-
14
-
15
-
16
-
17
-
18
-
19
-
20
-
21
-
22
-
23
-
24
-
25
-
26
-
27
-
28
-
29
-
30
-
31
-
32
-
33
-
34
-
35
-
36
-
37
-
38
-
39
-
40
-
41
-
42
-
43
-
44
-
45
-
46
-
47
-
48
-
49
-
50
-
51
-
52
-
53
-
54
-
55
-
56
-
57
-
58
-
59
-
60
-
61
-
62
-
63
-
64
-
65
-
66
-
67
-
68
-
69
-
70
-
71
-
72
-
73
-
74
-
75
-
76
-
77
-
78
-
79
-
80
-
81
-
82
-
83
-
84
-
85
-
86
-
87
-
88
-
89
-
90
-
91
-
92
-
93
-
94
-
95
-
96
-
97
-
98
-
99
-
100
-
101
-
102
-
103
-
104
-
105
-
106
-
107
-
108
-
109
-
110
-
111
-
112
-
113
-
114
-
115
-
116
-
117
-
118
-
119
-
120
-
121
-
122
-
123
-
124
-
125
-
126
-
127
-
128
-
129
-
130
-
131
-
132
-
133
-
134
-
135
-
136
-
137
-
138
-
139
-
140
-
141
-
142
-
143
-
144
-
145
-
146
-
147
-
148
-
149
-
150
-
151
-
152
-
153
-
154
-
155
-
156
-
157
-
158
-
159
-
160
-
161
-
162
-
163
-
164
-
165
-
166
-
167
-
168
-
169
-
170
-
171
-
172
-
173
-
174
-
 175
175 -
 176
176 -
 177
177 -
 178
178 -
 179
179 -
 180
180 -
 181
181 -
 182
182 -
 183
183 -
 184
184 -
 185
185 -
186
-
187
-
188
-
189
-
190
-
191
-
192
-
193
-
194
-
195
-
196
-
197
-
198
-
199
-
200
-
201
-
202
-
203
-
204
-
205
-
206
-
207
-
208
-
209
-
210
-
211
-
212
-
213
-
214
-
215
-
216
-
217
-
218
-
219
-
220
-
221
-
222
-
223
-
224
-
225
-
226
-
227
-
228
-
229
-
230
-
231
-
232
-
233
-
234
-
235
-
236
-
237
-
238
-
239
-
240
-
241
-
242
-
243
-
244
-
245
-
246
-
247
-
248
-
249
-
250
-
251
-
252
-
253
-
254
-
255
-
256
-
257
-
258
-
259
-
260
-
261
-
262
-
263
-
264
-
265
-
266
-
267
-
268
-
269
-
270
-
271
-
272
-
273
-
274
-
275
-
276
 |
 |