HP 4650n HP Color LaserJet 4650 series printer - User Guide - Page 28
Printer basics, Printers and Faxes - printer manual
 |
UPC - 829160046532
View all HP 4650n manuals
Add to My Manuals
Save this manual to your list of manuals |
Page 28 highlights
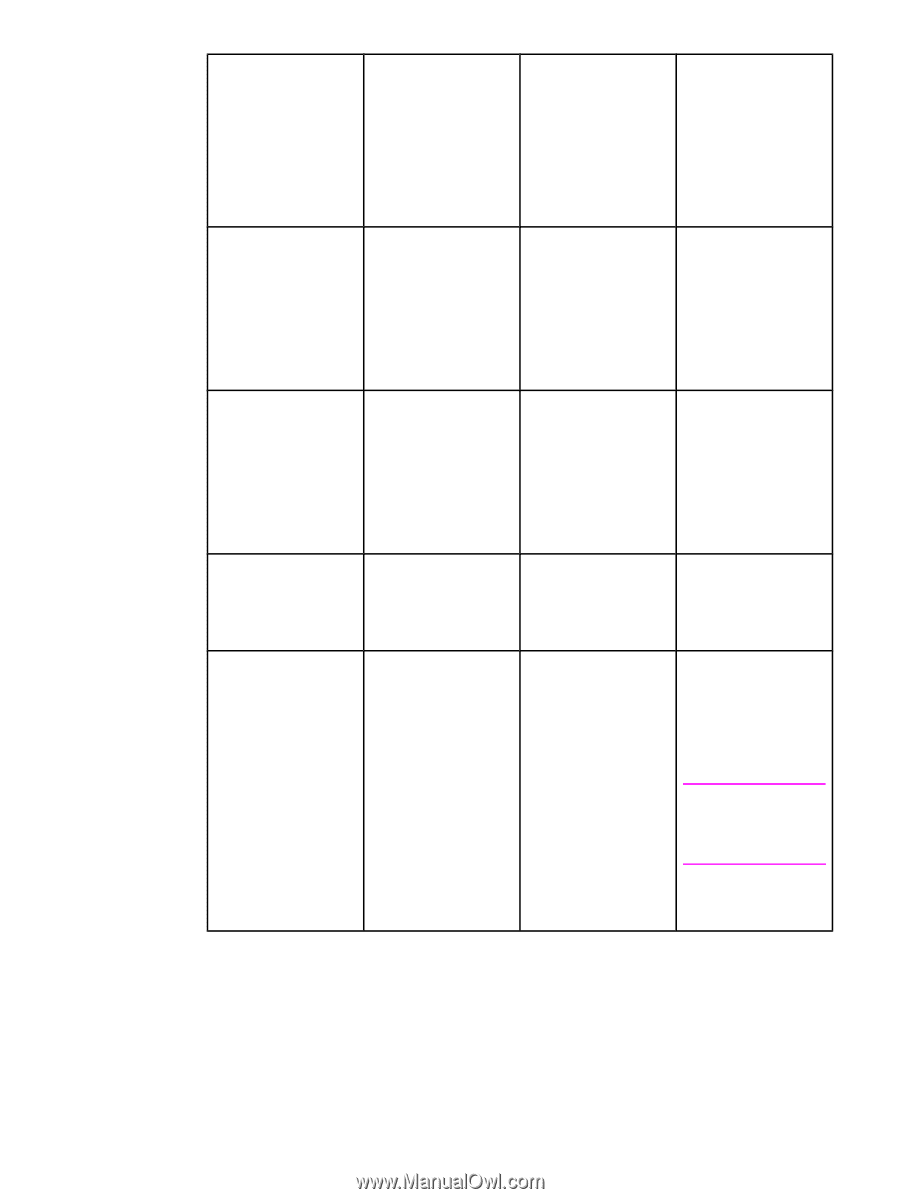
Operating System To change settings for all immediate print jobs (until the application is closed) To change print job default settings (For example, turn on Print on Both Sides by default.) To change configuration settings (For example, add a physical option such as a tray or enable/ disable a driver feature such as Allow Manual Duplexing.) Windows 98, NT 4.0, and ME From the File menu in the application, click Print. Select the printer, and then click Properties. (The steps may vary; this procedure is most common.) Click Start, click Settings, and then click Printers. Rightclick the printer icon, and choose Properties (Windows 98 and ME) or Document Defaults (NT 4.0). Click Start, click Settings, and then click Printers. Rightclick the printer icon, and choose Properties. Select the Configure tab. Windows 2000 and XP From the File menu in the application, click Print. Select the printer, and then click Properties or Preferences. (The steps may vary; this procedure is most common.) Click Start, click Settings, and then click Printers or Printers and Faxes. Right-click the printer icon, and choose Printing Preferences. Click Start, click Settings, and then click Printers or Printers and Faxes. Right-click the printer icon, and choose Properties. Select the Device Settings tab. Macintosh OS 9.1 On the File menu, click Print. Change the settings that you want on the various pop-up menus. On the File menu, click Print. As you change settings on the pop-up menu, click Save Settings. Click the desktop printer icon. From the Printing menu, click Change Setup. Macintosh OS X.1 On the File menu, click Print. Change settings that you want on the various pop-up menus. On the File menu, click Print. Change settings that you want on the various pop-up menus, and then on the main pop-up menu, click Save Custom Setting. These settings are saved as the Custom option. To use the new settings, you must select the Custom option every time you open a program and print. Delete the printer and reinstall. The driver will be auto-configured with the new options when it is reinstalled. (AppleTalk connections only) Note Configuration settings may not be available in Classic mode. 14 Chapter 1 Printer basics ENWW
-
 1
1 -
2
-
3
-
4
-
5
-
6
-
7
-
8
-
9
-
10
-
11
-
12
-
13
-
14
-
15
-
16
-
17
-
18
-
19
-
20
-
21
-
22
-
 23
23 -
 24
24 -
 25
25 -
 26
26 -
 27
27 -
 28
28 -
 29
29 -
 30
30 -
 31
31 -
 32
32 -
 33
33 -
34
-
35
-
36
-
37
-
38
-
39
-
40
-
41
-
42
-
43
-
44
-
45
-
46
-
47
-
48
-
49
-
50
-
51
-
52
-
53
-
54
-
55
-
56
-
57
-
58
-
59
-
60
-
61
-
62
-
63
-
64
-
65
-
66
-
67
-
68
-
69
-
70
-
71
-
72
-
73
-
74
-
75
-
76
-
77
-
78
-
79
-
80
-
81
-
82
-
83
-
84
-
85
-
86
-
87
-
88
-
89
-
90
-
91
-
92
-
93
-
94
-
95
-
96
-
97
-
98
-
99
-
100
-
101
-
102
-
103
-
104
-
105
-
106
-
107
-
108
-
109
-
110
-
111
-
112
-
113
-
114
-
115
-
116
-
117
-
118
-
119
-
120
-
121
-
122
-
123
-
124
-
125
-
126
-
127
-
128
-
129
-
130
-
131
-
132
-
133
-
134
-
135
-
136
-
137
-
138
-
139
-
140
-
141
-
142
-
143
-
144
-
145
-
146
-
147
-
148
-
149
-
150
-
151
-
152
-
153
-
154
-
155
-
156
-
157
-
158
-
159
-
160
-
161
-
162
-
163
-
164
-
165
-
166
-
167
-
168
-
169
-
170
-
171
-
172
-
173
-
174
-
175
-
176
-
177
-
178
-
179
-
180
-
181
-
182
-
183
-
184
-
185
-
186
-
187
-
188
-
189
-
190
-
191
-
192
-
193
-
194
-
195
-
196
-
197
-
198
-
199
-
200
-
201
-
202
-
203
-
204
-
205
-
206
-
207
-
208
-
209
-
210
-
211
-
212
-
213
-
214
-
215
-
216
-
217
-
218
-
219
-
220
-
221
-
222
-
223
-
224
-
225
-
226
-
227
-
228
-
229
-
230
-
231
-
232
-
233
-
234
-
235
-
236
-
237
-
238
-
239
-
240
-
241
-
242
-
243
-
244
-
245
-
246
-
247
-
248
-
249
-
250
-
251
-
252
-
253
-
254
-
255
-
256
-
257
-
258
-
259
-
260
-
261
-
262
-
263
-
264
-
265
-
266
-
267
-
268
-
269
-
270
-
271
-
272
-
273
-
274
-
275
-
276
 |
 |