HP Blackbird 002-21A HP Blackbird Gaming System - Getting Started Guide - Page 160
Transferring and Recording Video Files, Recording analog and digital video files
 |
View all HP Blackbird 002-21A manuals
Add to My Manuals
Save this manual to your list of manuals |
Page 160 highlights
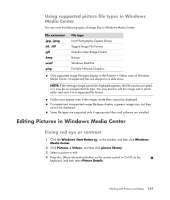
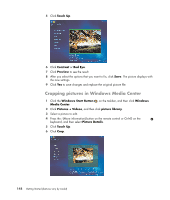
Transferring and Recording Video Files Once you capture the video by using video capture and editing software, you can use Windows Media Center to find it and add it to the Videos area. Recording analog and digital video files Refer to Help and Support for more information about capturing and recording video files from analog and digital video cameras. To find information in Help and Support: 1 Click the Windows Start Button on the taskbar, and then click Help and Support. 2 Type in search words such as recording video. Creating a DVD from Video Files in Windows Media Center 1 Click the Windows Start Button on the taskbar, and then click Windows Media Center. 2 From the Tasks menu, click burn cd/dvd. 3 Insert writable media (CD-R, CD-RW, DVD+/-R, or DVD+/-RW) into the drive. 4 Select Video DVD, and then click Next. NOTE: If you are using a rewritable disc that contains data, you must select Erase Disc to continue. 5 Select the Untitled area, enter the name of the disc by using the numeric keys on the keyboard or the remote control, and then click Next. Use the Backspace key on the keyboard or the Clear button on the remote control to delete letters. 6 Click Video Library, and then click Next. 7 Select the files you want to copy, and then click Next. A check mark appears next to a file when you select it. 8 Click Add More to add more files to the disc. 9 After you have selected all of the files, click Burn DVD. 10 Click Yes. Windows Media Center opens a message if you need to insert an additional disc to complete the recording. Windows Media Center opens a message when the disc has been created. 11 Click Done when the disc has been created. 152 Getting Started (features vary by model)
-
 1
1 -
2
-
3
-
4
-
5
-
6
-
7
-
8
-
9
-
10
-
11
-
12
-
13
-
14
-
15
-
16
-
17
-
18
-
19
-
20
-
21
-
22
-
23
-
24
-
25
-
26
-
27
-
28
-
29
-
30
-
31
-
32
-
33
-
34
-
35
-
36
-
37
-
38
-
39
-
40
-
41
-
42
-
43
-
44
-
45
-
46
-
47
-
48
-
49
-
50
-
51
-
52
-
53
-
54
-
55
-
56
-
57
-
58
-
59
-
60
-
61
-
62
-
63
-
64
-
65
-
66
-
67
-
68
-
69
-
70
-
71
-
72
-
73
-
74
-
75
-
76
-
77
-
78
-
79
-
80
-
81
-
82
-
83
-
84
-
85
-
86
-
87
-
88
-
89
-
90
-
91
-
92
-
93
-
94
-
95
-
96
-
97
-
98
-
99
-
100
-
101
-
102
-
103
-
104
-
105
-
106
-
107
-
108
-
109
-
110
-
111
-
112
-
113
-
114
-
115
-
116
-
117
-
118
-
119
-
120
-
121
-
122
-
123
-
124
-
125
-
126
-
127
-
128
-
129
-
130
-
131
-
132
-
133
-
134
-
135
-
136
-
137
-
138
-
139
-
140
-
141
-
142
-
143
-
144
-
145
-
146
-
147
-
148
-
149
-
150
-
151
-
152
-
153
-
154
-
 155
155 -
 156
156 -
 157
157 -
 158
158 -
 159
159 -
 160
160 -
 161
161 -
 162
162 -
 163
163 -
 164
164
 |
 |