HP Blackbird 002-21A HP Blackbird Gaming System - Getting Started Guide - Page 96
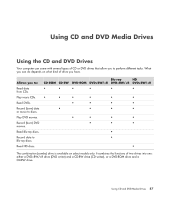
Handling CDs and DVDs, Inserting and removing CDs and DVDs, include a disc tray.
 |
View all HP Blackbird 002-21A manuals
Add to My Manuals
Save this manual to your list of manuals |
Page 96 highlights
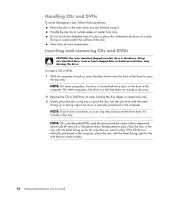
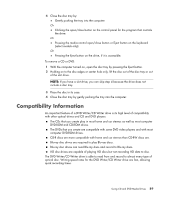
Handling CDs and DVDs To avoid damaging a disc, follow these guidelines: Return the disc to the case when you are finished using it. Handle the disc by its outside edges or center hole only. Do not touch the unlabeled side of a disc or place the unlabeled side down on a desk. Doing so could scratch the surface of the disc. Store discs at room temperature. Inserting and removing CDs and DVDs CAUTION: Use only standard-shaped (circular) discs in the drives. Using non-standard discs, such as heart-shaped discs or business-card discs, may damage the drive. To insert a CD or DVD: 1 With the computer turned on, press the Eject button near the front of the drive to open the disc tray. NOTE: On some computers, the drive is located behind a door on the front of the computer. On other computers, the drive is a slot that does not include a disc tray. 2 Remove the CD or DVD from its case, holding the disc edges or center hole only. 3 Gently place the disc in the tray or press the disc into the slot drive with the label facing up or facing right if the drive is vertically positioned in the computer. NOTE: If you have a slot drive, you can skip step 4 because the drive does not include a disc tray. NOTE: On a double-sided DVD, read the text around the center hole to determine which side (A versus B or Standard versus Widescreen) to play. Place the disc in the tray with the label facing up for the side that you want to play. If the CD drive is vertically positioned in the computer, place the disc with the label facing right for the side that you want to play. 88 Getting Started (features vary by model)
-
 1
1 -
2
-
3
-
4
-
5
-
6
-
7
-
8
-
9
-
10
-
11
-
12
-
13
-
14
-
15
-
16
-
17
-
18
-
19
-
20
-
21
-
22
-
23
-
24
-
25
-
26
-
27
-
28
-
29
-
30
-
31
-
32
-
33
-
34
-
35
-
36
-
37
-
38
-
39
-
40
-
41
-
42
-
43
-
44
-
45
-
46
-
47
-
48
-
49
-
50
-
51
-
52
-
53
-
54
-
55
-
56
-
57
-
58
-
59
-
60
-
61
-
62
-
63
-
64
-
65
-
66
-
67
-
68
-
69
-
70
-
71
-
72
-
73
-
74
-
75
-
76
-
77
-
78
-
79
-
80
-
81
-
82
-
83
-
84
-
85
-
86
-
87
-
88
-
89
-
90
-
 91
91 -
 92
92 -
 93
93 -
 94
94 -
 95
95 -
 96
96 -
 97
97 -
 98
98 -
 99
99 -
 100
100 -
 101
101 -
102
-
103
-
104
-
105
-
106
-
107
-
108
-
109
-
110
-
111
-
112
-
113
-
114
-
115
-
116
-
117
-
118
-
119
-
120
-
121
-
122
-
123
-
124
-
125
-
126
-
127
-
128
-
129
-
130
-
131
-
132
-
133
-
134
-
135
-
136
-
137
-
138
-
139
-
140
-
141
-
142
-
143
-
144
-
145
-
146
-
147
-
148
-
149
-
150
-
151
-
152
-
153
-
154
-
155
-
156
-
157
-
158
-
159
-
160
-
161
-
162
-
163
-
164
 |
 |