HP Blackbird 002-21A HP Blackbird Gaming System - Getting Started Guide - Page 59
Using the Mouse, Using the Mouse Buttons
 |
View all HP Blackbird 002-21A manuals
Add to My Manuals
Save this manual to your list of manuals |
Page 59 highlights
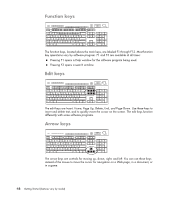
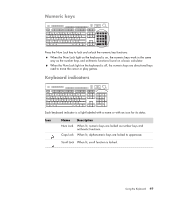
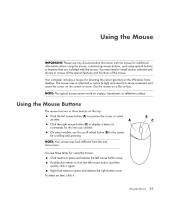
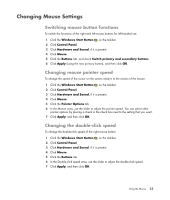
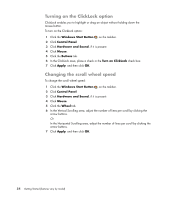
Using the Mouse IMPORTANT: Please see any documentation that came with the mouse for additional information about using the mouse, customizing mouse buttons, and using special buttons or features that are included with the mouse. You may need to install mouse software and drivers to access all the special features and functions of the mouse. Your computer includes a mouse for directing the cursor (pointer) on the Windows Vista desktop. The mouse uses a roller ball or optics (a light and sensor) to sense movement and cause the cursor on the screen to move. Use the mouse on a flat surface. NOTE: The optical mouse cannot work on a glass, translucent, or reflective surface. Using the Mouse Buttons The mouse has two or three buttons on the top: Click the left mouse button (A) to position the cursor or select an item. Click the right mouse button (C) to display a menu of commands for the item you clicked. On select models, use the scroll wheel button (B) in the center for scrolling and panning. NOTE: Your mouse may look different from the one shown here. You see these terms for using the mouse: Click means to press and release the left mouse button once. Double-click means to click the left mouse button and then quickly click it again. Right-click means to press and release the right button once. To select an item, click it. Using the Mouse 51
-
 1
1 -
2
-
3
-
4
-
5
-
6
-
7
-
8
-
9
-
10
-
11
-
12
-
13
-
14
-
15
-
16
-
17
-
18
-
19
-
20
-
21
-
22
-
23
-
24
-
25
-
26
-
27
-
28
-
29
-
30
-
31
-
32
-
33
-
34
-
35
-
36
-
37
-
38
-
39
-
40
-
41
-
42
-
43
-
44
-
45
-
46
-
47
-
48
-
49
-
50
-
51
-
52
-
53
-
 54
54 -
 55
55 -
 56
56 -
 57
57 -
 58
58 -
 59
59 -
 60
60 -
 61
61 -
 62
62 -
 63
63 -
 64
64 -
65
-
66
-
67
-
68
-
69
-
70
-
71
-
72
-
73
-
74
-
75
-
76
-
77
-
78
-
79
-
80
-
81
-
82
-
83
-
84
-
85
-
86
-
87
-
88
-
89
-
90
-
91
-
92
-
93
-
94
-
95
-
96
-
97
-
98
-
99
-
100
-
101
-
102
-
103
-
104
-
105
-
106
-
107
-
108
-
109
-
110
-
111
-
112
-
113
-
114
-
115
-
116
-
117
-
118
-
119
-
120
-
121
-
122
-
123
-
124
-
125
-
126
-
127
-
128
-
129
-
130
-
131
-
132
-
133
-
134
-
135
-
136
-
137
-
138
-
139
-
140
-
141
-
142
-
143
-
144
-
145
-
146
-
147
-
148
-
149
-
150
-
151
-
152
-
153
-
154
-
155
-
156
-
157
-
158
-
159
-
160
-
161
-
162
-
163
-
164
 |
 |