HP Blackbird 002-21A HP Blackbird Gaming System - Getting Started Guide - Page 71
Configuring sound for recording with the Realtek HD Audio Manager
 |
View all HP Blackbird 002-21A manuals
Add to My Manuals
Save this manual to your list of manuals |
Page 71 highlights
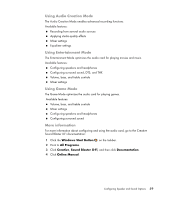
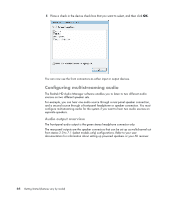
Configuring sound for recording with the Realtek HD Audio Manager The microphone connector is ready to use for recording sound. If you want to use another connector for recording, such as the Digital Audio In connector, complete the following steps to select it: 1 Click the Windows Start Button on the taskbar. 2 Click Control Panel. 3 Click Hardware and Sound, and then Realtek HD Audio Manager. 4 Click the Line In tab. 5 Click Digital In tab, and then select Set Default Device. 6 Click OK to close the window. NOTE: You can retask the front pink, blue, and green connectors to perform other audio functions; see "Retasking front panel audio connectors." Retasking front panel audio connectors You can retask the Line In, Mic In, Headphone, and Front Speaker Out connectors on the front of the computer, as necessary. 1 Click the Windows Start Button on the taskbar. 2 Click Control Panel. 3 Click Hardware and Sound, and then click Realtek HD Audio Manager. 4 Click a front connector icon that you want to retask. NOTE: Only the connectors that are not dimmed are able to be retasked. Configuring Speaker and Sound Options 63
-
 1
1 -
2
-
3
-
4
-
5
-
6
-
7
-
8
-
9
-
10
-
11
-
12
-
13
-
14
-
15
-
16
-
17
-
18
-
19
-
20
-
21
-
22
-
23
-
24
-
25
-
26
-
27
-
28
-
29
-
30
-
31
-
32
-
33
-
34
-
35
-
36
-
37
-
38
-
39
-
40
-
41
-
42
-
43
-
44
-
45
-
46
-
47
-
48
-
49
-
50
-
51
-
52
-
53
-
54
-
55
-
56
-
57
-
58
-
59
-
60
-
61
-
62
-
63
-
64
-
65
-
 66
66 -
 67
67 -
 68
68 -
 69
69 -
 70
70 -
 71
71 -
 72
72 -
 73
73 -
 74
74 -
 75
75 -
 76
76 -
77
-
78
-
79
-
80
-
81
-
82
-
83
-
84
-
85
-
86
-
87
-
88
-
89
-
90
-
91
-
92
-
93
-
94
-
95
-
96
-
97
-
98
-
99
-
100
-
101
-
102
-
103
-
104
-
105
-
106
-
107
-
108
-
109
-
110
-
111
-
112
-
113
-
114
-
115
-
116
-
117
-
118
-
119
-
120
-
121
-
122
-
123
-
124
-
125
-
126
-
127
-
128
-
129
-
130
-
131
-
132
-
133
-
134
-
135
-
136
-
137
-
138
-
139
-
140
-
141
-
142
-
143
-
144
-
145
-
146
-
147
-
148
-
149
-
150
-
151
-
152
-
153
-
154
-
155
-
156
-
157
-
158
-
159
-
160
-
161
-
162
-
163
-
164
 |
 |