HP Deskjet 1200c HP Business Inkjet 1200 - User Guide - Page 25
To replace the printheads, To clean the printhead contacts manually
 |
View all HP Deskjet 1200c manuals
Add to My Manuals
Save this manual to your list of manuals |
Page 25 highlights
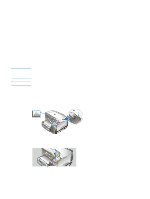
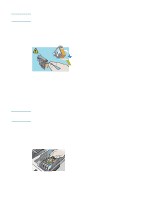
Note To replace the printheads Only replace printheads after you have attempted to clean the printheads. See To clean printheads automatically and To clean the printhead contacts manually. 1 Ensure the printer is plugged in and turned on. 2 Open the top cover. 3 Lift to open the printhead latch. 4 Lift the handle of a printhead and use it to pull the printhead out of its slot. 5 Remove the new printhead from its package, and then remove the protective tape. CAUTION 6 Insert the printhead into its color-coded slot. Press down firmly on the printhead to ensure proper contact. 7 Close the printhead latch. Ensure it is in the lock position. 8 Close the top cover. 9 Wait while the printer initializes the printheads and prints an alignment page. To clean the printhead contacts manually To find out which printheads are compatible with your printer, see Supplies. Clean the printhead contacts only after you have attempted to clean the printheads automatically. See To clean printheads automatically. Printhead contacts contain sensitive electronic components that can be damaged easily. 1 Ensure the printer is plugged in and turned on. 2 Open the top cover. 3 Wait two or three seconds, and then unplug the printer power cord. 4 Lift to open the printhead latch. 5 Lift the handle of a printhead and use it to pull the printhead out of its slot. ENWW 23
-
 1
1 -
2
-
3
-
4
-
5
-
6
-
7
-
8
-
9
-
10
-
11
-
12
-
13
-
14
-
15
-
16
-
17
-
18
-
19
-
 20
20 -
 21
21 -
 22
22 -
 23
23 -
 24
24 -
 25
25 -
 26
26 -
 27
27 -
 28
28 -
 29
29 -
 30
30 -
31
-
32
-
33
-
34
-
35
-
36
-
37
-
38
-
39
-
40
-
41
-
42
-
43
-
44
-
45
-
46
-
47
-
48
-
49
-
50
-
51
-
52
-
53
-
54
-
55
-
56
-
57
-
58
-
59
-
60
-
61
-
62
-
63
-
64
-
65
-
66
-
67
-
68
-
69
-
70
-
71
-
72
-
73
-
74
-
75
-
76
-
77
-
78
-
79
-
80
-
81
-
82
-
83
-
84
-
85
-
86
-
87
-
88
-
89
-
90
-
91
-
92
-
93
-
94
-
95
-
96
-
97
-
98
-
99
-
100
-
101
-
102
-
103
-
104
-
105
-
106
-
107
-
108
-
109
-
110
-
111
-
112
 |
 |