HP Deskjet 1200c HP Business Inkjet 1200 - User Guide - Page 41
Clearing jams, Problems setting up wireless communication
 |
View all HP Deskjet 1200c manuals
Add to My Manuals
Save this manual to your list of manuals |
Page 41 highlights
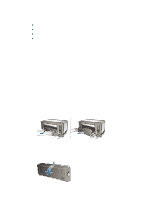
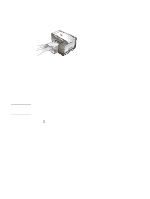
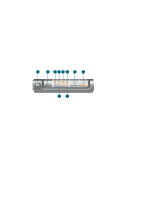
Problems setting up wireless communication If you cannot communicate with the printer after completing the software installation and removing the network cable, then one or more of the following network settings in the printer might be wrong: z Network Name (SSID) z Communication Mode (infrastructure or ad hoc) z Channel (ad hoc networks only) z Security settings (such as Authentication Type, and Encryption) Follow these steps to correct the printer's network settings: 1 Connect the printer to your network with a network cable or to the computer using the cross cable included with the printer. 2 Open the printer's embedded Web server (EWS). See Embedded Web server (EWS). 3 Click the Networking tab, and then click Wireless (802.11) in the left pane. 4 Use the Wireless Setup wizard on the Wireless Setup tab to change the printer's settings to match the settings of the network. 5 Close the printer's EWS, then disconnect the network cable from the printer. Clearing jams If print media is jammed in the printer, follow these instructions to clear the jam. To clear a jam 1 Remove all media from the output tray. 2 Check the rear access panel or the auto-duplex unit. a Push the button on either side of the rear access panel or the auto-duplex unit and remove the unit. b Locate any jammed media inside the printer, grasp it with both hands and pull it towards you. c If the jam is not there, push the latch on the top of the auto-duplex unit and lower its cover. If the jam is inside, carefully remove it. Close the cover. ENWW 39
-
 1
1 -
2
-
3
-
4
-
5
-
6
-
7
-
8
-
9
-
10
-
11
-
12
-
13
-
14
-
15
-
16
-
17
-
18
-
19
-
20
-
21
-
22
-
23
-
24
-
25
-
26
-
27
-
28
-
29
-
30
-
31
-
32
-
33
-
34
-
35
-
 36
36 -
 37
37 -
 38
38 -
 39
39 -
 40
40 -
 41
41 -
 42
42 -
 43
43 -
 44
44 -
 45
45 -
 46
46 -
47
-
48
-
49
-
50
-
51
-
52
-
53
-
54
-
55
-
56
-
57
-
58
-
59
-
60
-
61
-
62
-
63
-
64
-
65
-
66
-
67
-
68
-
69
-
70
-
71
-
72
-
73
-
74
-
75
-
76
-
77
-
78
-
79
-
80
-
81
-
82
-
83
-
84
-
85
-
86
-
87
-
88
-
89
-
90
-
91
-
92
-
93
-
94
-
95
-
96
-
97
-
98
-
99
-
100
-
101
-
102
-
103
-
104
-
105
-
106
-
107
-
108
-
109
-
110
-
111
-
112
 |
 |