HP Deskjet F2200 Full User Guide - Page 141
Add or Remove Programs, Deskjet F2200 All-In-One series - series driver
 |
View all HP Deskjet F2200 manuals
Add to My Manuals
Save this manual to your list of manuals |
Page 141 highlights
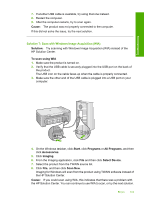
Troubleshooting Chapter 12 • Solution 7: Scan with Windows Image Acquisition (WIA) • Solution 8: Disable the Lexbces service • Solution 9: Run the Scan Diagnostic utility • Solution 10: Install a patch • Solution 11: Check the USB chipset and controller • Solution 12: Uninstall the software and reset the product Solution 1: Uninstall and reinstall the software Solution: Verify that the software was installed correctly. Open the HP Solution Center and verify that all the icons and buttons are present. If the appropriate icons and buttons for your product (such as Make Copies) do not appear, your installation might not be complete, and you might need to uninstall and then reinstall the software. Do not simply delete the application files from your hard drive. Make sure to remove them properly using the uninstall utility provided with the software. To uninstall from a Windows computer NOTE: Use this method if Uninstall is not available in the Windows Start menu (click Programs or All Programs, HP, Deskjet F2200 All-In-One series, Uninstall). 1. Open the Windows control panel and double-click Add or Remove Programs. NOTE: The procedure to open the control panel varies by operating system. If you are not sure how to do this, see the Windows Help. 2. Select HP Deskjet All-In-One Driver Software, and then click Change/ Remove. Follow the onscreen instructions. 3. Disconnect the product from your computer. 4. Restart your computer. NOTE: It is important that you disconnect the product before restarting your computer. Do not connect the product to your computer until after you have reinstalled the software. 5. Insert the product CD-ROM into your computer's CD-ROM drive and then start the Setup program. 6. Follow the onscreen instructions and the instructions provided in the Setup Guide that came with the product. After you have reinstalled the software, try to scan again. Cause: The software installation was not complete. If this did not solve the issue, try the next solution. 138 Troubleshooting
-
 1
1 -
2
-
3
-
4
-
5
-
6
-
7
-
8
-
9
-
10
-
11
-
12
-
13
-
14
-
15
-
16
-
17
-
18
-
19
-
20
-
21
-
22
-
23
-
24
-
25
-
26
-
27
-
28
-
29
-
30
-
31
-
32
-
33
-
34
-
35
-
36
-
37
-
38
-
39
-
40
-
41
-
42
-
43
-
44
-
45
-
46
-
47
-
48
-
49
-
50
-
51
-
52
-
53
-
54
-
55
-
56
-
57
-
58
-
59
-
60
-
61
-
62
-
63
-
64
-
65
-
66
-
67
-
68
-
69
-
70
-
71
-
72
-
73
-
74
-
75
-
76
-
77
-
78
-
79
-
80
-
81
-
82
-
83
-
84
-
85
-
86
-
87
-
88
-
89
-
90
-
91
-
92
-
93
-
94
-
95
-
96
-
97
-
98
-
99
-
100
-
101
-
102
-
103
-
104
-
105
-
106
-
107
-
108
-
109
-
110
-
111
-
112
-
113
-
114
-
115
-
116
-
117
-
118
-
119
-
120
-
121
-
122
-
123
-
124
-
125
-
126
-
127
-
128
-
129
-
130
-
131
-
132
-
133
-
134
-
135
-
 136
136 -
 137
137 -
 138
138 -
 139
139 -
 140
140 -
 141
141 -
 142
142 -
 143
143 -
 144
144 -
 145
145 -
 146
146 -
147
-
148
-
149
-
150
-
151
-
152
-
153
-
154
-
155
-
156
-
157
-
158
-
159
-
160
-
161
-
162
-
163
-
164
-
165
-
166
-
167
-
168
-
169
-
170
-
171
-
172
-
173
-
174
-
175
-
176
-
177
-
178
-
179
-
180
-
181
-
182
-
183
-
184
-
185
-
186
-
187
-
188
-
189
-
190
-
191
-
192
-
193
-
194
-
195
-
196
-
197
-
198
-
199
-
200
-
201
-
202
-
203
-
204
-
205
-
206
-
207
-
208
-
209
-
210
-
211
-
212
-
213
-
214
-
215
-
216
-
217
-
218
-
219
-
220
-
221
-
222
-
223
-
224
-
225
 |
 |
