HP Deskjet F2200 Full User Guide - Page 98
Resolving print cartridge problems, To troubleshoot the print cartridges, Print Cartridge Problem - review
 |
View all HP Deskjet F2200 manuals
Add to My Manuals
Save this manual to your list of manuals |
Page 98 highlights
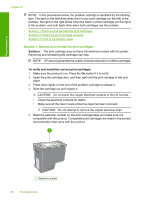
Troubleshooting Resolving print cartridge problems Many problems can be resolved with the following procedures. If you receive a specific error message about the print cartridges, see Print cartridge messages for more information. To troubleshoot the print cartridges 1. Remove and reinstall the print cartridges. For more information, see Replace the print cartridges. NOTE: Make sure the plastic tape has been removed. If it is still covering the ink nozzles, gently remove the plastic tape by using the pink pull tab. 2. If print quality is suffering, check the estimated ink levels. For more information, see Check the estimated ink levels. 3. Print a self-test report and review the test patterns. For more information, see Print a self-test report. 4. Clean the print cartridges: • First, try cleaning the print cartridges from the HP Photosmart Software. For more information, see Clean the print cartridges. CAUTION: Performing this procedure unnecessarily can waste ink and shorten the life of the cartridges. • If cleaning the print cartridges from the software did not help, you can try cleaning the print cartridge contacts. For more information, see Clean the print cartridge contacts. 5. If none of the previous procedures resolved the problem, replace the print cartridges. For more information, see Replace the print cartridges. Resolving print cartridge error messages After you install a print cartridge, one or both of the print cartridge status lights begin to blink. The printer will not print. One of the following messages may appear on your computer screen: Print Cartridge Problem Incorrect Print Cartridge(s) Incorrectly Installed Cartridge(s) Print Cartridge(s) Missing Work through the following sections in order. When the print cartridge light stops blinking, you have solved the problem. Print cartridge troubleshooting 95
-
 1
1 -
2
-
3
-
4
-
5
-
6
-
7
-
8
-
9
-
10
-
11
-
12
-
13
-
14
-
15
-
16
-
17
-
18
-
19
-
20
-
21
-
22
-
23
-
24
-
25
-
26
-
27
-
28
-
29
-
30
-
31
-
32
-
33
-
34
-
35
-
36
-
37
-
38
-
39
-
40
-
41
-
42
-
43
-
44
-
45
-
46
-
47
-
48
-
49
-
50
-
51
-
52
-
53
-
54
-
55
-
56
-
57
-
58
-
59
-
60
-
61
-
62
-
63
-
64
-
65
-
66
-
67
-
68
-
69
-
70
-
71
-
72
-
73
-
74
-
75
-
76
-
77
-
78
-
79
-
80
-
81
-
82
-
83
-
84
-
85
-
86
-
87
-
88
-
89
-
90
-
91
-
92
-
 93
93 -
 94
94 -
 95
95 -
 96
96 -
 97
97 -
 98
98 -
 99
99 -
 100
100 -
 101
101 -
 102
102 -
 103
103 -
104
-
105
-
106
-
107
-
108
-
109
-
110
-
111
-
112
-
113
-
114
-
115
-
116
-
117
-
118
-
119
-
120
-
121
-
122
-
123
-
124
-
125
-
126
-
127
-
128
-
129
-
130
-
131
-
132
-
133
-
134
-
135
-
136
-
137
-
138
-
139
-
140
-
141
-
142
-
143
-
144
-
145
-
146
-
147
-
148
-
149
-
150
-
151
-
152
-
153
-
154
-
155
-
156
-
157
-
158
-
159
-
160
-
161
-
162
-
163
-
164
-
165
-
166
-
167
-
168
-
169
-
170
-
171
-
172
-
173
-
174
-
175
-
176
-
177
-
178
-
179
-
180
-
181
-
182
-
183
-
184
-
185
-
186
-
187
-
188
-
189
-
190
-
191
-
192
-
193
-
194
-
195
-
196
-
197
-
198
-
199
-
200
-
201
-
202
-
203
-
204
-
205
-
206
-
207
-
208
-
209
-
210
-
211
-
212
-
213
-
214
-
215
-
216
-
217
-
218
-
219
-
220
-
221
-
222
-
223
-
224
-
225
 |
 |
