HP Deskjet F2200 Full User Guide - Page 200
Contact HP, Cause, If the print cartridges are installed in the wrong slots and you cannot
 |
View all HP Deskjet F2200 manuals
Add to My Manuals
Save this manual to your list of manuals |
Page 200 highlights
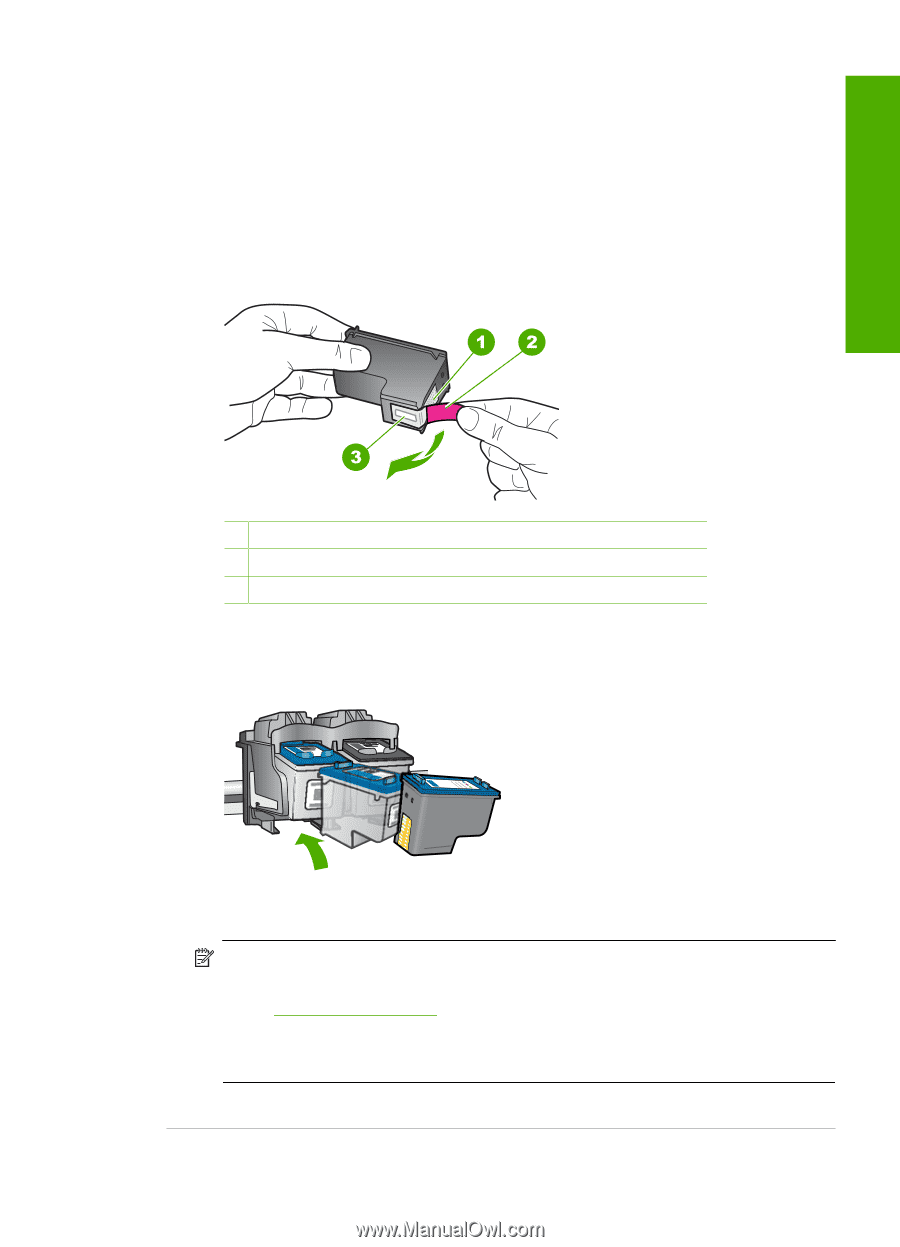
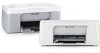
Troubleshooting 3. Check to make sure you are using the correct print cartridges for your product. For a list of compatible print cartridges, see the printed documentation that came with the product. 4. Remove the black print cartridge from the slot on the right. Do not touch the ink nozzles or the copper-colored contacts. Check for possible damage to the coppercolored contacts or ink nozzles. Make sure the clear plastic tape has been removed. If it is still covering the ink nozzles, gently remove the clear plastic tape by using the pink pull tab. Make sure you do not remove the copper colored tape containing the electrical contacts. 1 Copper-colored contacts 2 Plastic tape with pink pull tab (must be removed before installing) 3 Ink nozzles under tape 5. Reinsert the print cartridge by sliding it forward into the slot on the right. Then push the print cartridge forward until it clicks into the socket. 6. Repeat steps 1 and 2 for the tri-color print cartridge on the left side. NOTE: If the print cartridges are installed in the wrong slots and you cannot remove them from the product, contact HP support for service. Go to: www.hp.com/support. If prompted, choose your country/region, and then click Contact HP for information on calling for technical support. Cause: The indicated print cartridges were installed incorrectly. Errors 197
-
 1
1 -
2
-
3
-
4
-
5
-
6
-
7
-
8
-
9
-
10
-
11
-
12
-
13
-
14
-
15
-
16
-
17
-
18
-
19
-
20
-
21
-
22
-
23
-
24
-
25
-
26
-
27
-
28
-
29
-
30
-
31
-
32
-
33
-
34
-
35
-
36
-
37
-
38
-
39
-
40
-
41
-
42
-
43
-
44
-
45
-
46
-
47
-
48
-
49
-
50
-
51
-
52
-
53
-
54
-
55
-
56
-
57
-
58
-
59
-
60
-
61
-
62
-
63
-
64
-
65
-
66
-
67
-
68
-
69
-
70
-
71
-
72
-
73
-
74
-
75
-
76
-
77
-
78
-
79
-
80
-
81
-
82
-
83
-
84
-
85
-
86
-
87
-
88
-
89
-
90
-
91
-
92
-
93
-
94
-
95
-
96
-
97
-
98
-
99
-
100
-
101
-
102
-
103
-
104
-
105
-
106
-
107
-
108
-
109
-
110
-
111
-
112
-
113
-
114
-
115
-
116
-
117
-
118
-
119
-
120
-
121
-
122
-
123
-
124
-
125
-
126
-
127
-
128
-
129
-
130
-
131
-
132
-
133
-
134
-
135
-
136
-
137
-
138
-
139
-
140
-
141
-
142
-
143
-
144
-
145
-
146
-
147
-
148
-
149
-
150
-
151
-
152
-
153
-
154
-
155
-
156
-
157
-
158
-
159
-
160
-
161
-
162
-
163
-
164
-
165
-
166
-
167
-
168
-
169
-
170
-
171
-
172
-
173
-
174
-
175
-
176
-
177
-
178
-
179
-
180
-
181
-
182
-
183
-
184
-
185
-
186
-
187
-
188
-
189
-
190
-
191
-
192
-
193
-
194
-
 195
195 -
 196
196 -
 197
197 -
 198
198 -
 199
199 -
 200
200 -
 201
201 -
 202
202 -
 203
203 -
 204
204 -
 205
205 -
206
-
207
-
208
-
209
-
210
-
211
-
212
-
213
-
214
-
215
-
216
-
217
-
218
-
219
-
220
-
221
-
222
-
223
-
224
-
225
 |
 |