HP Deskjet F2200 Full User Guide - Page 41
Print a borderless image, Properties, Printing Shortcuts, Photo, printing-borderless, Print, Options
 |
View all HP Deskjet F2200 manuals
Add to My Manuals
Save this manual to your list of manuals |
Page 41 highlights
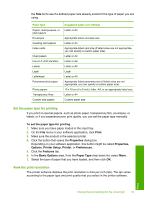
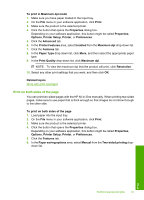
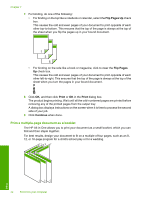
Chapter 7 • Print a multiple-page document as a booklet • Print multiple pages on a single sheet • Print a multiple-page document in reverse order • Reverse an image for iron-on transfers • Print on transparencies • Print a group of addresses on labels or envelopes • Print a poster • Print a Web page Print a borderless image Borderless printing lets you print to the top, bottom, and side edges of 10 x 15 cm (4 x 6 inch) HP Premium Plus Photo Papers with a tear-off tab. When you remove the tear-off tab, the printed image is borderless and extends to the edges of the paper. TIP: You can automatically adjust the settings in the Properties dialog box to print a borderless 10 x 15 cm (4 x 6 inch) photo on HP Premium Plus Photo Paper. Click the Printing Shortcuts tab, and then, in the Printing Shortcuts list, select Photo printing-borderless. You can also set the options manually as described in the following procedure. To print a borderless image 1. Remove all paper from the input tray. 2. Place the photo paper, with the print side down and the short edge forward, on the right side of the input tray. Verify that the tear-off tab is pointing away from the product. 3. On the File menu in your software application, click Print. 4. Make sure the product is the selected printer. 5. Click the button that opens the Properties dialog box. Depending on your software application, this button might be called Properties, Options, Printer Setup, Printer, or Preferences. 38 Print from your computer Print
-
 1
1 -
2
-
3
-
4
-
5
-
6
-
7
-
8
-
9
-
10
-
11
-
12
-
13
-
14
-
15
-
16
-
17
-
18
-
19
-
20
-
21
-
22
-
23
-
24
-
25
-
26
-
27
-
28
-
29
-
30
-
31
-
32
-
33
-
34
-
35
-
 36
36 -
 37
37 -
 38
38 -
 39
39 -
 40
40 -
 41
41 -
 42
42 -
 43
43 -
 44
44 -
 45
45 -
 46
46 -
47
-
48
-
49
-
50
-
51
-
52
-
53
-
54
-
55
-
56
-
57
-
58
-
59
-
60
-
61
-
62
-
63
-
64
-
65
-
66
-
67
-
68
-
69
-
70
-
71
-
72
-
73
-
74
-
75
-
76
-
77
-
78
-
79
-
80
-
81
-
82
-
83
-
84
-
85
-
86
-
87
-
88
-
89
-
90
-
91
-
92
-
93
-
94
-
95
-
96
-
97
-
98
-
99
-
100
-
101
-
102
-
103
-
104
-
105
-
106
-
107
-
108
-
109
-
110
-
111
-
112
-
113
-
114
-
115
-
116
-
117
-
118
-
119
-
120
-
121
-
122
-
123
-
124
-
125
-
126
-
127
-
128
-
129
-
130
-
131
-
132
-
133
-
134
-
135
-
136
-
137
-
138
-
139
-
140
-
141
-
142
-
143
-
144
-
145
-
146
-
147
-
148
-
149
-
150
-
151
-
152
-
153
-
154
-
155
-
156
-
157
-
158
-
159
-
160
-
161
-
162
-
163
-
164
-
165
-
166
-
167
-
168
-
169
-
170
-
171
-
172
-
173
-
174
-
175
-
176
-
177
-
178
-
179
-
180
-
181
-
182
-
183
-
184
-
185
-
186
-
187
-
188
-
189
-
190
-
191
-
192
-
193
-
194
-
195
-
196
-
197
-
198
-
199
-
200
-
201
-
202
-
203
-
204
-
205
-
206
-
207
-
208
-
209
-
210
-
211
-
212
-
213
-
214
-
215
-
216
-
217
-
218
-
219
-
220
-
221
-
222
-
223
-
224
-
225
 |
 |