HP LaserJet P4510 HP LaserJet P4010 and P4510 Series - Software Technical Refe - Page 103
Port Creation Options, Hardware Address
 |
View all HP LaserJet P4510 manuals
Add to My Manuals
Save this manual to your list of manuals |
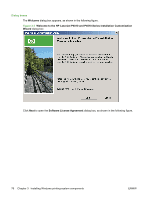
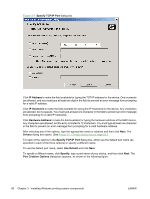
Page 103 highlights
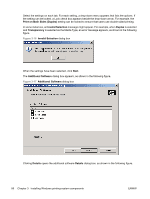
Figure 3-8 Port Creation Options dialog box Install Windows printingsystem components Click No, do no create the port (the printer will not be installed) if you do not want to create a port. If you click Next without typing a hardware address, a network setup error message appears, as shown in the following figure. Figure 3-9 Please enter a Hardware address - Network Setup Error dialog box NOTE: To print a configuration page to see the hardware address, see Print a configuration page on page 242. If you click Yes, create the port, type the device hardware address in the Hardware Address field, and then click Next. The Model dialog box opens. Click the applicable product model and click Next. ENWW Install Overview 81
-
 1
1 -
2
-
3
-
4
-
5
-
6
-
7
-
8
-
9
-
10
-
11
-
12
-
13
-
14
-
15
-
16
-
17
-
18
-
19
-
20
-
21
-
22
-
23
-
24
-
25
-
26
-
27
-
28
-
29
-
30
-
31
-
32
-
33
-
34
-
35
-
36
-
37
-
38
-
39
-
40
-
41
-
42
-
43
-
44
-
45
-
46
-
47
-
48
-
49
-
50
-
51
-
52
-
53
-
54
-
55
-
56
-
57
-
58
-
59
-
60
-
61
-
62
-
63
-
64
-
65
-
66
-
67
-
68
-
69
-
70
-
71
-
72
-
73
-
74
-
75
-
76
-
77
-
78
-
79
-
80
-
81
-
82
-
83
-
84
-
85
-
86
-
87
-
88
-
89
-
90
-
91
-
92
-
93
-
94
-
95
-
96
-
97
-
 98
98 -
 99
99 -
 100
100 -
 101
101 -
 102
102 -
 103
103 -
 104
104 -
 105
105 -
 106
106 -
 107
107 -
 108
108 -
109
-
110
-
111
-
112
-
113
-
114
-
115
-
116
-
117
-
118
-
119
-
120
-
121
-
122
-
123
-
124
-
125
-
126
-
127
-
128
-
129
-
130
-
131
-
132
-
133
-
134
-
135
-
136
-
137
-
138
-
139
-
140
-
141
-
142
-
143
-
144
-
145
-
146
-
147
-
148
-
149
-
150
-
151
-
152
-
153
-
154
-
155
-
156
-
157
-
158
-
159
-
160
-
161
-
162
-
163
-
164
-
165
-
166
-
167
-
168
-
169
-
170
-
171
-
172
-
173
-
174
-
175
-
176
-
177
-
178
-
179
-
180
-
181
-
182
-
183
-
184
-
185
-
186
-
187
-
188
-
189
-
190
-
191
-
192
-
193
-
194
-
195
-
196
-
197
-
198
-
199
-
200
-
201
-
202
-
203
-
204
-
205
-
206
-
207
-
208
-
209
-
210
-
211
-
212
-
213
-
214
-
215
-
216
-
217
-
218
-
219
-
220
-
221
-
222
-
223
-
224
-
225
-
226
-
227
-
228
-
229
-
230
-
231
-
232
-
233
-
234
-
235
-
236
-
237
-
238
-
239
-
240
-
241
-
242
-
243
-
244
-
245
-
246
-
247
-
248
-
249
-
250
-
251
-
252
-
253
-
254
-
255
-
256
-
257
-
258
-
259
-
260
-
261
-
262
-
263
-
264
-
265
-
266
-
267
-
268
-
269
-
270
-
271
-
272
-
273
-
274
-
275
-
276
-
277
-
278
-
279
-
280
-
281
-
282
-
283
-
284
-
285
-
286
-
287
-
288
-
289
-
290
-
291
-
292
-
293
-
294
-
295
-
296
-
297
-
298
 |
 |

Figure 3-8
Port Creation Options
dialog box
Click
No, do no create the port (the printer will not be installed)
if you do not want to create a port.
If you click
Next
without typing a hardware address, a network setup error message appears, as shown
in the following figure.
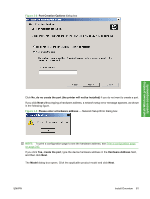
Figure 3-9
Please enter a Hardware address
— Network Setup Error dialog box
NOTE:
To print a configuration page to see the hardware address, see
Print a configuration page
on page
242
.
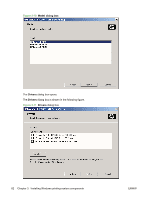
If you click
Yes, create the port
, type the device hardware address in the
Hardware Address
field,
and then click
Next
.
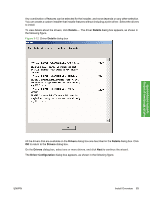
The
Model
dialog box opens. Click the applicable product model and click
Next
.
ENWW
Install Overview
81
Install Windows printing-
system components