HP LaserJet P4510 HP LaserJet P4010 and P4510 Series - Software Technical Refe - Page 188
Make Job Private, Job Notification Options, User Name, Display Job ID when printing
 |
View all HP LaserJet P4510 manuals
Add to My Manuals
Save this manual to your list of manuals |
Page 188 highlights
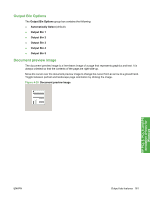
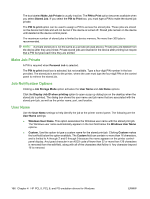
The box labeled Make Job Private is usually inactive. The PIN to Print option becomes available when you select Stored Job. If you select the PIN to Print box, you must type a PIN to make the stored job private. The PIN to print option can be used to assign a PIN to access the stored jobs. These jobs are stored on the device hard disk and will not be lost if the device is turned off. Stored jobs remain on the device until deleted at the device control panel. The maximum number of stored jobs is limited by device memory. No more than 300 jobs is recommended. NOTE: A private stored job is not the same as a private job (see above). Private jobs are deleted from the device after they are printed. Private stored jobs are retained in the device after printing but require that a PIN be typed each time they are printed. Make Job Private A PIN is required when Personal Job is selected. The PIN to print check box is selected, but not available. Type a four-digit PIN number in the box provided. The stored job is sent to the printer, where the user must type the four-digit PIN on the control panel to retrieve the stored job. Job Notification Options Clicking a Job Storage Mode option activates the User Name and Job Name options. Click the Display Job ID when printing option to open a pop-up dialog box on the desktop when the stored job is printed. The dialog box shows the user name and job name that are associated with the stored print job, as well as the printer name, port, and location. User Name Use the User Name settings to help identify the job at the printer control panel. The following are the User Name settings: ● Windows User Name. This option associates the Windows user name with the stored print job. The Windows user name automatically appears in the text field below the Windows User Name options. ● Custom. Use this option to type a custom name for the stored print job. Clicking Custom makes the text field below the option available. The Custom field can contain no more than 16 characters, and is limited to A through Z and 0 through 9 because the name appears on the printer controlpanel display. Any typed character in an ASCII code of fewer than 32 or more than 126 characters is removed from the edit field, along with all of the characters that follow it. Any character beyond 16 is removed. 166 Chapter 4 HP PCL 5, PCL 6, and PS emulation drivers for Windows ENWW
-
 1
1 -
2
-
3
-
4
-
5
-
6
-
7
-
8
-
9
-
10
-
11
-
12
-
13
-
14
-
15
-
16
-
17
-
18
-
19
-
20
-
21
-
22
-
23
-
24
-
25
-
26
-
27
-
28
-
29
-
30
-
31
-
32
-
33
-
34
-
35
-
36
-
37
-
38
-
39
-
40
-
41
-
42
-
43
-
44
-
45
-
46
-
47
-
48
-
49
-
50
-
51
-
52
-
53
-
54
-
55
-
56
-
57
-
58
-
59
-
60
-
61
-
62
-
63
-
64
-
65
-
66
-
67
-
68
-
69
-
70
-
71
-
72
-
73
-
74
-
75
-
76
-
77
-
78
-
79
-
80
-
81
-
82
-
83
-
84
-
85
-
86
-
87
-
88
-
89
-
90
-
91
-
92
-
93
-
94
-
95
-
96
-
97
-
98
-
99
-
100
-
101
-
102
-
103
-
104
-
105
-
106
-
107
-
108
-
109
-
110
-
111
-
112
-
113
-
114
-
115
-
116
-
117
-
118
-
119
-
120
-
121
-
122
-
123
-
124
-
125
-
126
-
127
-
128
-
129
-
130
-
131
-
132
-
133
-
134
-
135
-
136
-
137
-
138
-
139
-
140
-
141
-
142
-
143
-
144
-
145
-
146
-
147
-
148
-
149
-
150
-
151
-
152
-
153
-
154
-
155
-
156
-
157
-
158
-
159
-
160
-
161
-
162
-
163
-
164
-
165
-
166
-
167
-
168
-
169
-
170
-
171
-
172
-
173
-
174
-
175
-
176
-
177
-
178
-
179
-
180
-
181
-
182
-
 183
183 -
 184
184 -
 185
185 -
 186
186 -
 187
187 -
 188
188 -
 189
189 -
 190
190 -
 191
191 -
 192
192 -
 193
193 -
194
-
195
-
196
-
197
-
198
-
199
-
200
-
201
-
202
-
203
-
204
-
205
-
206
-
207
-
208
-
209
-
210
-
211
-
212
-
213
-
214
-
215
-
216
-
217
-
218
-
219
-
220
-
221
-
222
-
223
-
224
-
225
-
226
-
227
-
228
-
229
-
230
-
231
-
232
-
233
-
234
-
235
-
236
-
237
-
238
-
239
-
240
-
241
-
242
-
243
-
244
-
245
-
246
-
247
-
248
-
249
-
250
-
251
-
252
-
253
-
254
-
255
-
256
-
257
-
258
-
259
-
260
-
261
-
262
-
263
-
264
-
265
-
266
-
267
-
268
-
269
-
270
-
271
-
272
-
273
-
274
-
275
-
276
-
277
-
278
-
279
-
280
-
281
-
282
-
283
-
284
-
285
-
286
-
287
-
288
-
289
-
290
-
291
-
292
-
293
-
294
-
295
-
296
-
297
-
298
 |
 |