HP LaserJet P4510 HP LaserJet P4010 and P4510 Series - Software Technical Refe - Page 287
Network Settings, Package Target, Create Package
 |
View all HP LaserJet P4510 manuals
Add to My Manuals
Save this manual to your list of manuals |
Page 287 highlights
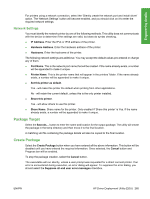
Engineering details For printers using a network connection, select the 'Silently create the network port and install driver' option. The 'Network Settings' button will become enabled, and you should click on it to enter the required network settings. Network Settings You must identify the network printer by one of the following methods. This utility does not communicate with the device to determine if the settings are valid, but does do syntax checking. ● IP Address. Enter the IPv4 or IPv6 address of the printer. ● Hardware Address. Enter the hardware address of the printer. ● Hostname. Enter the hostname of the printer. The following network settings are additional. You may accept the default values pre-entered or change any of them. ● Port Name. This is the network port name that will be created. If the name already exists, a number will be appended to make it unique. ● Printer Name. This is the printer name that will appear in the printers' folder. If the name already exists, a number will be appended to make it unique. ● Set this printer as default. Yes - will make this printer the default when printing from other applications. No - will retain the current default, unless this is the only printer installed. ● Share this printer. Yes - will allow others to use this printer. ● Share Name. Share name for the printer. Only enabled if 'Share this printer' is Yes. If the name already exists, a number will be appended to make it unique. Package Target Select the Save As... button to enter the name and location for the output package. The utility will create the package in the temp directory and then move it to the final location. A matching xml file containing the package details will also be copied to the final location. Create Package Select the Create Package button when you have entered all the above information. This button will be disabled until you have entered the required information. Once selected, the Cancel button and Progress bar will be enabled. To stop the package creation, select the Cancel button. The executable will run silently, unless a user prompt was requested for a direct connect printer. If an error is encountered during execution, an error dialog will appear. To suppress the error dialog, you should select the Suppress all end user error messages checkbox. ENWW HP Driver Deployment Utility (DDU) 265
-
 1
1 -
2
-
3
-
4
-
5
-
6
-
7
-
8
-
9
-
10
-
11
-
12
-
13
-
14
-
15
-
16
-
17
-
18
-
19
-
20
-
21
-
22
-
23
-
24
-
25
-
26
-
27
-
28
-
29
-
30
-
31
-
32
-
33
-
34
-
35
-
36
-
37
-
38
-
39
-
40
-
41
-
42
-
43
-
44
-
45
-
46
-
47
-
48
-
49
-
50
-
51
-
52
-
53
-
54
-
55
-
56
-
57
-
58
-
59
-
60
-
61
-
62
-
63
-
64
-
65
-
66
-
67
-
68
-
69
-
70
-
71
-
72
-
73
-
74
-
75
-
76
-
77
-
78
-
79
-
80
-
81
-
82
-
83
-
84
-
85
-
86
-
87
-
88
-
89
-
90
-
91
-
92
-
93
-
94
-
95
-
96
-
97
-
98
-
99
-
100
-
101
-
102
-
103
-
104
-
105
-
106
-
107
-
108
-
109
-
110
-
111
-
112
-
113
-
114
-
115
-
116
-
117
-
118
-
119
-
120
-
121
-
122
-
123
-
124
-
125
-
126
-
127
-
128
-
129
-
130
-
131
-
132
-
133
-
134
-
135
-
136
-
137
-
138
-
139
-
140
-
141
-
142
-
143
-
144
-
145
-
146
-
147
-
148
-
149
-
150
-
151
-
152
-
153
-
154
-
155
-
156
-
157
-
158
-
159
-
160
-
161
-
162
-
163
-
164
-
165
-
166
-
167
-
168
-
169
-
170
-
171
-
172
-
173
-
174
-
175
-
176
-
177
-
178
-
179
-
180
-
181
-
182
-
183
-
184
-
185
-
186
-
187
-
188
-
189
-
190
-
191
-
192
-
193
-
194
-
195
-
196
-
197
-
198
-
199
-
200
-
201
-
202
-
203
-
204
-
205
-
206
-
207
-
208
-
209
-
210
-
211
-
212
-
213
-
214
-
215
-
216
-
217
-
218
-
219
-
220
-
221
-
222
-
223
-
224
-
225
-
226
-
227
-
228
-
229
-
230
-
231
-
232
-
233
-
234
-
235
-
236
-
237
-
238
-
239
-
240
-
241
-
242
-
243
-
244
-
245
-
246
-
247
-
248
-
249
-
250
-
251
-
252
-
253
-
254
-
255
-
256
-
257
-
258
-
259
-
260
-
261
-
262
-
263
-
264
-
265
-
266
-
267
-
268
-
269
-
270
-
271
-
272
-
273
-
274
-
275
-
276
-
277
-
278
-
279
-
280
-
281
-
 282
282 -
 283
283 -
 284
284 -
 285
285 -
 286
286 -
 287
287 -
 288
288 -
 289
289 -
 290
290 -
 291
291 -
 292
292 -
293
-
294
-
295
-
296
-
297
-
298
 |
 |