HP LaserJet P4510 HP LaserJet P4010 and P4510 Series - Software Technical Refe - Page 199
Removing external fonts, Installable Options, Automatic Configuration
 |
View all HP LaserJet P4510 manuals
Add to My Manuals
Save this manual to your list of manuals |
Page 199 highlights
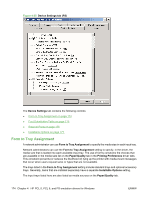
Removing external fonts 1. Click Start. 2. Select Settings. 3. Click Printers (Microsoft Windows 2000) or Printers and Faxes (Windows XP Professional and Windows Server 2003) or Printers and Other Hardware Devices (Windows XP Home) or Hardware and Sound (Windows Vista). 4. Right-click the name of the printer. 5. Click Properties. 6. Click the Device Settings tab. 7. Click the External Fonts option. The Properties button appears. 8. Click Properties. The HP Font Installer dialog box appears. The external fonts that are installed appear in the Installed Fonts window. 9. Select the fonts to remove, and then click Remove. The fonts are removed. 10. Click OK to close the HP Font Installer dialog box. Installable Options Topics: ● Automatic Configuration ● Envelope Feeder ● Tray 3, 4, 5, 6 ● Duplex Unit (for 2-sided Printing) ● Allow Manual Duplexing ● Accessory Output Bin ● Printer Memory ● Printer Hard Disk ● Job Storage ● Mopier Mode Automatic Configuration Use the Device Settings tab to tell the driver about the hardware configuration of the device. If bidirectional communication is enabled in a supported environment, set up this tab by selecting the Update Now setting in the Automatic Configuration setting. The default setting is Off. After an automatic configuration, the setting returns to Off after the changes are made. If your environment does not support bidirectional communication, the Update Now setting is unavailable, so you must manually configure the options on this tab. HP PCL 5, PCL 6, and PS emulation drivers for Windows ENWW Device Settings tab features 177
-
 1
1 -
2
-
3
-
4
-
5
-
6
-
7
-
8
-
9
-
10
-
11
-
12
-
13
-
14
-
15
-
16
-
17
-
18
-
19
-
20
-
21
-
22
-
23
-
24
-
25
-
26
-
27
-
28
-
29
-
30
-
31
-
32
-
33
-
34
-
35
-
36
-
37
-
38
-
39
-
40
-
41
-
42
-
43
-
44
-
45
-
46
-
47
-
48
-
49
-
50
-
51
-
52
-
53
-
54
-
55
-
56
-
57
-
58
-
59
-
60
-
61
-
62
-
63
-
64
-
65
-
66
-
67
-
68
-
69
-
70
-
71
-
72
-
73
-
74
-
75
-
76
-
77
-
78
-
79
-
80
-
81
-
82
-
83
-
84
-
85
-
86
-
87
-
88
-
89
-
90
-
91
-
92
-
93
-
94
-
95
-
96
-
97
-
98
-
99
-
100
-
101
-
102
-
103
-
104
-
105
-
106
-
107
-
108
-
109
-
110
-
111
-
112
-
113
-
114
-
115
-
116
-
117
-
118
-
119
-
120
-
121
-
122
-
123
-
124
-
125
-
126
-
127
-
128
-
129
-
130
-
131
-
132
-
133
-
134
-
135
-
136
-
137
-
138
-
139
-
140
-
141
-
142
-
143
-
144
-
145
-
146
-
147
-
148
-
149
-
150
-
151
-
152
-
153
-
154
-
155
-
156
-
157
-
158
-
159
-
160
-
161
-
162
-
163
-
164
-
165
-
166
-
167
-
168
-
169
-
170
-
171
-
172
-
173
-
174
-
175
-
176
-
177
-
178
-
179
-
180
-
181
-
182
-
183
-
184
-
185
-
186
-
187
-
188
-
189
-
190
-
191
-
192
-
193
-
 194
194 -
 195
195 -
 196
196 -
 197
197 -
 198
198 -
 199
199 -
 200
200 -
 201
201 -
 202
202 -
 203
203 -
 204
204 -
205
-
206
-
207
-
208
-
209
-
210
-
211
-
212
-
213
-
214
-
215
-
216
-
217
-
218
-
219
-
220
-
221
-
222
-
223
-
224
-
225
-
226
-
227
-
228
-
229
-
230
-
231
-
232
-
233
-
234
-
235
-
236
-
237
-
238
-
239
-
240
-
241
-
242
-
243
-
244
-
245
-
246
-
247
-
248
-
249
-
250
-
251
-
252
-
253
-
254
-
255
-
256
-
257
-
258
-
259
-
260
-
261
-
262
-
263
-
264
-
265
-
266
-
267
-
268
-
269
-
270
-
271
-
272
-
273
-
274
-
275
-
276
-
277
-
278
-
279
-
280
-
281
-
282
-
283
-
284
-
285
-
286
-
287
-
288
-
289
-
290
-
291
-
292
-
293
-
294
-
295
-
296
-
297
-
298
 |
 |
