HP LaserJet P4510 HP LaserJet P4010 and P4510 Series - Software Technical Refe - Page 274
Print-ready file printing by using FTP on a direct network connection
 |
View all HP LaserJet P4510 manuals
Add to My Manuals
Save this manual to your list of manuals |
Page 274 highlights
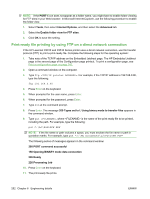
NOTE: If the PORT1 icon does not appear as a folder name, you might have to enable folder viewing for FTP sites in your Web browser. In Microsoft Internet Explorer, use the following procedure to enable the folder view. 1. Select Tools, then select Internet Options, and then select the Advanced tab. 2. Select the Enable folder view for FTP sites. 3. Click OK to save the setting. Print-ready file printing by using FTP on a direct network connection If the HP LaserJet P4010 and P4510 Series printer uses a direct network connection, use file transfer protocol (FTP) to print a print-ready file. Complete the following steps for the operating system: 1. Take note of the TCP/IP address on the Embedded Jetdirect page. The HP Embedded Jetdirect page is the second page of the Configuration page printout. To print a configuration page, see Print a configuration page on page 242. 2. Open a command window on the computer. 3. Type ftp . For example, if the TCP/IP address is 192.168.0.90, type the following: ftp 192.168.0.90 4. Press Enter on the keyboard. 5. When prompted for the user name, press Enter. 6. When prompted for the password, press Enter. 7. Type bin at the command prompt. 8. Press Enter. The message 200 Types set to I, Using binary mode to transfer files appears in the command window. 9. Type put , where is the name of the print-ready file to be printed, including the path. For example, type the following: put C:\LJ\P4510FW.PDF NOTE: If the file name or path includes a space, you must enclose the file name or path in quotation marks. For example, type put "c:\My Documents\LJ\P4510FW.PDF" The following series of messages appears in the command window: 200 PORT command successful 150 Opening BINARY mode data connection 226 Ready 226 Processing Job 10. Press Enter on the keyboard. 11. The print-ready file prints. 252 Chapter 6 Engineering details ENWW
-
 1
1 -
2
-
3
-
4
-
5
-
6
-
7
-
8
-
9
-
10
-
11
-
12
-
13
-
14
-
15
-
16
-
17
-
18
-
19
-
20
-
21
-
22
-
23
-
24
-
25
-
26
-
27
-
28
-
29
-
30
-
31
-
32
-
33
-
34
-
35
-
36
-
37
-
38
-
39
-
40
-
41
-
42
-
43
-
44
-
45
-
46
-
47
-
48
-
49
-
50
-
51
-
52
-
53
-
54
-
55
-
56
-
57
-
58
-
59
-
60
-
61
-
62
-
63
-
64
-
65
-
66
-
67
-
68
-
69
-
70
-
71
-
72
-
73
-
74
-
75
-
76
-
77
-
78
-
79
-
80
-
81
-
82
-
83
-
84
-
85
-
86
-
87
-
88
-
89
-
90
-
91
-
92
-
93
-
94
-
95
-
96
-
97
-
98
-
99
-
100
-
101
-
102
-
103
-
104
-
105
-
106
-
107
-
108
-
109
-
110
-
111
-
112
-
113
-
114
-
115
-
116
-
117
-
118
-
119
-
120
-
121
-
122
-
123
-
124
-
125
-
126
-
127
-
128
-
129
-
130
-
131
-
132
-
133
-
134
-
135
-
136
-
137
-
138
-
139
-
140
-
141
-
142
-
143
-
144
-
145
-
146
-
147
-
148
-
149
-
150
-
151
-
152
-
153
-
154
-
155
-
156
-
157
-
158
-
159
-
160
-
161
-
162
-
163
-
164
-
165
-
166
-
167
-
168
-
169
-
170
-
171
-
172
-
173
-
174
-
175
-
176
-
177
-
178
-
179
-
180
-
181
-
182
-
183
-
184
-
185
-
186
-
187
-
188
-
189
-
190
-
191
-
192
-
193
-
194
-
195
-
196
-
197
-
198
-
199
-
200
-
201
-
202
-
203
-
204
-
205
-
206
-
207
-
208
-
209
-
210
-
211
-
212
-
213
-
214
-
215
-
216
-
217
-
218
-
219
-
220
-
221
-
222
-
223
-
224
-
225
-
226
-
227
-
228
-
229
-
230
-
231
-
232
-
233
-
234
-
235
-
236
-
237
-
238
-
239
-
240
-
241
-
242
-
243
-
244
-
245
-
246
-
247
-
248
-
249
-
250
-
251
-
252
-
253
-
254
-
255
-
256
-
257
-
258
-
259
-
260
-
261
-
262
-
263
-
264
-
265
-
266
-
267
-
268
-
 269
269 -
 270
270 -
 271
271 -
 272
272 -
 273
273 -
 274
274 -
 275
275 -
 276
276 -
 277
277 -
 278
278 -
 279
279 -
280
-
281
-
282
-
283
-
284
-
285
-
286
-
287
-
288
-
289
-
290
-
291
-
292
-
293
-
294
-
295
-
296
-
297
-
298
 |
 |