HP Presario B1000 Compaq Presario B1000 Notebook PC Series - Notebook Computer - Page 65
Working with the Built-in HDD
 |
View all HP Presario B1000 manuals
Add to My Manuals
Save this manual to your list of manuals |
Page 65 highlights
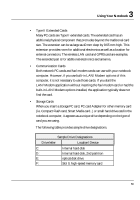
3 Using Your Notebook function of the Control Panel in Windows. To resume full-on state, press the power button. Suspend to Disk mode When this mode is activated, the context of the entire system is saved to disk and all components and devices are powered off, while all clocks are also stopped (except Real Time Clock or RTC). You can activate this by setting the Hibernate (Windows XP) mode on the Power Management function of the Control Panel in Windows. To resume full-on state, you can press the power button. Mechanical off Mode All power, except the RTC (real time clock), has been turned off from the system. This includes external AC power source and battery power source. 3.6 Working with the Built-in HDD Your notebook computer is equipped with a built-in large capacity 2.5 inch IDE hard disk drive where you store or install your computer operating system and all application software programs. You need to format the hard disk before using. The internal hard disk is normally assigned as Drive C after formatting. Sometimes divided into two partitions, adding a Drive D. Since your computer supports different hard disk capacities (to 40 GB or above), you also need to setup the disk type first on your computer's BIOS SETUP program before formatting the disk drive. Your computer supports Auto-detect hard disk type, so you do not need to set it manually. Your dealer should already have done all of this for you. You can refer to Chapter 6 on how to run the BIOS SETUP program. 65
-
 1
1 -
2
-
3
-
4
-
5
-
6
-
7
-
8
-
9
-
10
-
11
-
12
-
13
-
14
-
15
-
16
-
17
-
18
-
19
-
20
-
21
-
22
-
23
-
24
-
25
-
26
-
27
-
28
-
29
-
30
-
31
-
32
-
33
-
34
-
35
-
36
-
37
-
38
-
39
-
40
-
41
-
42
-
43
-
44
-
45
-
46
-
47
-
48
-
49
-
50
-
51
-
52
-
53
-
54
-
55
-
56
-
57
-
58
-
59
-
 60
60 -
 61
61 -
 62
62 -
 63
63 -
 64
64 -
 65
65 -
 66
66 -
 67
67 -
 68
68 -
 69
69 -
 70
70 -
71
-
72
-
73
-
74
-
75
-
76
-
77
-
78
-
79
-
80
-
81
-
82
-
83
-
84
-
85
-
86
-
87
-
88
-
89
-
90
-
91
-
92
-
93
-
94
-
95
-
96
-
97
-
98
-
99
-
100
-
101
-
102
-
103
-
104
-
105
-
106
-
107
-
108
-
109
-
110
-
111
-
112
-
113
-
114
-
115
-
116
-
117
-
118
-
119
-
120
-
121
-
122
-
123
-
124
-
125
-
126
-
127
-
128
-
129
-
130
-
131
-
132
-
133
-
134
-
135
-
136
 |
 |